I have many amplifiers but i can't afford the cost for housing.
Here is an attempt for my own building.
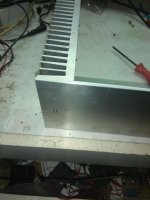
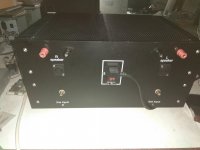
Heatshinks is a donation from the past.
Thank you Toni. 🙂
So far I have spent 25 € on the aluminum, front and back sides as well as the perforated sheets.
10 € for spray primer and paint.
Front and rear are aluminium.
Top and bottom are 3mm steel.
Here is an attempt for my own building.
Heatshinks is a donation from the past.
Thank you Toni. 🙂
So far I have spent 25 € on the aluminum, front and back sides as well as the perforated sheets.
10 € for spray primer and paint.
Front and rear are aluminium.
Top and bottom are 3mm steel.
Attachments

Last edited:

For high power stuff I use PC cases.
You can get desktop vertical or horizontal cases.
Second hand if funds are tight.
I strip out most of the power supply leaving mains switch, mains socket, mains filter and fan housing.
I put fans in at opposite corners to get a good air flow.
If you want to pay a little more you can get some very nice PC cases with all sorts of LED fans etc.
Thanks Ray, i will paint aluminium after anodizing.
This way i will have the opportunity for lacer lettering.
Yes nigel, pc cases are fine but i want something suitable for my heatshinks.
This way i will have the opportunity for lacer lettering.
Yes nigel, pc cases are fine but i want something suitable for my heatshinks.
Thanks for sharing - at some point soon I may need to design a custom enclosure and this sort of idea is great to have. BTW copper-clad FR4 is another, lighter, material for cabinet construction and front/back panels. You can spray paint it if polished copper isn't your aesthetic. Its nasty to mill/route though, and I suspect getting a PCB fab house to do this for you isn't cheap, but can get it screen printed drilled and routed to arbitrary specification and even mount components on the inside if you wanted.
If only heatsinks were cheaper,
If only heatsinks were cheaper,
Very nice.
I have currently two amps without chassis because I can't afford it, a leach super amp and a bryston clone.
I have currently two amps without chassis because I can't afford it, a leach super amp and a bryston clone.
Thanks Ray, i will paint aluminium after anodizing.
This way i will have the opportunity for lacer lettering.
Yes nigel, pc cases are fine but i want something suitable for my heatshinks.
Do you make anodizing at home ??
I would like to learn how to do anodizing ...
Thanks Ray, i will paint aluminium after anodizing. This way i will have the opportunity for lacer lettering.
Is the bottom plate also perf stock? If so, you might need some internal bracing to make it rigid.
Anodizing is pretty simple.
The "nasty" chemicals are:
- Sodium Hydroxide (drain cleaner) 2% solution (i.e. a couple of large spoons per litre)
- Sulfuric Acid for the anodizing bath 10% (mix battery acid 1-3 or 1-4 in water)
You do need to be very careful with that acid, gloves, glasses and clothes you don't care about are essential.
You also need some aluminium wire to connect to the part to be anodized, and either some lead sheet or some Aluminium sheet that you will throw away afterwards for the Cathode (negative). Lead can be reused. Al takes a beating, but is cheap and available.
Process:
- Make your parts
- Scrub or sand your parts to the finish that you want after anodizing. ANY scratches or blemishes will stay there, so do not short cut this process! Anodizing is a great way to finish a part, but totally unforgiving in your quality of finish.
- Clean your parts
Soapy water, then
Clean water, then
I do one last clean in acetone
- Connect the aluminium wire to your part WELL. Use a convenient drill hole, or if you can put a dedicated connection hole somewhere out of sight. This cannot be a loose connection, it must be tight and good or the part will not be anodized.
- Protective gear on
- Prepare your acid bath
- Prepare your sodium hydroxide bath
- Prepare your dye (caswell online sell a range - black works really well)
- Dip the parts in the sodium hydroxide etchant bath for 1-2 minutes they will bubble and carry on. That is normal.
- Set your power supply to CONSTANT CURRENT if you can, measure the area of your part and set for 10A per square foot if the current it can deliver goes this high. Else scale the times, i.e. for a 5A supply double things up.
Connect the + lead from your power supply to your part to be anodized
Connect the - lead from your power supply to the cathode (lead or Al sheet in the acid)
Hang your part in the acid, and check the current is about right.
Anodise for 90-120 Min.
Expect bubbles at the Cathode. This is hydrogen. There is not that much of it really, you are unlikely to blow the house up.
If you are using a constant voltage power supply (i.e. a normal one) adjust the voltage to get about 10A/Sq Ft. Else just set it to a safe maximum.
As stated above, if you can't get enough current, increase the anodizing time proportionally - though I would probably run out of patience at 3-4 hours. The only impact of this will be a thinner anodized layer.
When done, >> ON WITH gloves, glasses and PPE <<<<
- pull the part out
- Wash in clean water
- Dip in dye, this might take 10-20 mins to get really deep colour.
- Dip in boiling water for 30 minutes to seal.
- Done.
The only hard bit is if you want to do like a whole rack case. You need big baths and lots of acid. For small parts this is entertaining and not hard. For big parts I would either send it out to an anodizing shop, or paint.
Watch some of the many video's online. The process really is as simple as described above. Just be careful of that acid and caustic. Safety first, then have fun.
Have fun
Last edited:
Thanks Ray, i will paint aluminium after anodizing.
This way i will have the opportunity for lacer lettering.
Yes nigel, pc cases are fine but i want something suitable for my heatshinks.
I guess you are sending your chassis out for anodizing.
If so, they can anodize them in any colour you like.
Only problem is $$$$$, they usually have a minimum batch price, say 50 or 100 kg; in that case I have left my stuff at the anodizer plant and asked them to run it together with their next job, whatever it is, in that case I pay a nominal fee BUT colour i often a surprise 😱
That said, matte "natural" (aluminum silver no tint) and satin black are very common, so if not in a hurry I can get any of them, generally within the week or 10 days at most.
In fact often they do not even want to charge me (since the real customer pays for the lot job anyway) but I always "forget" a sixpack or a couple "longnecks" (fine wine bottles) on or by the counter ... which makes me always welcome 😀
Or you can straight paint aluminum, secret is properly preparing surface.
In this very moment (just stopped 10 minutes for a cup of coffee) I am about to paint a back panel/heatsink for a 300W Bass amplifier, made out of folded and riveted together 1.5mm aluminum sheet, so it´s 3 mm thick where it matters.
After cutting/folding I washed it well with detergent (to degrease it), and rough steel "sponge" (not steel wool wich is way finer) so as to even surface and mechanically remove top coat (yes, I know new oxide forms instantly), then slightly sanded in a crossing pattern with 120 or 220 grit wet emery paper so as to make surface rough (it always helps adhesion), after punching remaining holes I´ll degrease it again (just pure alcohol and paper towels, simply to remove finger skin grease) , will then apply wash primer, let it dry per instructions (a couple hours) and then final paint.
Much simpler than it sounds, I am just somewhat obsessive with details he he, but nothing more than: cleaning>light sanding (a car shop might sandblast it)>wash primer >final paint.
After a couple days when both wash primer (which reacts with aluminum) and paint have fully dried/cured, adhesion is incredibly good, you need to grind/sand paint off to remove it, not kidding.
While otherwise paint adhesion to aluminum is iffy, think painting on glass or chromed/stainless steel: no *real* adhesion.
Home anodizing is not difficult; I have done it about a half dozen times successfully. But one word of caution, the sulfuric acid bath does tend to give off noxious fumes. The first time I did it I made the mistake of not implementing proper ventilation nor wearing a good mask. That resulted in injury to my lungs which likely triggered a minor case of pneumonia. Some recommend floating balls (kind of like ping pong balls)on the top of solution to suppress the fumes (it does seem to work). Others here will likely have better solutions.
That is great Thimos, well done, I have the same idea to use the heatsinks as the sides.
I wonder where Tony sourced the extrusions?
I know that we can get similar ones at Extruded Aluminum Heatsinks from HeatSinkUSA for a reasonable price, also the ones from the DIYAudio store are more expensive have a finer finish and are anodized.
I do agree with rayma, extra bracing required, esp for the transformer weight.
Good luck, keep up the good work and us informed as you progress.
There isn't an anodizing shop in my area so i use the anodizing at home. The Outdoor method of course 😉
I haven't access to clear surfaces aluminium, usually all are scratched.
I use sanding spog or sanding paper if scratches are deep.
Very hot water and plenty of soap for oil removal. I end up with a non smooth surface.Then is time for the anodize.I use my bench power supply.
I don't need deep anodize not perfectly done as i will paint with spray paint after this.
I know that isn't the best method but works fine for me.
Last edited:
Thank you all for the perfect explanation on anodizing procedure. Here is how they look.
My SX class A.
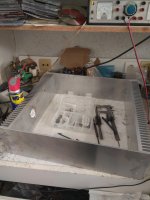
In the first picture the front braced but no anodized not painted yet,after 2 or 3 years! 😀
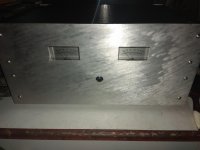
In the second picture the back plate anodized and painted.
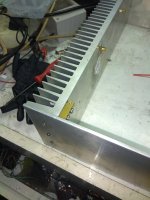
I do agree with rayma, extra bracing required, esp for the transformer weight.
Top and bottom is 3mm steal.
Isn't enouph?
My SX class A.
In the first picture the front braced but no anodized not painted yet,after 2 or 3 years! 😀
In the second picture the back plate anodized and painted.
I do agree with rayma, extra bracing required, esp for the transformer weight.
Top and bottom is 3mm steal.
Isn't enouph?
Attachments
Last edited:
Remember to add the acid to the water, not the other way round! 😱Home anodizing is not difficult; I have done it about a half dozen times successfully. But one word of caution, the sulfuric acid bath does tend to give off noxious fumes. The first time I did it I made the mistake of not implementing proper ventilation nor wearing a good mask. That resulted in injury to my lungs which likely triggered a minor case of pneumonia. Some recommend floating balls (kind of like ping pong balls)on the top of solution to suppress the fumes (it does seem to work). Others here will likely have better solutions.
...
Heatshinks is a donation from the past.
Thank you Toni. 🙂...
You are welcome! Looks really good. 40 years ago I have brushed my aluminium front panels by hand using sand paper, water and only in one direction. Afterwards single adhesive letters. Finish using clear acryl paint.
Have fun, Toni
- Home
- Amplifiers
- Solid State
- Building your own amplifier enclosure