Thanks Dennis - would those be the pair R1/R2 and R30/R32? Should I worry also about R3/R4 and R31/R33? What would be an appropriate value? 2x20Ω?
Hi Lbcyclist,
I was actually thinking of modifying the R part on your power supply board,
where you currently have the 1 ohm resistor.
If you currently have +/34V with both boards attached and assuming
a total 100mA draw (going by the Pearl 2 documentation; you can
verify by measuring the voltage across that 1 ohm resistor), you can
lose a couple more volts, for example, by changing out the 1 ohm
and putting 20ohms/1W in its place.
Cheers,
Dennis
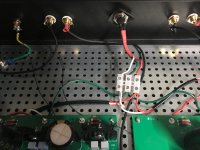
Hi all, I'm finally getting around to building a proper PS for my Pearl 2 and I wanted to confirm I'm on the right track. Thanks!


Hi Lbcyclist,
I was actually thinking of modifying the R part on your power supply board,
where you currently have the 1 ohm resistor.
If you currently have +/34V with both boards attached and assuming
a total 100mA draw (going by the Pearl 2 documentation; you can
verify by measuring the voltage across that 1 ohm resistor), you can
lose a couple more volts, for example, by changing out the 1 ohm
and putting 20ohms/1W in its place.
Cheers,
Dennis
Thanks Dennis,
I thought about this too. I’ll hook it all up and measure the voltage drop across the resistor.
McQuaide - yes I have heat sinks on the regulators. At 34.x volts we scratching the top end of the regulator voltage range, which is 35V according to the spec sheet. Dropping a few volts would be much better for heat and probably part longevity as well.
Could you mount the transistors on the side of a galaxy case with it's "Pseudo" heat sinks and do away with the tall ones normally soldered to the boards?
Just considering ways of bringing the size of the case down including stacking the boards (already mentioned by me in this thread).
Cheers
Steve
Just considering ways of bringing the size of the case down including stacking the boards (already mentioned by me in this thread).
Cheers
Steve
Could you mount the transistors on the side of a galaxy case with it's "Pseudo" heat sinks and do away with the tall ones normally soldered to the boards?
Just considering ways of bringing the size of the case down including stacking the boards (already mentioned by me in this thread).
Cheers
Steve
I've been running Pearl 2s on 28v with no heat sinks for years. Never an issue.
The clip-on would benefit from a very thin film of goop, but no mica would be necessary, as the heatsinks are not attached to anything. This is true of the heatsinks on the Pearl boards as well.
Pass DIY Addict
Joined 2000
Paid Member
I used the taller sinks that WBS linked above. They don't get warm at all, though my linear power supply delivers about 27v to the on-board regulators, so there isn't much excess voltage to burn off. A bit of thermal paste is always a good idea for sinks, as Jim indicates.
The MOSFETs on the BA-3 keep the sinks hot enough that you can't touch them for more than a second or so. The regs on the Pearl 2 don't seem to get hot at all.
Finished building now experiencing
Well after many meltdowns, mistakes and many other emotions, I have finally finished the Pearl 2. It is without doubt the the biggest improvement to my vinyl setup. Would like to thank everyone on the forum for their assistance as without the their help this would not have been a project I would/could attempt.
Andrew
Pass DIY Addict
Joined 2000
Paid Member
Congrats on your build! It's hard for me to talk about improvements due to the Pearl 2 as it was my first phono stage... I am impressed, though!
Now, let's see some pics!
Now, let's see some pics!
Pass DIY Addict
Joined 2000
Paid Member
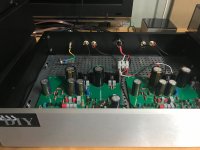
Very nice, Andrew! I see you also built a two-chassis version. This is the way mine is constructed and I want to see if I can get everything into a single chassis without causing noise problems. Thanks for sharing!
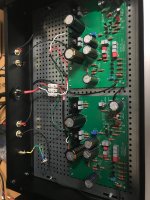
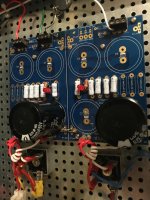
Here are some pic off my Pearl 2 and PSU
Andrew
Very nice! Can I ask what cable you used for the umbilical cord?
The umbilical cord is made with 3 pin din plug, 3 core 18AWG tinned copper cable, covered with expandable PPS sleeve. Hopefully the link works
Expandable PPS Sleeve - 10mm x 2m | Jaycar Electronics
Made the umbilical 2m in length, so as to keep it at max distance. There is no noise at all until volume is at extreme level. Also upgraded to an AT33EV cart.
Expandable PPS Sleeve - 10mm x 2m | Jaycar Electronics
Made the umbilical 2m in length, so as to keep it at max distance. There is no noise at all until volume is at extreme level. Also upgraded to an AT33EV cart.
The umbilical cord is made with 3 pin din plug, 3 core 18AWG tinned copper cable, covered with expandable PPS sleeve. Hopefully the link works
Expandable PPS Sleeve - 10mm x 2m | Jaycar Electronics
Made the umbilical 2m in length, so as to keep it at max distance. There is no noise at all until volume is at extreme level. Also upgraded to an AT33EV cart.
Thank you!
- Home
- Amplifiers
- Pass Labs
- Building a Pearl 2