I guess I got lucky.
Probably. My inner statitstician thinks it is also possible that we get to hear about the failures much more than we hear about successes, which exaggerates the reputation.
I agree.
I've shepherded this thread for a bit longer than 7yr now and it's common enough that I've been suggesting to builders to buy (5) of the ZVP during the initial order, that way there's three extra on hand.
They are sensitive enough devices that Wayne has stopped using them in general.
I've shepherded this thread for a bit longer than 7yr now and it's common enough that I've been suggesting to builders to buy (5) of the ZVP during the initial order, that way there's three extra on hand.
They are sensitive enough devices that Wayne has stopped using them in general.
It's a common enough occurrence that you are allowed to brag a little if you didn't have any issues... 😀 😀 😀
... compensates for the bag with 10 unused ones I have lying around, I suppose.
... compensates for the bag with 10 unused ones I have lying around, I suppose.
I can assure you you'd have blown one of you had no spares. Murphy would make sure of it!
I guess I got lucky.
Same here. I bought a few extras, but mine somehow survived assembly.
Russellc
I just finished building and while the boards power up ok and the regulator voltages look good the offset point is -23.7 on both boards. I think that means one of the semi's is toast? P1 adjustment does not change the offset voltage.
I agree.
I've shepherded this thread for a bit longer than 7yr now and it's common enough that I've been suggesting to builders to buy (5) of the ZVP during the initial order, that way there's three extra on hand.
They are sensitive enough devices that Wayne has stopped using them in general.
As I am as old as Moses, would recommend that upon receipt of the ZVP devices you grab the nearest cold water pipe before decanting. You can make a little bandaid from aluminum foil and wrap around the leads as it's soldered into place and remove before powering up.
Or, you can follow what I suggested ("Pearl Without Tears") and use an OPA604 for the output stage. Pearl Two
I have all my parts in my order cart, but the power supply is holding me up. I have never built one before. I decided to use the Universal PSU but I don't have any idea how to configure it for the Pearl. I have the capacitors and diodes(?) in my cart. Do I need heatsinks for them with such a small transformer? I noticed others making their own power supplies did not have them. I am very much a beginner and I'm getting the feeling this project is beyond me. I'd like to complete it, but I also need a working phono stage because I listened to records a lot.
Also, would this be an alternative for a PSU: 50VA+50VA HIFI Linear Power Supply 2 Way LPS DC 5V/ 9V/ 12V / 15V / 18V /19V/24V-in Amplifier from Consumer Electronics on Aliexpress.com | Alibaba Group
Last, the final amount for this project is around $600. Is that standard with needing to buy everything including the chassis?
Thanks
Pass DIY Addict
Joined 2000
Paid Member
My total cost for the Pearl 2 is about $450.
Boards plus twelve 2SK170 from Pass Labs $200
Chassis $70
Transformer, caps, diodes: $50
Board components, RCA jacks, etc: $100
Boards plus twelve 2SK170 from Pass Labs $200
Chassis $70
Transformer, caps, diodes: $50
Board components, RCA jacks, etc: $100
There are regulators already on the Pearl 2 boards, you need a non-regulated supply, this seems suitable - Dynamic Home Amplifier Rectifier Filter Fever Capacitor Board Audio Power Supply 691049210972 | eBay
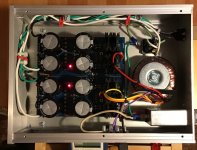
Since we are discussing power supplies, I have just completed mine. It uses the universal power supply PCB and then I went over the top with it, mostly because I had the capacitors from project that never materialized. The case is from ebay, and the seller cut the power inlet opening according to the data sheet, which really was my biggest concern about building this. I tried to locate the transformer in the l/r center of the enclosure to avoid surprises when lifting it.
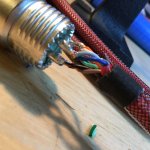
The umbilical cord connector is a four conductor XLR using a CAT 5 cable, building the cord was one of the more frustrating parts of this project.
The umbilical cord connector is a four conductor XLR using a CAT 5 cable, building the cord was one of the more frustrating parts of this project.
Attachments
Since we are discussing power supplies, I have just completed mine. It uses the universal power supply PCB and then I went over the top with it, mostly because I had the capacitors from project that never materialized. The case is from ebay, and the seller cut the power inlet opening according to the data sheet, which really was my biggest concern about building this. I tried to locate the transformer in the l/r center of the enclosure to avoid surprises when lifting it.
The umbilical cord connector is a four conductor XLR using a CAT 5 cable, building the cord was one of the more frustrating parts of this project.
That looks great and was exactly what I was shooting for. Could I ask what Ebay vendor you got your case from? Looks perfect for the power supply.
There are regulators already on the Pearl 2 boards, you need a non-regulated supply, this seems suitable - Dynamic Home Amplifier Rectifier Filter Fever Capacitor Board Audio Power Supply 691049210972 | eBay
Thanks 6L6! I will look at this. Does the amount of capacitance matter? I think I read that it needs to be at least 10000uf per rail? Is that correct.
There are regulators already on the Pearl 2 boards, you need a non-regulated supply, this seems suitable - Dynamic Home Amplifier Rectifier Filter Fever Capacitor Board Audio Power Supply 691049210972 | eBay
Would this be appropriate as well? Audio Grade DC Power Supply, 500W, Unregulated [XAPS-500W] – Xkitz Electronics
They are local.
That looks great and was exactly what I was shooting for. Could I ask what Ebay vendor you got your case from? Looks perfect for the power supply.
The vendor is along1986090. The case is “Cello amplifier case” or something similar. It has “Cello” written on the face plate, but that's easily removed with a rug and some alcohol. I found the space a little constrained, if I’d do it again I’d get a slightly larger enclosure.
i guess zvp3310 replacement is a good place to start given the high likelihood that the part was static damaged.
Enochrome - yes, that looks fine.🙂
Thanks 6L6. I ordered it this morning along with Antek transformer. Next is the case.
First off, thanks everyone for helping me along the way so far. I have little experience so the help and this process has been a learning experience and really interesting.
I have almost everything ready to order and had one last part of the phono stage to order which is the power connectors. I have read somewhere in this thread that it is possible to use a 3 pin an xlr instrument interconnect, is that true? I am asking because I have plenty around to use and want to make sure before I order the chassis mount jacks, which I don't have. If not, then I will order 3 pin mic connector and cable (like 6L6 in his build thread) or the powercon version. Just trying to keep the cost down while not compromising performance.
Thanks
- Home
- Amplifiers
- Pass Labs
- Building a Pearl 2