Hi Russ..
Merry Christmas.
Yes, it's working all ok. I'll be listing to it tomorrow (actually today).
Merry Christmas.
Yes, it's working all ok. I'll be listing to it tomorrow (actually today).
AVR300: Let us know how it goes for you.
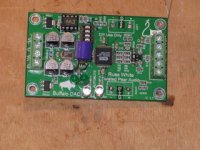
I will have to pull out my boards to have a look at exactly where you mean to cut the trace and wire in the circuit. AVR300's pic with the wire added in after C6 is a great help! Would it be better to use a pot for R3 (esp as my VA is a little higher than the 6.5V)?
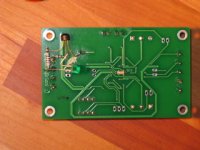
AVR300: Could you take a quick pic of the underside of the board where you cut the trace?
A little etched board would work lovely here I think!
Fran
I will have to pull out my boards to have a look at exactly where you mean to cut the trace and wire in the circuit. AVR300's pic with the wire added in after C6 is a great help! Would it be better to use a pot for R3 (esp as my VA is a little higher than the 6.5V)?
AVR300: Could you take a quick pic of the underside of the board where you cut the trace?
A little etched board would work lovely here I think!
Fran
My first choice of CCS would probably not be a JFET, but it should work fine. I would probably do a bipolar type CCS. But it does take more components. Honestly just the resistor will yield excellent results as long as VA is well regulated, which it will be if you are using LCDPS.
Cheers!
Russ
Cheers!
Russ
Hello
I have just finished the mod at 5.30 in the morning, it works!
I made up a CCS from a npn and a green LED. Because I did not want an additional board, I have soldered the CCS on the empty side. I cut the trace and soldered the CCS output to it. On the upper side I soldered the 2 green LEDs around C13, R4 remains, and finally I soldered an Oscon on both sides of C6 with a 10k between its legs. 10k give me just 3.4V.
Attachments
rolls said:Hello
I have just finished the mod at 5.30 in the morning, it works!
I made up a CCS from a npn and a green LED. Because I did not want an additional board, I have soldered the CCS on the empty side. I cut the trace and soldered the CCS output to it. On the upper side I soldered the 2 green LEDs around C13, R4 remains, and finally I soldered an Oscon on both sides of C6 with a 10k between its legs. 10k give me just 3.4V.
Very good work!
Cheers!
Russ
rolls said:I made up a CCS from a npn and a green LED.
I think you mean PNP?
Russ White said:
I think you mean PNP?
Of course you are right, just my writing is wrong.
By the way, I have got the MUX this morning, but first I want to listen to this mod, because you mentioned that the MUX in front of the buffalo could be an improvement as well. For this mod I had to remove and unsolder the board and it has always been my experience that the new joints need time to run in.
Andre

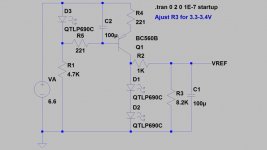
If the simualtion is to believed PSRR should be about 105db at 60hz, and about 130db at 1Khz.
At 1mhz it should be in the 140-150db range depending on the ESR and ESL of the caps etc.
I have no idea if those results will stand in real life. But it definitely sounds really good.
At 1mhz it should be in the 140-150db range depending on the ESR and ESL of the caps etc.
I have no idea if those results will stand in real life. But it definitely sounds really good.

Re: Next level VREF
Russ
I'd like to suggest a small daughter board for Buffalos sold. Ideally this should take VA from 6-9V for those who are not on variable output supplies.
Perhaps using the LTC 6652 or Maxim 6043 can reduce component count.
Fred
Russ White said:This should be pretty good here. Now the VREF itself has much better PSRR.
This is how I am running it right now.
Cheers!
Russ
Russ
I'd like to suggest a small daughter board for Buffalos sold. Ideally this should take VA from 6-9V for those who are not on variable output supplies.
Perhaps using the LTC 6652 or Maxim 6043 can reduce component count.
Fred
Re: Next level VREF
Sorry, I fail to see VREF in the buffalo schematic.
Where is it?
Russ White said:This should be pretty good here. Now the VREF itself has much better PSRR.
Sorry, I fail to see VREF in the buffalo schematic.
Where is it?
Yeah, that would be great.
Russ/Brian would you be up for it? Or if not, would yourselves or someone else here with say, eagle skills, do a very simple layout single sided so that we could home etch a board?
I was going to do this, but just with a marker. An nice layout would be so much neater......
Rolls: Could you email me a higher resolution picture of the trace you cut underneath the board?
JoshauG: The vref is the feed to the opamp, you connect it to one side of C6 which then leads to the opamp. See AVR300s first pic on the last page.
Fran
woodturner-fran said:AVR300: Let us know how it goes for you.
I will have to pull out my boards to have a look at exactly where you mean to cut the trace and wire in the circuit. AVR300's pic with the wire added in after C6 is a great help! Would it be better to use a pot for R3 (esp as my VA is a little higher than the 6.5V)?
AVR300: Could you take a quick pic of the underside of the board where you cut the trace?
A little etched board would work lovely here I think!
Fran
Fran, did you figure it out. Rolls post 1066 says it all. Otherwise I'll gladly take a picture.
Re: Next level VREF
Thanks Russ, mine is now upgraded to the bipolare ccs.
Russ White said:This should be pretty good here. Now the VREF itself has much better PSRR.
This is how I am running it right now.
Cheers!
Russ
Thanks Russ, mine is now upgraded to the bipolare ccs.
- Status
- Not open for further replies.
- Home
- More Vendors...
- Twisted Pear
- Buffalo DAC (ESS Sabre 9008)