Hi Soundhappy. The thought had crossed my mind. Just put a stepped attenuator in the M2, but I was concerned about interference on the tiny cables going roundabout. What are the tiny cables doing when You close the lid, no one knows. Perhaps I replace B1 for a Soekris DAC with a pot or a B1 Korg triod. Then there's only the postamplifier 🙂 left to build and the chain is complete.
lay the big caps down and glue them to the chassis?
i still would not know which caps to use 🙂.
From B1 schematic use ordinary electrolytic caps 15000uF with voltage rating of 25 or above, higher for longevity. I don’t think audiograde is necessary.
Perhaps: ESMH350VNN153MR40T United Chemi-Con | Mouser
Perhaps: ESMH350VNN153MR40T United Chemi-Con | Mouser
Last edited:
thanks for your reply. so what you are saying is that higher uF will result in longer life but the value will not influence the sound ?
i narrowed my mouser search down to 10 products (lead spacing 10mm, 25v, etc....). will any of them do?
i narrowed my mouser search down to 10 products (lead spacing 10mm, 25v, etc....). will any of them do?
I'm no expert on caps. Surely there is the hunt of the perfect one. I don't believe thoose caps effect the sound. If You use an external switching supply, use the 15kuF. If You use a good regulator perhaps You can skip them.
Higher voltage rating or temp rating expans life. Lots of nice reading to do 🙂
Higher voltage rating or temp rating expans life. Lots of nice reading to do 🙂
Last edited:
good electrolytic c. come along with a datasheet (esr, life time @ different temperatures , etc.)
the thing is that i don't know which values to focus on. that's the problem. would any of those do?
Mouser List
Mouser List
If You going to strap them lying down the connection does not matter, radial or screw... If snaped in choose "snap-in". You can use either but I would choose 15000uF/ 35V to be on the safe side. There is a lot of info in this thread.
https://www.mouser.se/Passive-Compo...hr0?P=1z0wqttZ1z0wtpxZ1z0vhz5Z1yx4atvZ1ypb2ik
Nice reading: DIY Audio Articles
https://www.mouser.se/Passive-Compo...hr0?P=1z0wqttZ1z0wtpxZ1z0vhz5Z1yx4atvZ1ypb2ik
Nice reading: DIY Audio Articles
Last edited:
thanks! i think i'm possibly not asking the right question 🙂
say i choose a 15000uF / 25v - i still find dozens of results. there is a huge variety of different series from each manufacturer. how do i know specifically which one to use?
say i choose a 15000uF / 25v - i still find dozens of results. there is a huge variety of different series from each manufacturer. how do i know specifically which one to use?
Sometimes I choose the ones that look good 😉
Capacitor Characteristics
Taller often means larger surface: good
Temp.-rate higher and higher voltage rate: more life span, more expensive
Capacitor Characteristics
Taller often means larger surface: good
Temp.-rate higher and higher voltage rate: more life span, more expensive
Input capacitors are easy compared to output capacitors. The facts get blurred and feelings get in the way.
Last edited:
I'd like to squeeze my B1 into a very low enclosure with only 40mm internal height. I think the only part that could be hard to fit are the power supply caps C1 and C2. The manual says to use caps rated at 25v 1000uF to 15000 uF. Will it make any difference if I use ones closer to 15000 or closer to 1000?
I'm massively overwhelmed with the variety of caps out there. Can someone point me in the right direction of which ones would be suited?
Hi Maxi,
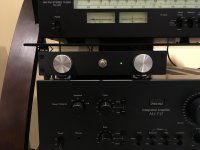
I wanted a low height enclosure as well so I used the Galaxy 1U enclosure from the DiyStore which also has an internal height of 40mm. I bought these caps from Mouser 647-LLS1E153MELB (which are snap in) because they were shallow enough to fit into the enclosure. When I went to install them they were too wide to fit side by side on the board with the lead spacing on the B1 board, so I soldered wire leads on to the caps and viola! The caps sit within 1mm of the top lid, using 1/8” nylon standoff’s to mount the board. As others have suggested you can lay the caps on their sides to keep the internal height of the components down. I hadn’t posted any build pics yet because I’m still deciding on a knob for the rotary input selector that I installed. But here’s what it looks like 99% done.
Attachments
JSA1971 - that looks great!!
Thanks so much 6L6! 😊 I like the way it turned out, I’ll repost when I finally get my selector knob installed. Your build guides make these projects so easy to put together, and your advice and suggestions give our imaginations and confidence a big boost. Thanks for your hard work on these forums!
Thanks for the detailed description JSA1971. Looks fantastic. When it comes to knobs I think Kilo International definitely has the best looking ones. I'll use them for my project for sure. Build pics would be very much appreciated 😀
So now that the power supply caps issue is resolved (many thanks!), let's talk about the other caps 🙂
It seems that everyone is using "audio grade" caps for C101 and C201 (the 10uF kind) but most people put less emphasis on the C100 and C200 (1uF) caps. All of them are in the signal path, right? so shouldn't all be equally important ("audio grade") ?
Quote from passdiy.com B1:
"C1 and C2 are big electrolytic types, with a nominal rating of 15000 uF at 25 Volts. C100, 200, 101 and 201 are high quality film capacitors. You can use these values or substitute in your favorites."
Interesting facts from wiki.
"C1 and C2 are big electrolytic types, with a nominal rating of 15000 uF at 25 Volts. C100, 200, 101 and 201 are high quality film capacitors. You can use these values or substitute in your favorites."
Interesting facts from wiki.
Attachments

Last edited:
You could always use an external PSU with large caps and then use smaller caps in the B1 itself. You can also lie the caps down and use them axially.
Impressive motivation of capacitor testing: Humble Homemade Hifi - Cap Test
Read many times, still question his interpretation. Two pieces of aluminum foil separated by some material whether bonded to inert separator or not. I do believe some are tailored to produce pleasant result but not rocket science if quality controls are in place.
- Home
- Amplifiers
- Pass Labs
- B1 preamp build thread