Thank you Ian for your help. With only LifePO4Mini it ist working fine. I now also get the 3.3V instead of 3.5V out of the LiferPO4Mini. In my last test with UCC I managed to get the UCC into conditioning mode when there was no load on UCC. However in this case, the output voltage was still less (about 3.15V) than the input voltage and the UCC has left the conditioning after a some while after connecting the load. If it is like Eduard said, that the voltage over the UCC caps should be the same because they are in series, I think it may be a bad soldering on the caps of UCC!? because I have measured a too low voltage on both caps and also different voltage (1.6V and 1.3V). I will resolder the caps and try again.
Please be very careful that the UCs will store energy even at power off. You have to discharge them to 0V before you re-solder them.
To achieve lowest possible ESR, UCC uses double thickness copper PCB, you have to use soldering iron higher than 80W for the re-work job.
Ian

Thats the whole point to the Hobby is to Solder
Creating a good solder joint necessitates both preparation and hands-on experience. For those who do not solder regularly, distinguishing between a satisfactory solder joint and a subpar one can prove challenging, compounded by uncertainty regarding the appropriate tools for a given task. In such instances, the adage 'you don't know what you don't know' rings especially true." (curtosy of chatgp) https://www.engineerlive.com/content/how-perfect-your-solder-joint-formation......if people cant solder I question how they can succeed in this hobby. All hobbies need to have the basic skills mastered no matter what the interest is in
Yes learning to solder is a must for this hobby and definitely so for soldering the those UCC supercaps.
But where to start?
I started building tube amps about 40 years ago and remember being in the same spot as some of the new guys here. Firstly there are lots of soldering tutorials on YouTube that gives some general pointers to good soldering practice and what the finished job should look like. For hands on experience I bought some cheap DIY kits from ebay. I built a few Cmoy’s headphone amps and such like.
But first a good soldering iron will pay for itself over time but no advice hear about what is good. Plenty of it’s easy once you have the right iron and tip.
I’ve been out of DIY for some time now so I asked an expert for advice on what works all the way up to the supercaps and I ended up buying this.
Weller WE 1010 (T0053298399) 70W/230V WE Digital Soldering Station Kit with UK Plug, Temperature Range 100°C – 450°C
£149.00 from amazon UK.
It’s great.
Expensive? Well yes and no.
It’s a reputable brand and is going to last and have spare parts available for years to come.
A friend has this which he likes.
On solder.
I use lead/tin as that new fangled lead free stuff seems to need more heat and is not as nice to use.
I started my Ian DAC build with the simple purepi/Q7/ ess/OPA861(powered with 2 ifi 5V switchers) and it sounds great and very little soldering.
That give a chance for soldering practice and sound step ups later once the right skills are in place.
I’ve added some LIFPO Mini 3.3v and Linearpi duo to the mix on my build. Also 2 x5V and 2x 3.3V
I’ll give an update on that later on the sound.
Sorry for the long post but I had a flashback to when I was new and green.
So if I’ve broken any rules (spoken or unspoken) with this post please feel free to burn me as a Witch
But where to start?
I started building tube amps about 40 years ago and remember being in the same spot as some of the new guys here. Firstly there are lots of soldering tutorials on YouTube that gives some general pointers to good soldering practice and what the finished job should look like. For hands on experience I bought some cheap DIY kits from ebay. I built a few Cmoy’s headphone amps and such like.
But first a good soldering iron will pay for itself over time but no advice hear about what is good. Plenty of it’s easy once you have the right iron and tip.
I’ve been out of DIY for some time now so I asked an expert for advice on what works all the way up to the supercaps and I ended up buying this.
Weller WE 1010 (T0053298399) 70W/230V WE Digital Soldering Station Kit with UK Plug, Temperature Range 100°C – 450°C
£149.00 from amazon UK.
It’s great.
Expensive? Well yes and no.
It’s a reputable brand and is going to last and have spare parts available for years to come.
A friend has this which he likes.
Hakko FX-888D Soldering Station, 70W, AC, 26V
IMHO for anyone new to soldering it’s about investing in a good iron and buying and building a few kits and not IMHO cheaping out on the iron and going straight to the UCC which may turn out to be unreliable. You also may save cash in the longer term by not burning out several el cheapo irons.On solder.
I use lead/tin as that new fangled lead free stuff seems to need more heat and is not as nice to use.
I started my Ian DAC build with the simple purepi/Q7/ ess/OPA861(powered with 2 ifi 5V switchers) and it sounds great and very little soldering.
That give a chance for soldering practice and sound step ups later once the right skills are in place.
I’ve added some LIFPO Mini 3.3v and Linearpi duo to the mix on my build. Also 2 x5V and 2x 3.3V
I’ll give an update on that later on the sound.
Sorry for the long post but I had a flashback to when I was new and green.
So if I’ve broken any rules (spoken or unspoken) with this post please feel free to burn me as a Witch
Hello,
The link given in number 11603 should be read by diy builders because it is written by experts.
Solder containing lead works easier but we don't know what they use in China/India when manufacturing our boards
Especially the people who got into trouble soldering the supercaps which should be done right , right from the start. " Repairing " a bad joint is always a bit tricky. The supercap joints need " serious power " to be cleaned and then get a new soldering proces.
Like you can read in the link mixing up to different solders is not a good idea. And that is what we will be doing once we begin fault tracking our boards. Will more bad joints pop up in the future? We don't know.
It is like a wrong executed welding at a seaside hotel fence. It could still last a year but i know about a large fence at the seaside which was welded using the wrong filler material ( that could not stand the salty environment) and had to be completely replaced.
If you invest serious money you want things to work right from the start for at least a decade or so.
Of course if customers will be easier triggered by a ten mm thick frontplate they will get that. I would rather go for the mindset used by the engineers that designed Revox reel to reel machines.
Greetings,Eduard
Last edited:
Weller do produce some were nice soldering stations. So does ERSA. There is 80w digital on sale here @ 160€:
https://www.reichelt.com/de/en/ersa-soldering-station-rds-80-rds-80-p69172.html?&trstct=pol_2&nbc=1
Another important thing when soldering big terminals is to use a big tip. The small tips simply loose the heat and can’t maintain it once applied a big metal surfaces.
https://www.reichelt.com/de/en/ersa-soldering-station-rds-80-rds-80-p69172.html?&trstct=pol_2&nbc=1
Another important thing when soldering big terminals is to use a big tip. The small tips simply loose the heat and can’t maintain it once applied a big metal surfaces.
I'm pretty happy with this Weller WE1010NA
https://www.amazon.ca/gp/product/B077JDGY1J/ref=ppx_yo_dt_b_search_asin_title?ie=UTF8&th=1
https://www.amazon.ca/gp/product/B077JDGY1J/ref=ppx_yo_dt_b_search_asin_title?ie=UTF8&th=1
Hello,
Probably most people will have just one tip. With the idea i probably will never use a broad tip so why get one?
What is also underestimated you should have your board and cap properly " secured " so you can apply some pressure to transfer the heat efficiently.
Clean parts is also crucial.
I have always had Weller. Now just got the Hakko because the exchange part of the Weller was unavailable.
Greetings,Eduard
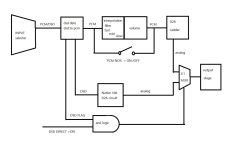
IanCanada DDC/Streamer integration with Gustard R26, Roon and HQPlayer
This is a quick synopsis of what I did to set up a IanCanada’s / Gabster DCC Streamer into a Roon / HQPlayer / Gustard R26 system ( I will call this “Complete Integration”). What I have written is cryptic, but I hope it is good enough to guide another novice like me to have success.
Motivation and how to assemble the IanCanada “Flagship Re-Clocker Streamer Kit (#93B):
https://iancanada.ca/products/flags...rk-music-streamer-kits?variant=47606889185580
Motivation was Gabster video:
@iancanada , @camrector , @crossride were extremely helpful to a successful conclusion of my “Complete Integration”. I am starting my journey with only the experience of running a Raspberry Pi with Ropieee as an endpoint in Roon and very basic knowledge of HQPlayer.
I have uploaded a bunch of images that are not well organized but could be helpful to understand the integration.
There are three main focuses to the Complete Integration”
Configuration adjustments between #93B and the R26
Hardware changes / settings
#93B
Switch change on HdmiPI Pro II - Remove thin film over switches
SW1: OFF
SW2: ON
SW3: ON
SW4: OFF
Configuration change on FifoPi Q7II
Using #49 MonitorPi Pro set FifoPi to Dop Pass through mode
Small cable connection between FifoPi Q7II (Q7) and HdmiPi Pro II. which can pass the DSDEN signal to Pin15.
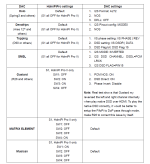
Gustard R26
Setting Changes
PCM NOS: ON
DSD Direct: ON
Phase Invert: Disabled
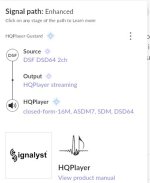
Roon and HQPlayer software settings
Roon setup Without integration of Roon
Roon
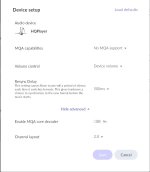
Go to Device setup of your Ropieee endpoint and configure DSD playback to DSD over PCM
Ropieee
Hat Configuration - Audiophonics I-Sabre ES90*8Q2M
Setup with HQPlayer integrated with Roon
Roon
Disable Roon endpoint that is being used for HQPlayer. This is to avoid conflicts with HQPlayer
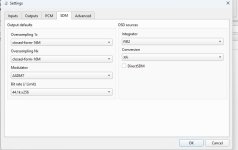
HQPlayer Settings
Output Page
Set device to your RoPieee endpoint
Set SDM pack to DoP
SDM Page
DSD sources / check DirectSDM
Things to be aware of and have.
If you have issues, document all the systematic changes you make. Going from streaming source to your preamp with this setup is a complex system. Until I started documenting changes progress was hit or miss.
For troubleshooting of the “Complete Integration” it is handy to have a 2nd Raspberry Pi and Volumino software available
No need to get a customized HDMI cable to work as your I2S cable
Understand what the LED lights are on the FifoPiQ7II
Order batteries from Ian Canada. Adding batteries to the order adds $8 to the shipping, but if you order anywhere else the shipping for the batteries will be over $20.
This is a quick synopsis of what I did to set up a IanCanada’s / Gabster DCC Streamer into a Roon / HQPlayer / Gustard R26 system ( I will call this “Complete Integration”). What I have written is cryptic, but I hope it is good enough to guide another novice like me to have success.
Motivation and how to assemble the IanCanada “Flagship Re-Clocker Streamer Kit (#93B):
https://iancanada.ca/products/flags...rk-music-streamer-kits?variant=47606889185580
Motivation was Gabster video:
@iancanada , @camrector , @crossride were extremely helpful to a successful conclusion of my “Complete Integration”. I am starting my journey with only the experience of running a Raspberry Pi with Ropieee as an endpoint in Roon and very basic knowledge of HQPlayer.
I have uploaded a bunch of images that are not well organized but could be helpful to understand the integration.
There are three main focuses to the Complete Integration”
- Configuring DoP in software and hardware to get DSD files streaming
- Hardware configuration between the #93B and the R26.
- Software configuration in Roon and HQPlayer
Configuration adjustments between #93B and the R26
Hardware changes / settings
#93B
Switch change on HdmiPI Pro II - Remove thin film over switches
SW1: OFF
SW2: ON
SW3: ON
SW4: OFF
Configuration change on FifoPi Q7II
Using #49 MonitorPi Pro set FifoPi to Dop Pass through mode
Small cable connection between FifoPi Q7II (Q7) and HdmiPi Pro II. which can pass the DSDEN signal to Pin15.
Gustard R26
Setting Changes
PCM NOS: ON
DSD Direct: ON
Phase Invert: Disabled
Roon and HQPlayer software settings
Roon setup Without integration of Roon
Roon
Go to Device setup of your Ropieee endpoint and configure DSD playback to DSD over PCM
Ropieee
Hat Configuration - Audiophonics I-Sabre ES90*8Q2M
Setup with HQPlayer integrated with Roon
Roon
Disable Roon endpoint that is being used for HQPlayer. This is to avoid conflicts with HQPlayer
HQPlayer Settings
Output Page
Set device to your RoPieee endpoint
Set SDM pack to DoP
SDM Page
DSD sources / check DirectSDM
Things to be aware of and have.
If you have issues, document all the systematic changes you make. Going from streaming source to your preamp with this setup is a complex system. Until I started documenting changes progress was hit or miss.
For troubleshooting of the “Complete Integration” it is handy to have a 2nd Raspberry Pi and Volumino software available
No need to get a customized HDMI cable to work as your I2S cable
Understand what the LED lights are on the FifoPiQ7II
Order batteries from Ian Canada. Adding batteries to the order adds $8 to the shipping, but if you order anywhere else the shipping for the batteries will be over $20.
Attachments
-
 Roon HQPlayer Music chain DoP on HQplayer.jpg24.1 KB · Views: 259
 -
 Roon Audio List.jpg40.5 KB · Views: 211
 -
 Streamer config 93B.png43.7 KB · Views: 208
 -
 HQPlayer SDM.jpg38.1 KB · Views: 208
 -
 HQPlayer Roon Settings.jpg30.6 KB · Views: 220
 -
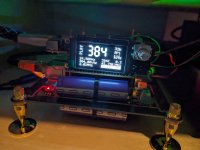 93B Display 2.jpg412.8 KB · Views: 247
 -
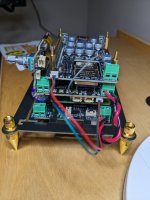 93B side w small cable.jpg407.2 KB · Views: 252
 -
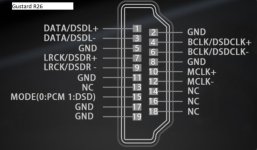 Gustard R26 IS2 Pin arrangement.jpeg50.5 KB · Views: 243
 -
 Gustard R26 Logic Flow.jpeg48.2 KB · Views: 211
 -
 PS Audio vs Gustard HDMI cable .jpg78.3 KB · Views: 198
 -
 HdmiPi Pro II Switch configuration.jpg94.1 KB · Views: 232
 -
 iancanada flagship #93B.jpg42.2 KB · Views: 253
@dcallende
Your project looks perfect. Good job.
Thank you so much for sharing your experiences. It's very details like good a guidance. Better than my user's manuals 🙂.
That would be a great help for other community members. Appreciated!
Ian
Your project looks perfect. Good job.
Thank you so much for sharing your experiences. It's very details like good a guidance. Better than my user's manuals 🙂.
That would be a great help for other community members. Appreciated!
Ian
Addressing RaspberryPi 5 issues as a streamer
Somebody reports that RPi5 has problems with music higher than 192KHz and DSD. But I'm still waiting for RPi 5 is available in Canada.
Yesterday a friend of mine sent a PRi5 to me. So I did some tests today to address the issues. Here are the results.
1. Addressing RPi5 software issues
I confirmed that current software still has bugs with RPi5. I tested Volumio V3.611-2024-01-30, I found that RPi output wrong I2S frequencies over GPIO when playing music higher than 192KHz and DoP higher than DSD64. RPi4 doesn't have such problems with the same software. (You just need to install a MonitorPi or Pro to the RPi GPIO, it tells everything)
Solution:
a. Work with RPi5 through USB connection using a ReceiverPi DDC. RPi5 USB output works fine without any problem.
b. I suggest using RPi4 for now until the RPi5 software bugs are fixed.
2. Make RPi5 working with PurePi
RPi5 has shorter GPIO pins at the back side of PCB. It doesn't connect well with the spring contactors using the default 7mm standoffs.
Solutions:
When using 6mm standoffs, RPi5 works perfectly with a PurePi
Please let me know if you have more updates
Ian
Agreed......I have multiple tips and a solder station where you can vary the temperature and with a heat gun for SMD plus a de-soldering station, I feel all are a must for this hobby.Hello,
Probably most people will have just one tip. With the idea i probably will never use a broad tip so why get one?
What is also underestimated you should have your board and cap properly " secured " so you can apply some pressure to transfer the heat efficiently.
Clean parts is also crucial.
I have always had Weller. Now just got the Hakko because the exchange part of the Weller was unavailable.
Greetings,Eduard
Here is a small problem I encountered with a FifoPi MA and isolator II on volumio.
https://community.volumio.com/t/new...e-after-reboot-no-sound-i2s-signal-gone/65353
https://community.volumio.com/t/new...e-after-reboot-no-sound-i2s-signal-gone/65353
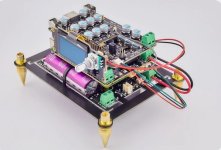
Finally finished my prototype full stack of Ian's modules with a Roon endpoint streamer, DAC and balanced output.
Putting this together carefully after reading all the manuals everything worked first time and sounds great. A different sound presentation to my Ian streamer with the DDDAC and I will do a full comparison in time.


Putting this together carefully after reading all the manuals everything worked first time and sounds great. A different sound presentation to my Ian streamer with the DDDAC and I will do a full comparison in time.
Hi
I just built the Fifopi q7 with hdmipi pro and it finally work. However, I found no sound when it plays 16/44.1 files.
Dac is holo may(hdmi alt2 setup). It can show 44.1 but just no sound. Fifopi with default clock.
I still didn’t found solution on web so I am asking here.
I just built the Fifopi q7 with hdmipi pro and it finally work. However, I found no sound when it plays 16/44.1 files.
Dac is holo may(hdmi alt2 setup). It can show 44.1 but just no sound. Fifopi with default clock.
I still didn’t found solution on web so I am asking here.
- Home
- Source & Line
- Digital Line Level
- Asynchronous I2S FIFO project, an ultimate weapon to fight the jitter