
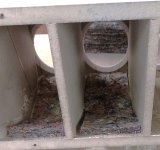
Looks like a diffuser panel to me. If it is for treating one side only, while the other side is open, I'd wager absorption would work better.Wondering about using a panel like
FN Acustico White Wood effect Foiled veneer Acoustic panel (L)2400mm (W)572.5mm,
for close side wall treatment, it would seem likely effective for that variable angle reflection?
Any views please?
This is a DIY forum, right? Make your own!
I have made quite a few absorbers and diffusers over time and i learnt that absorbing higher frequencies may be possible with thinnish panels, but mid and bass need to quite thick, so as this would be at quite an open angle to the path, i thought the slats might work well, breaking up the first reflection close to the right speaker, there is also thin felt behind...........and as you implied its all taking a while (there is golf to play as well!) i wondered about a part ready made solution.
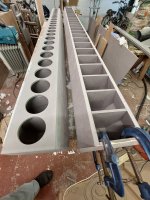
BTW, back panel pre-fitted to one cabinet, internal absorption (?) felt to fit before wiring and drivers, 3 weeks? (including the golf!)
BTW, back panel pre-fitted to one cabinet, internal absorption (?) felt to fit before wiring and drivers, 3 weeks? (including the golf!)
Attachments
Look at @nc535 thread with the measured results of damping panels in the corner. Remember that the waves pass trough a panel twice to return their path. Keep some distance between the panel and the wall and go as thick as you can. I've hid them from view with a curtain which is another source of absorption/diffusion... It could work for you on the right side wall. I used threaded rods to lock them between ceiling and floor, as to not have to use wall plugs. For security there's one wall fixture for each panel.I have made quite a few absorbers and diffusers over time and i learnt that absorbing higher frequencies may be possible with thinnish panels, but mid and bass need to quite thick, so as this would be at quite an open angle to the path, i thought the slats might work well, breaking up the first reflection close to the right speaker, there is also thin felt behind...........and as you implied its all taking a while (there is golf to play as well!) i wondered about a part ready made solution.
BTW, back panel pre-fitted to one cabinet, internal absorption (?) felt to fit before wiring and drivers, 3 weeks? (including the golf!)
Panels behind both curtains.
I don't recall the details of the simulations I did but I do recall significant benefit for snugging absorption up against the tower walls. Basically, there is no escaping early reflections from front and near side walls without absorption. The tighter, closer you fit the array into the corner, the higher the frequency of the first reflection null and the less thickness of absorption you need (and can fit. Vituix room tab diagram with reflections enabled will show the first reflection point which moves with listening position/reference angle. That first reflection point ideally would be the horizontal center of the absorber as its not a laser beam being reflected. As you optimize the listening geometry, you may find you want to vary the toe-in.
With 77 pages on your thread at a depth of discussion way beyond my comprehension, i will work with the conclusion above concerning positioning and see what it all looks like when first up and running.
Knowing i need some room for turning the tower for "aim", i could push it close to the wall taking only that into account, or do i need to get absorption/wall treatment alongside the cabinet as well or only ahead of the front baffle?
Knowing i need some room for turning the tower for "aim", i could push it close to the wall taking only that into account, or do i need to get absorption/wall treatment alongside the cabinet as well or only ahead of the front baffle?
I wouldn't ask anybody to read it either at this point, nor would you find your answer there.
I recommend treatment on both front wall and near side wall. that is a nice to have, not a requirement.
you need to at least do a scale drawing of your speaker position, listening position and walls, use it to find both the reflection point and how much room you need to aim the axis of the speaker at your chair. Keeping speaker as close to the wall as you can will minimize the absorber thickness and area you need
or you could do it purely empirically like everyone else 🙂
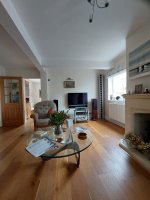
We did do a scale drawing of the room back in post 22 and this relates to the picture in post 1.
Now having looked at the driver centre at about 230mm from the front wall and 145mm from the side, it seems likely the first direct reflection is likely off the window with radiator under!
On the side wall, nearer the front wall ( between the window and the front wall) there is some opportunity, but if i add thickness next to the tower it makes that problem worse.
However if the side wall treatment ahead of the speaker has some thickness it will eat into the 145mm dimension and perhaps affect that first reflection.
It's all pretty tight!
So it seems that i should move the tower as close to the side wall as possible and treat in front of it if i can.........
M
Inside treatment started, felt wadding on each side of each cell apart from the baffle, 5 pieces per cell =250, its not really much work but each piece is tiny compared with "normal" speaker build, probably only takes 45 minutes per face on each tower, so a days work and its done but i like to let them dry glue side down, so its one face at a time.
Then the rubber seals, wiring and driver mounting......
Then the rubber seals, wiring and driver mounting......
Attachments
Some advice please.
I had originally intended to make a wall mount bracket to remove the tower from the floor by a couple of inches, which would entail a bit of engineering top and bottom, but would avoid the footprint of a stand and rigidly mount it to a solid wall.
Its a quite rigid engineered floating floor with 20mm of OSB and 20mm engineered oak bonded to that, on top of the beams, a more ancient DIY project.
However i am rapidly going off the complexity and wonder about standing the speaker on the floor (with just thin felt corners or something) and just having a top safety bracket.
That could be quite a simple bracket and bolt and allow the aim to be changed.
Is standing the speaker on a (rigid) wood floor a bad thing?
M
That's what I did... I've made it able to adjust toe in with a clamp construction. The width and depth of the feet make it stable.
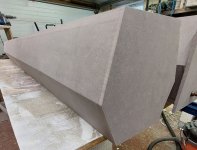
Mine were planned to sit beside the chimney on one side which is why the back is made less wide.


Here in this render you still see the poor man spikes that I used first. The damped industrial feet were a very good upgrade though,
got them under my subwoofers too. See here: https://www.vandermill-audio.nl/top-and-bottom-panels/
Very easy to level the feet and the cost isn't crazy. You can get Audiophile versions for a lot more though.
The foot I had cut from solid aluminium with water jet cutting. Just to fuel some ideas, might be a bit much. 🙂
Mine were planned to sit beside the chimney on one side which is why the back is made less wide.
Here in this render you still see the poor man spikes that I used first. The damped industrial feet were a very good upgrade though,
got them under my subwoofers too. See here: https://www.vandermill-audio.nl/top-and-bottom-panels/
Very easy to level the feet and the cost isn't crazy. You can get Audiophile versions for a lot more though.
The foot I had cut from solid aluminium with water jet cutting. Just to fuel some ideas, might be a bit much. 🙂
As i cut and glue in 250 pieces of damping felt i think i am getting lazy, i was now thinking of standing it directly on the floor, with just a thin felt in between, just to avoid scratches, probably cutting the skirting away in the corner to allow closest proximity to the sidewall as well...........see pic in 186 above, thinking i will start that way anyway!
You are more daring than I would be 😱. As a former mechanical engineer by profession I could never see me do/risk that.
Hide your valuable stuff at least 2 meters from the speakers 😉, including kids and the wife if applicable.
Hide your valuable stuff at least 2 meters from the speakers 😉, including kids and the wife if applicable.
Which bit is daring? i too was an engineer, boats and stuff, a long time ago, so i see no problem to having just a top safety bracket.
If i decide where the rotation pivot point is i will put a thread insert on the top plate and a bracket arm that screws into it, as long as it has a good few threads engaged, but i will engage more than that and put a lock nut as well, then the whole thing wont move! (but we need the folk out there to catch if needed..........)
But seriously, yours are on the wood floor on very exotic feet (lovely but tough toi make by hand) , any worry if i just stand them on the floor? - then i don't need those feet at all?
M
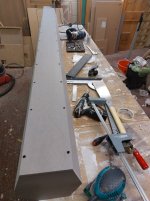
I haven't actually given up, it just seems like it while i have been away(!) but now fully lined one cabinet and marked off for the drivers.
To complete i have to line the other cabinet, neoprene tape the driver and back panel seals, wiring and assemble, should be done this year!
M
To complete i have to line the other cabinet, neoprene tape the driver and back panel seals, wiring and assemble, should be done this year!
M
Attachments

- Home
- Loudspeakers
- Full Range
- Another corner array project