Small update. I'm making progress, but still facing an issue, it seems.
The pigtailed powerjacks worked like a charm and required no drilling, so that was a win. I rechecked all my resistors, wiring and solder points, and I think everything looks right. I powered up and got both lights on, proper grounds, and no voltage across the speaker outputs, but most importantly, no more smoke!
Testing with the selector in Stereo, I'm getting 23.81V on each side's V+, ~23.8 on Q2 Pin 2, and successfully adjusted the pot to get 12V on the right channel Q1 middle pin, but for some reason the Left channel doesn't really respond to adjustments on the pot and is reading overvoltage at ~20V. Any ideas?
I did start to try troubleshooting based on the resistor values across both channels, and found some differences, but I realized the build guide Step 56 doesn't seem to match the v1.8 kit's resistors, so I'm a bit lost. I also checked the V In from RCA on each side and found ~0 on the right channel but ~2.4 on the not-working L side with no source connected, so this seems like a problem, but not one I'm sure how to correct. The LEDs also fade out pretty slowly (~10 sec) when I flip the power switch off, which seemed possibly odd.
Please let me know if any updated photos would help.
Testing with the selector in Stereo, I'm getting 23.81V on each side's V+, ~23.8 on Q2 Pin 2, and successfully adjusted the pot to get 12V on the right channel Q1 middle pin, but for some reason the Left channel doesn't really respond to adjustments on the pot and is reading overvoltage at ~20V. Any ideas?
Concentrate for now on the channel that adjusts to 12 volts.
That doesn't sound right. The high current draw should kill the supply pretty instantly.The LEDs also fade out pretty slowly (~10 sec) when I flip the power switch off, which seemed possibly odd.
With the 12 volts midpoint set correctly both FET's in that channel should be getting quite warm/hot. You should also see about 0.9 volts between the middle pin of Q1 and the Source of Q2 (the pin with 12 volts on it).
Measure and check that.
With the amp OFF you should measure 0.57 ohms between those two same pins. Your meter lead resistance will add to that but you should see a measured value of about 1 ohm in circuit.

Thanks, Mooly! All those values roughly check out on the right channel. 12.4V when measuring ground to Q1’s bottom pin and 0.83V between that pin and Q2 middle pin. Does that sound about right? This is at 11.9V between ground and Q1 middle pin.
I made a quick table to compare:

I was also getting similar temps on both channels ~99* F for left and 102 for right after 10 minutes of power on, but after 20 min on, the left channel dropped to just 86* while right was up to 108* F.
Resistance in circuit looks OK. 0.7 ohms for R and 0.8 for L.
Definitely something amiss.
I made a quick table to compare:
I was also getting similar temps on both channels ~99* F for left and 102 for right after 10 minutes of power on, but after 20 min on, the left channel dropped to just 86* while right was up to 108* F.
Resistance in circuit looks OK. 0.7 ohms for R and 0.8 for L.
Definitely something amiss.
The voltages sound about right, maybe written ID of the pins might be amiss although your picture looks correct 🙂
The Drain (middle) of Q1 should be at 12 volts and the Source should be ground. Q2 middle pin (Drain) should be at supply voltage (24 volt)
0.83 volts between Q1 Drain and Q2 Source sounds OK. With the 12 volts correct both FET's will be equally hot.
So that channel sounds basically OK at this point and should work and play music as expected.

The channel with 20 volts rather than 12 volts at the midpoint has a problem.
You seem to show no volt drop between Q1 Drain and Q2 Source for this channel meaning no voltage across the low value resistors. That suggests Q1 is not being turned on.
Check that the small FET (Q4) is correctly fitted and check the continuity (with the amp OFF) from all leads on Q4 to their destinations. The Drain should go to the supply and the Source should go to R6 and the Gate of Q1. So you should see 100 ohms measuring between Q1 Gate and Q4 Source. Measure to and from the leads themselves and not on the print as likely trouble points are cracks in the print around the solder pads of the parts.
The Drain (middle) of Q1 should be at 12 volts and the Source should be ground. Q2 middle pin (Drain) should be at supply voltage (24 volt)
0.83 volts between Q1 Drain and Q2 Source sounds OK. With the 12 volts correct both FET's will be equally hot.
So that channel sounds basically OK at this point and should work and play music as expected.
The channel with 20 volts rather than 12 volts at the midpoint has a problem.
You seem to show no volt drop between Q1 Drain and Q2 Source for this channel meaning no voltage across the low value resistors. That suggests Q1 is not being turned on.
Check that the small FET (Q4) is correctly fitted and check the continuity (with the amp OFF) from all leads on Q4 to their destinations. The Drain should go to the supply and the Source should go to R6 and the Gate of Q1. So you should see 100 ohms measuring between Q1 Gate and Q4 Source. Measure to and from the leads themselves and not on the print as likely trouble points are cracks in the print around the solder pads of the parts.
Thanks again, Mooly! Here's what I can report back. I did get 100 Ohms between Q1G and Q4S on both channels, so that's good. Voltages... less so.
I tried another table/drawing. Hope it helps. Pencil here is the Right Channel, blue Sharpie = Left Channel. Check mark indicates continuity... X = no beep. Still not getting head from the Right Channel, so I think you're right that Q1 is not turning on.

I did check the back of the PCB on the troublesome Left Channel, but it looked okay to me.

I tried another table/drawing. Hope it helps. Pencil here is the Right Channel, blue Sharpie = Left Channel. Check mark indicates continuity... X = no beep. Still not getting head from the Right Channel, so I think you're right that Q1 is not turning on.
I did check the back of the PCB on the troublesome Left Channel, but it looked okay to me.
Q1 isn't turning on, the 3 volts on the gate isn't enough. That voltage is derived from the input FET Q4 and of course depends on the setting of the preset.
What are the voltages on Q4 as measured from ground? Measure on the pins directly. You should have supply on the Drain (24v) but what are the other two pins at?
What are the voltages on Q4 as measured from ground? Measure on the pins directly. You should have supply on the Drain (24v) but what are the other two pins at?
Another thought...
Is the 10uf input coupling cap the correct way around. If fitted incorrectly the leakage current would be enough to pull the gate of Q4 down.
Is the 10uf input coupling cap the correct way around. If fitted incorrectly the leakage current would be enough to pull the gate of Q4 down.
Okay... some more readings.
I'm pretty sure I installed both caps the correct way around, but is there a way I could check that? I did already trim the leads on the PCB back, but I did leave some space on the PCB top side that might allow me to remove & resolder them.
|
|
|
|
| |||||
|---|---|---|---|---|---|---|---|---|---|
| Top/closest | 1.60 V | 0.413 V | 2.74 V | 4.35 V | |||||
| Middle | 1.32 V | 0.033 V | 4.40 V | 4.23 V | |||||
| Bottom/farthest | 23.9 V | 23.88 V | 23.81 V | 23.9 V |
I'm pretty sure I installed both caps the correct way around, but is there a way I could check that? I did already trim the leads on the PCB back, but I did leave some space on the PCB top side that might allow me to remove & resolder them.
Check the last item here first 😉
Make sure the cap is physically the same way around as the good channel. The + position is marked on both the board and on the cap.
If there is doubt then the cap can be removed (or one end lifted to isolate it) to remove it from the equation. The DC conditions should be the same with or without the cap.
Make sure the FET is marked the same as the one in the good channel and fitted physically the same way around.
Make sure the 100 ohm and 1k (R6 and R9) are not reversed.
Check that R9 really is a 1k.
Using this color code as my reference.
R6 = 100 Ohms (brown, black, black, black, slightly thicker brown) on both sides, thicker brown stripe pointing down with the amp's front power switch facing me.
R9 = 1000 Ohms (brown, black, black, brown, even thicker brown) on both sides, again thickest brown stripe pointing down from the same perspective.
C3 & C4 match across channels, with (P) corresponding to the + pin/diagram, and a white stripe aligned with the other pin hole.
Same for Q3 & Q4, they're both correctly aligned with the PCB print, with the flat side of Q4 facing me/Q1 on the Left Channel (still looking toward the power switch) and Q3's flat facing away/Q2. For the Right Channel, it's mirrored, with Q3's flat side toward me/Q2 and Q4's flat side facing away/Q1.
Thanks to everyone sticking with troubleshooting with me... I'd be completely lost without you... even though it seems like I still am with you! 🤣
R9 = 1000 Ohms (brown, black, black, brown, even thicker brown) on both sides, again thickest brown stripe pointing down from the same perspective.
Can you actually measure its value. We need to be 100% sure it is 1k. Just lift one end of it to get an accurate reading.
(The value of R6 will actually have no effect on the DC conditions no matter what is fitted)
If it is OK then refit the resistor and then isolate one end of the input cap and see if the DC conditions come correct.
If they are still incorrect then we need to look at swapping Q4.
The only other possibility I can think of after that (beyond a physical issue or break somewhere) is Q1 has a damaged gate channel giving a low impedance at that point.
(FET's can be damaged by static when being handled due to the very thin and near infinite gate impedance. Electrical leakage from unsuitable soldering equipment can also in extreme cases cause issues)
Thanks Mooly, about to try the resistor check. (Edit: checked both R6 and R9 and each reads the appropriate 100 and 1000 values.)
Just to make sure I follow on the input capacitor if the resistor isn't the issue--I'm just going to desolder one leg and check the DC voltages again? Does it matter which?
Just to make sure I follow on the input capacitor if the resistor isn't the issue--I'm just going to desolder one leg and check the DC voltages again? Does it matter which?
Last edited:
Just lift the cap, either end, it doesn't matter which.
Also confirm that you have the same voltage on each end of R10 which is 330k to the gate of Q4. Although the voltage should be identical on each end, your meters internal resistance may pull the gate voltage down a little meaning you see slightly lower voltage on that end of the 330k. As a second check there should be zero (0.00) volts as measured across the 330k. Try that with the preset in different positions.
Also measure the voltage across the 100 ohm (R6). Can't remember if we did that but there should be 0.00 volts across it no matter what voltage the resistor is at relative to ground. If Q1 is drawing a DC gate current then it is faulty. That would show as a voltage across the 100 ohm
If its still no good at that point then I think you have to try swapping the two FET's Q4 and Q1
Ok there does appear to be an issue at R10 on the left channel. R10 right reads about 4.3 to 4.4V, but left side is reading 0V on the “top” side with orange facing up and 0.23 on the leg closer to thick brown. This is with the black meter lead on ground and red to the resistor leg mentioned.
So R10.
Its not easy figuring out 'top sides' and 'orange sides' 🙂 If those are the colours on the resistor then it all depends which way round you fitted it...
The end that goes to Q4 is measuring the gate voltage of the FET. The other end is from the wiper of the preset. Whatever voltage you see on the preset wiper should also appear at the gate. If you have voltage across this resistor then we have a problem. Either the FET is faulty or there is something pulling the gate down (a short or C3).
If you take Q4 out completely and set the preset midway then you should see about 10 volts on the preset wiper and the same on where the gate of Q4 would fit. In other words 10 volts on each end of R10 and no voltage across R10. If that is so then we must suspect Q4 as faulty.
I just came down to listen to my ACA that I built a couple of weeks ago and has been working fine and the left channel was making a static sound.
I am not sure where to start to trouble shoot.
I was actually going to ask if I could add another LED to light the inside of the amplifier because I made a clear Lexan top for it. Is another LED to much load for the LED circuit? and should I do one on both channels to balance out any load.
Thanks,
Scott
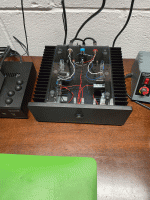
Attachments
Its not the LED assuming you haven't connected it incorrectly. LED and series resistor across the 24v rail. You can connect tens if not hundreds of LED's like that without the ACA even noticing.
Hi Mooly, sorry to disappear on you! Was traveling for work and away from this troublesome amp 🙂.So R10.
Its not easy figuring out 'top sides' and 'orange sides' 🙂 If those are the colours on the resistor then it all depends which way round you fitted it...
The end that goes to Q4 is measuring the gate voltage of the FET. The other end is from the wiper of the preset. Whatever voltage you see on the preset wiper should also appear at the gate. If you have voltage across this resistor then we have a problem. Either the FET is faulty or there is something pulling the gate down (a short or C3).
If you take Q4 out completely and set the preset midway then you should see about 10 volts on the preset wiper and the same on where the gate of Q4 would fit. In other words 10 volts on each end of R10 and no voltage across R10. If that is so then we must suspect Q4 as faulty.
I wanted to make sure I understood correctly before removing Q4. I should remove Q4, then measure ground to each end of R10, and I should see 10V on each end, then 0V when measuring across both legs of R10 at the same time? If so, Q4 is shot?
Without removing Q4, I did notice that there's a voltage difference across the "bottom" leg (sitting near the Q4 label on the PBC, connecting to R9): ~4.4V on Right and ~2.6V on Left. More evidence of an issue with Q4?
If I do need to replace Q4, is this the right part on DIYAudio? The markings are quite small and hard to read but I believe it says LS K170F 1839 C. Also a bit confused if I'd need to order multiple for matching and/or replace the seemingly working Q4 on the right channel.
Its not easy just picking up exactly what the train of thought was but the two important points to be 100% sure on first were that:
1/ R6 which is the 100 ohm must have 0.000 volts across it. Any voltage across this resistor means the FET is drawing gate current (which it should not). I think we did check that but reconfirm that is so.
2/ The same applies to R10. There should be 0.00 volts across this resistor.
Yes, with Q4 removed and the preset centred you should see approx 10 volts on R10. There must be 0.00 volts across R10 in that condition.
(because R10 is a high value you will find if you measure the voltage from ground to each end of the resistor then you will see a small difference in voltages. This is because your meter adds a small load and pulls the voltage down on the gate end of R10.
This is what you should see with no Q4 fitted:

Lets try and prove the problem first before spending big money on FET's. They don't need be matched or anything like that for the ACA.
1/ R6 which is the 100 ohm must have 0.000 volts across it. Any voltage across this resistor means the FET is drawing gate current (which it should not). I think we did check that but reconfirm that is so.
2/ The same applies to R10. There should be 0.00 volts across this resistor.
I wanted to make sure I understood correctly before removing Q4. I should remove Q4, then measure ground to each end of R10, and I should see 10V on each end, then 0V when measuring across both legs of R10 at the same time? If so, Q4 is shot?
Yes, with Q4 removed and the preset centred you should see approx 10 volts on R10. There must be 0.00 volts across R10 in that condition.
(because R10 is a high value you will find if you measure the voltage from ground to each end of the resistor then you will see a small difference in voltages. This is because your meter adds a small load and pulls the voltage down on the gate end of R10.
This is what you should see with no Q4 fitted:
If I do need to replace Q4, is this the right part on DIYAudio? The markings are quite small and hard to read but I believe it says LS K170F 1839 C. Also a bit confused if I'd need to order multiple for matching and/or replace the seemingly working Q4 on the right channel.
Lets try and prove the problem first before spending big money on FET's. They don't need be matched or anything like that for the ACA.
- Home
- The diyAudio Store
- Amp Camp Amp Kit 1.6/1.8