OK, thanks Sandy. That's helpful. I guess I didn't get a copy of the BoM (and/or, I'm too uninformed to know where to find it). From your message I see that the 33k resistors are for R13, which should affect only the LEDs. Perhaps the resistance was raised to dim them?
In my kit, there was one sheet of paper folded in the box. On the front of it was an introduction/overview of the kit written by Mark "Variac" Cronander and on the back of it was the BOM and the V1.8 schematic.
Indeed, the note says that R13 was changed to dim the LED's as the new LED's supplied were too bright with 10k. The brightness with the included 33.2k resistor seems fine to me.
Sandy.
BOM
Thanks Sandy for pointing out the BOM, I had not looked at it. I see now that the 33k.2Kohm Resistors are used to Dim the LEDs.
Mark
Thanks Sandy for pointing out the BOM, I had not looked at it. I see now that the 33k.2Kohm Resistors are used to Dim the LEDs.
Mark
Yes, its in the works.
Yes The Back Panel will be able to be ordered, it is in the works. You can purchase the new switch now from Parts Express there is a link to the Parts express page. Here is the link to find out information on upgrading.
ACA Upgrade Information – diyAudio Store
Hope this helps.
Mark
Any chance of an upgrade kit from 1.6 to 1.8. Printed back panel and new switch?
Yes The Back Panel will be able to be ordered, it is in the works. You can purchase the new switch now from Parts Express there is a link to the Parts express page. Here is the link to find out information on upgrading.
ACA Upgrade Information – diyAudio Store
Hope this helps.
Mark
Last edited:
Correction, See Jason's Post #689
Hi Steve, Jason has posted the information your looking for regarding the Switch and the new back panel. Look at post #689 in this tread.
Mark
Any chance of an upgrade kit from 1.6 to 1.8. Printed back panel and new switch?
Hi Steve, Jason has posted the information your looking for regarding the Switch and the new back panel. Look at post #689 in this tread.
Mark
Hi Steve, Jason has posted the information your looking for regarding the Switch and the new back panel. Look at post #689 in this tread.
Mark
Right here.
Thanks for the posts. Happy to be in on the 1.8 early. I'm looking forward to some new gear.
For those of us not blessed to live within US borders, I (for one and would guess that there are others) would suggest that advice of suitable alternative to Parts Express supplied parts be considered and noted in the appropriate places.
For example, the v1.8 upgrade 3 position switch would cost about USD60 😱 to ship to Oz from Parts Express (buying more stuff, doesn't seem to offer an economy of scale shipping advantage for some daft reason). Whereas, if I source something like one of these babies:
A203SYZQ04 TE Connectivity - Toggle Switches - Distributors, Price Comparison, and Datasheets | Octopart component search
(which is not a precisely matching substitute but I reckon should work), I can get that piece of kit delivered to me as a single item (for no added shipping cost) from RS .. 😉 ... go figure 😕
Just a minor point to bear in mind.
Great to see the v1.8 improvements. Looking forward to the time when the back panel is on offer as a separate part.
Yep just like the printed back panel and the advantage of having the connection method labeled. Direct from Italy like the cases would work for me and source a quality switch elsewhere.
I caught one of the 1.6 kit switches with the soldering iron and that annoyed me, (functioned just fine) so replaced one in each of the pair I have with a lockable switch with gold plated contacts. Pleased that others are getting the chance to build this amp and enjoy it.
I caught one of the 1.6 kit switches with the soldering iron and that annoyed me, (functioned just fine) so replaced one in each of the pair I have with a lockable switch with gold plated contacts. Pleased that others are getting the chance to build this amp and enjoy it.
Having the printed rear panels shipped directly from our warehouse is an idea we are currently discussing with Jason but I think it's definitely a good one.
In case there's enough people interested, we may also add the new mounting brackets which use weld nuts and hex head screws instead of the old self-threading screws
In case there's enough people interested, we may also add the new mounting brackets which use weld nuts and hex head screws instead of the old self-threading screws
Gianluca, I'm so glad that the discussion we had at BAF2019 had (I'd like to think) some effect. I'm keen to see the look of the new bracket system. The hex head nuts will make your cases look even more "pro".
I take it that you'll apply this plan across the board to all your chassis products?
Put me down for a pair of v1.8 back plates. I'm keen. They look sweet.. 😉
I take it that you'll apply this plan across the board to all your chassis products?
Put me down for a pair of v1.8 back plates. I'm keen. They look sweet.. 😉
For the rear switch, almost any on-off-on DPDT switch will do.
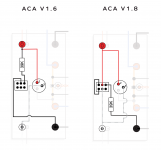
For those building the V1.8 using V1.6 instructions, attached is a direct comparison that clearly shows the differences.
As the differences are very slight, I will rename this thread "V1.6 / V1.8".
For those building the V1.8 using V1.6 instructions, attached is a direct comparison that clearly shows the differences.
As the differences are very slight, I will rename this thread "V1.6 / V1.8".
Attachments
I guess I was a little anxious to build the amp, so I just did the v1.6 wiring on the 3-way switch and ignored the back panel. Even though I doubt I'll ever use the options, I think I'll go ahead and rewire it to match the v1.8 intent.
A quick question: I'm curious as to the use of solid wire for most of the build. I only ask, because I apparently haven't developed the same assembly skills for solid wire as stranded and it took me longer to assemble and the quality of my workmanship wasn't as good as I'm used to.
Is solid wire more common for this type of project, is it easier for beginners, does it 'sound better' or was there some other criteria?
Just curious - no criticism. If I need to work on my solid wire skills, then no problem!
Sandy.
PS: If it is logical to ship a batch of rear panels and switches to one location in the US and the distribute from there, I'll volunteer to be the go-between for a short period of time. I'm packing and shipping all the time anyway, so if it helps the cause, I'll be glad to do it if it makes sense to management.
Hey guys,
New to the forum here as I bought an ACA 1.8 when it became available on June 29th. Very pleased to inform the gang that both the components and chassis parts arrived on exactly the same day. I was impressed given that the chassis parts come from Italy as you know.
While this is my first ACA build, it's not my first mod; I built the Walt Jung Dyna PAT5 mod published in the Audio Amateur way back in the day and also built up my Haflter DH-101 preamp.
This forum has already been a big help in that I found out what the 33.2k ohm resistors are for.
Two questions I have are:
1) Is it possible to convert a stereo amp to mono if I decide I want to build another and use them as mono blocks?
2) If folks have any suggestions, kits or vendors for a 24V, 5 A linear power supply, please let me know.
Thanks, gang.
Puma,
Yes, you can convert the amp to mono but it is by simply flipping the new 3-way switch. Take a look at the wiring diagram pdf in the new build guide here:
1.8 Build Guide
Also, if you use a balanced connector, you will get mono (as long as you have the switch in the correct spot.) No internal work needed.
For power supply, there were some mentioned in the build thread. The only one I remember by name is the SLB (Smooth Like Butta) but I imagine there are many more. It's a long read but well worth it.
The current PSU available in the complete kit (and separately) is a 24v Meanwell SMPS PSU which is a rather significant upgrade over the original 19v generic PSU, being much quieter electrically, and gives a bit more muscle to the ACA, while unfortunately adding to the cost significantly when it was introduced in the 1.6 version.
Gianluca, I'm so glad that the discussion we had at BAF2019 had (I'd like to think) some effect. I'm keen to see the look of the new bracket system. The hex head nuts will make your cases look even more "pro".
I take it that you'll apply this plan across the board to all your chassis products?
Put me down for a pair of v1.8 back plates. I'm keen. They look sweet.. 😉
Yes 🙂 We've had many other people asking us to change these screws so we have decided it was time to do it. They are not the countersunk holes some have suggested us to use (due to how the chassis is mounted, it would have been impossible to use these) but it's still an improvement over the old ones
At the moment all the 200mm and 300mm deep Dissipante/Mini Dissipante chassis use the new brackets/screws combo but we plan to use these for the 400mm and 500mm deep chassis as soon as we run out of the old brackets
Good work Gianluca.
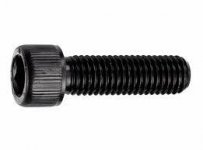
Personally, I used knurled socket cap machine screws in basic black:
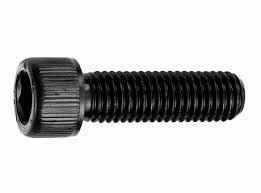
for my Aleph J that's built inside a Deluxe 5U.
I think the look offers a robust, no nonsense aesthetic. Works for me.
Because I had the old style brackets, I modified them to use M4 nutserts / rivnuts. It was a little tricky but I was able to make it work and the top / bottom plate screwed together with (for me) surprisingly no issue. The only downside is that the top plate stands slightly proud (1-2 mm) but with it being black on black tucked away into a shelf, it's not a problem.
I will be keen to get my hands on the updated 400 mm brackets for an upcoming build. I'll pace myself, so that I get the good gear. Thanks for the update - appreciated.
Personally, I used knurled socket cap machine screws in basic black:
for my Aleph J that's built inside a Deluxe 5U.
I think the look offers a robust, no nonsense aesthetic. Works for me.
Because I had the old style brackets, I modified them to use M4 nutserts / rivnuts. It was a little tricky but I was able to make it work and the top / bottom plate screwed together with (for me) surprisingly no issue. The only downside is that the top plate stands slightly proud (1-2 mm) but with it being black on black tucked away into a shelf, it's not a problem.
I will be keen to get my hands on the updated 400 mm brackets for an upcoming build. I'll pace myself, so that I get the good gear. Thanks for the update - appreciated.
Attachments
Hi All, I plan on using for the first time Fire Metall Solder for my Amp 1.8 Build. Has anyone used this solder before and how did like it, Flux or no Flux etc. Also on the 4 big resistor I was thinking of offsetting them from the board with teflon tubing, its just the right size for the leads, thoughts suggestions? Also thinking of using it on the two small transistors on the board.
Stay Well and Safe DIYers.
Mark
Stay Well and Safe DIYers.
Mark
- Home
- The diyAudio Store
- Amp Camp Amp Kit 1.6/1.8