proper tool is increasing level of easiness
I'm simply thinking less, thus worrying less
well, I'm extremely successful in that (not thinking) even without tool, but even I sometimes must see others reality

I'm simply thinking less, thus worrying less
well, I'm extremely successful in that (not thinking) even without tool, but even I sometimes must see others reality
anyway, as sort of reference (read- not so useful knowledge pool), I have two:
-Wera 7461 (pre-set, range 1.2-3.0 Nm), successfully set to 0.9Nm, so M3 torque job
-Garant 65 9915_500 (pre-set, range 100-500 cNm), successfully set to 1.3Nm, so M4 torque job
-Wera 7461 (pre-set, range 1.2-3.0 Nm), successfully set to 0.9Nm, so M3 torque job
-Garant 65 9915_500 (pre-set, range 100-500 cNm), successfully set to 1.3Nm, so M4 torque job
Some of you gents recently got torque screwdrivers. Any comments on them?
Thanks,
Dennis
Hi, Dennis!
I haven’t tried mine yet. I have to replace one or two MOSFETs on my ACP, and fasten 6 diode bridges on the J Zen, so will report back when done


I found that M5 15mm double nut that seems perfect for the purpose (here with 25mm M4 screw)

Let's start!


Little sanding for levelling the MosFets

Bending da legs...

Trying with loose screws...
So, at this point, better to solder legs, solder wires from back and mounting it with gop and micas, washers and screws
OR
Solder legs, put gop & micas under mosfets, washers and tighten the screws, in order to solder wires from top as suggested somewhere by Jim?
Surely any soldering before everything is tightened down risks straining the legs, or am I missing something? (it wouldn't be the first time.)
First screw them Mosfets down (with large washer and then split or Belleville washer), only after Mosfets and PCB are tightened, then solder Mosfets.
😉
😉
I usually solder my cables into the PCB before tightening it to the heatsink. (if I‘m not using Quick Connects).
That way, I can make sure that I have a good solder joint, especially for the high-current wires.
Regards, Claas
That way, I can make sure that I have a good solder joint, especially for the high-current wires.
Regards, Claas
So, I will solder wire, put goop on micas and mosfets, adjust everything with loose screws, tighten the screws and solder the mosfets... 🙂

I see that you're relatively new here, so I'll offer some advice:
DON'T DO IT!!!
You'll only end up LOVING this amp! You'll say it's the BEST amp you've ever heard! And that it's the last amp you'll even need! But then, a few months after it's done, you'll be curious about how "other" amps sound. So you'll build a second and then a third amp.
After a while, you'll be wondering if you are REALLY getting everything you can out of your sound system. You'll start looking at a bigger pair of speakers to build. Then, you'll just want another amp. Pretty soon, you'll have an amp and speakers in every room in the house. After a decade or two, you'll start running out of rooms in the house that "need" their own dedicated sound system. You'll just start tripping over amps and speakers after a little while.
Best not to give in to the initial temptations 😉
(Yes, you have everything that you need from the store - make the final click and get to it!)
... Don't forget converting the already built amps to dual mono, or bridging to mono and making two amps per system because ... why not?

So, I will solder wire, put goop on micas and mosfets, adjust everything with loose screws, tighten the screws and solder the mosfets... 🙂
Goop is for porn and sissies
Looks amazing! Keep up the good work, Vinz! 😀
Hi all!


Goop on micas and MOSFETs...

Inox 10mm M3 Hex screw, inox M3 Split washer and inox M3 fender washer

MOSFETs in place with loose screws


In order to facilitate wiring, I decided to solder PSU wire before, signal input and loudspeaker output wires after

PCB ready for tightening screws

Set torque screwdriver to 0,9
Goop on micas and MOSFETs...
Inox 10mm M3 Hex screw, inox M3 Split washer and inox M3 fender washer
MOSFETs in place with loose screws
In order to facilitate wiring, I decided to solder PSU wire before, signal input and loudspeaker output wires after
PCB ready for tightening screws
Set torque screwdriver to 0,9


It works perfectly!


So, once screws tightened, I can solder and trim the MOSFETs legs

The result!
general remark:
bigger solder tip, temp cranked to max - that's proper way for soldering mosfet pins and power wires
fast and efficient, that's less stressful than endless gnawing with tiny tip and measly temp
edit: smaller size French wrench is handy to keep mosfet from rotating while torquing M3
mosfet pins - I'm cutting them rarely - handy to have them for measurements
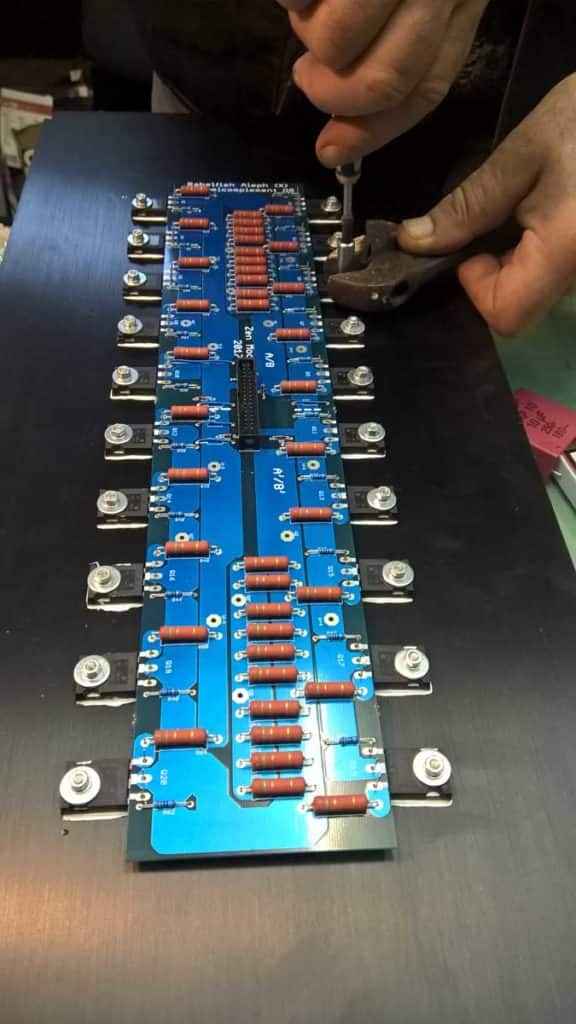
Last edited:
Thanks ZM.
What do you think about this layout for PSU?

Diode bridges between donuts and PCBs, chokes at their sides. Mains cables under the iron base.
What do you think about this layout for PSU?
Diode bridges between donuts and PCBs, chokes at their sides. Mains cables under the iron base.
good enough
living in Eu, so having simple primaries - one NTC board is good enough for both Donuts - one CL60 (or such) per primary
though, rotate those cap bank pcbs for 180deg
or for 90

living in Eu, so having simple primaries - one NTC board is good enough for both Donuts - one CL60 (or such) per primary
though, rotate those cap bank pcbs for 180deg
or for 90
- Home
- Amplifiers
- Pass Labs
- Aleph J illustrated build guide