The mesh frequency parameter is what controls much of the resolution in CircSym,It seems I got axisymmetry to work though with the whole thing user-defined, and meshing problems I had are gone. The enclosure in ABEC however looks pretty rough to me and there doesn't seem to be a way to control the resolution. Not sure if that's screwing up the results or if I'm missing something else...
ABEC.MeshFrequency = 40000, it can be set higher without too much time penalty. It is only solving in one axis so the way it shows as segmented around the axis doesn't matter.
Mesh.LengthSegments will change how smooth the curve is represented by the points which can matter too
Your driven element looks very strange, I would start there to see what is going on.

Problem is, I also have the waveguide user-defined. I can match a small R-OSSE and a Bezier to the coaxial profile but it's kinda burdensome and I keep failing to make the Bezier work from the Desmos script anyway...
It seems I got axisymmetry to work though with the whole thing user-defined, and meshing problems I had are gone. The enclosure in ABEC however looks pretty rough to me and there doesn't seem to be a way to control the resolution. Not sure if that's screwing up the results or if I'm missing something else...
View attachment 1217600View attachment 1217599
Your results are weird because the interface is in the wrong place, likely it's set at a point that's closer than where the baffle actually is
It's set to 1 since I'm only simulating the source without a waveguide. Changing the last numbers defining the points seems to have a minimal effectSo it looks like Mesh.LengthSegments is what matters in CircSym.
Yeah I don't mean the look around the axis, but the radial steps (which aren't super bad but could be better for sure).The mesh frequency parameter is what controls much of the resolution in CircSym,
ABEC.MeshFrequency = 40000, it can be set higher without too much time penalty. It is only solving in one axis so the way it shows as segmented around the axis doesn't matter.
Mesh.LengthSegments will change how smooth the curve is represented by the points which can matter too
Your driven element looks very strange, I would start there to see what is going on.
I can't change LengthSegments simulating only the source. I also tried simulating the coaxial cone instead of the tweeter (Velocity set to 2) but the results are pretty much the same so I guess I'm doing something fundamentally wrong.
There's no interface defined as it's not required in a freestanding sim. I tried adding it but it made no difference.Your results are weird because the interface is in the wrong place, likely it's set at a point that's closer than where the baffle actually is
Here's a slightly simplified example giving similar results
Code:
Length = 0            ; [mm]

Source.Contours = {
    point   p1  4     0    0.5
    point   p2  0     12   0.5
    point   p3  -1.26 50.5 0.5
    point   p4  -97.1 0    0.5
    cpoint  c1  -16 0
    cpoint  c2  -14.8  30.8
    cpoint  c3  -35.9  0

    arc   p1 c1 p2  1.0       ;tweeter
    arc   p2 c2 p3  0         ;woofer cone
    arc   p3 c3 p4  0         ;enclosure

}

Mesh.LengthSegments  = 1
Mesh.SubdomainSlices =

ABEC.SimType         = 2
ABEC.SimProfile      = 0
ABEC.f1              = 200    ; [Hz]
ABEC.f2              = 20000    ; [Hz]
ABEC.NumFrequencies  = 100
ABEC.MeshFrequency   = 40000    ; [Hz]

ABEC.Polars:SPL = {
  MapAngleRange = 0,180,37
  NormAngle = 10    ; [deg]
  Distance = 3      ; [m]
}

Report = {
Title = "Demo"
NormAngle = 10
Width = 1024
Height = 768
}

Output.ABECProject = 1I've never done what you're doing so I don't know if this is the correct approach. This is a Dayton DC200-8 woofer where the dust cap is the source and the cone is deactivated - works like a waveguide. It covers an OSSE Horn that is the same outside diameter as the woofer but does not interfere with the woofer cone. The OSSE Horn is used to create the rear enclosure using the Mesh.RearShape and Mesh.RearCubic commands. You could modify the DC200-8 woofer settings to look like the woofer and tweeter you're going to use and to roll back to the rear enclosure.


You can activate portions of the woofer in the bolded lines. If you modify the dust cap to look like your tweeter you probably want a higher resolution than I used to properly model your high frequencies (more than 10). Or maybe you don't need to worry about that in CircSym mode, I'm not sure.
Source.Contours = { ; Dayton DC200-8 Woofer
zoff -24 ; -24 = external mount, -30 = flush mount, -49 = recessed mount w/ 19 mm plywood, -32 = rear flush mount
point p1 12 0 20 ; center of dome
point p2 0 35 20 ; inner edge of cone
point p3 24 75 20 ; outer edge of cone/ inner edge of surround
point p4 31 82 20 ; peak of surround
point p5 24 89 20 ; outer edge of surround
point p6 24 93 0 ; outer edge of divot/ inner edge of mount bracket
point p7 31 93 0 ; inner peak of mount bracket
point p8 31 104 0 ; outer peak of mount bracket
point p9 24 104 0 ; outer edge of mount bracket
cpoint c1 -50 0 ; center of dome arc
cpoint c2 24 82 ; center of surround arc
arc p1 c1 p2 10 ; dome arc (replace 10 with 0 to turn off)
arc p3 c2 p4 0 ; inner half of surround arc (replace 0 with 10 to turn on)
arc p4 c2 p5 0 ; outer half of surround arc (replace 0 with 10 to turn on)
line p2 p3 0 ; cone line (replace 0 with 10 to turn on)
line p5 p6 0 ; divot line
line p6 p7 0 ; divot to peak mount line
line p7 p8 0 ; inner to outer peak mount line
line p8 p9 0 ; outer peak to mount edge line
line p9 WG0 0 ; connect woofer mount edge to waveguide line
}
Depending where you cross your tweeter you may want to modify these settings as well.
; -------------------------------------------------------
; ABEC Project Settings
; -------------------------------------------------------
ABEC.SimType = 2 ; 2= Free Space, 1= Infinite Baffle
ABEC.SimProfile = 0 ; 0 = CircSym
ABEC.MeshFrequency = 33000
ABEC.NumFrequencies = 1000
ABEC.f1 = 200 ; [Hz] (increase to your tweeter cutoff)
ABEC.f2 = 20000 ; [Hz]
I'm not sure this is the right way to approach your simulation but maybe it will give you ideas.
Source.Contours = { ; Dayton DC200-8 Woofer
zoff -24 ; -24 = external mount, -30 = flush mount, -49 = recessed mount w/ 19 mm plywood, -32 = rear flush mount
point p1 12 0 20 ; center of dome
point p2 0 35 20 ; inner edge of cone
point p3 24 75 20 ; outer edge of cone/ inner edge of surround
point p4 31 82 20 ; peak of surround
point p5 24 89 20 ; outer edge of surround
point p6 24 93 0 ; outer edge of divot/ inner edge of mount bracket
point p7 31 93 0 ; inner peak of mount bracket
point p8 31 104 0 ; outer peak of mount bracket
point p9 24 104 0 ; outer edge of mount bracket
cpoint c1 -50 0 ; center of dome arc
cpoint c2 24 82 ; center of surround arc
arc p1 c1 p2 10 ; dome arc
arc p3 c2 p4 0 ; inner half of surround arc
arc p4 c2 p5 0 ; outer half of surround arc
line p2 p3 0 ; cone line
line p5 p6 0 ; divot line
line p6 p7 0 ; divot to peak mount line
line p7 p8 0 ; inner to outer peak mount line
line p8 p9 0 ; outer peak to mount edge line
line p9 WG0 0 ; mount edge to waveguide line
}
Source.Velocity = 2 ; move in axial direction
; -------------------------------------------------------
; OSSE Horn Settings
; -------------------------------------------------------
Throat.Diameter = 208 ; 208 = outer edge of woofer mount
Length = 1 ; 20
Throat.Angle = 1
Coverage.Angle = 1 ; 20
OS.k = 0
Term.s = 2 ; 2
Term.q = 0.99 ; 0.99
Term.n = 4.54 ; 5.45
; -------------------------------------------------------
; Mesh Settings
; -------------------------------------------------------
Mesh.RearShape = 5 ; closed back
Mesh.RearCubic = -60,2,50,-80,5 ; [mm]
Mesh.LengthSegments = 64
Mesh.SubdomainSlices =
; -------------------------------------------------------
; ABEC Project Settings
; -------------------------------------------------------
ABEC.SimType = 2 ; 2= Free Space, 1= Infinite Baffle
ABEC.SimProfile = 0 ; 0 = CircSym
ABEC.MeshFrequency = 33000
ABEC.NumFrequencies = 1000
ABEC.f1 = 200 ; [Hz]
ABEC.f2 = 20000 ; [Hz]
ABEC.Abscissa = 1 ; 1=log | 2=linear
ABEC.Polars:SPL_H = {
MapAngleRange = 0,180,72
NormAngle = 0
Distance = 2.0
Offset = 65.06
FRDExport = {
NamePrefix = hor
PhaseComp = -2.0 ;[m]
}
}
You can activate portions of the woofer in the bolded lines. If you modify the dust cap to look like your tweeter you probably want a higher resolution than I used to properly model your high frequencies (more than 10). Or maybe you don't need to worry about that in CircSym mode, I'm not sure.
Source.Contours = { ; Dayton DC200-8 Woofer
zoff -24 ; -24 = external mount, -30 = flush mount, -49 = recessed mount w/ 19 mm plywood, -32 = rear flush mount
point p1 12 0 20 ; center of dome
point p2 0 35 20 ; inner edge of cone
point p3 24 75 20 ; outer edge of cone/ inner edge of surround
point p4 31 82 20 ; peak of surround
point p5 24 89 20 ; outer edge of surround
point p6 24 93 0 ; outer edge of divot/ inner edge of mount bracket
point p7 31 93 0 ; inner peak of mount bracket
point p8 31 104 0 ; outer peak of mount bracket
point p9 24 104 0 ; outer edge of mount bracket
cpoint c1 -50 0 ; center of dome arc
cpoint c2 24 82 ; center of surround arc
arc p1 c1 p2 10 ; dome arc (replace 10 with 0 to turn off)
arc p3 c2 p4 0 ; inner half of surround arc (replace 0 with 10 to turn on)
arc p4 c2 p5 0 ; outer half of surround arc (replace 0 with 10 to turn on)
line p2 p3 0 ; cone line (replace 0 with 10 to turn on)
line p5 p6 0 ; divot line
line p6 p7 0 ; divot to peak mount line
line p7 p8 0 ; inner to outer peak mount line
line p8 p9 0 ; outer peak to mount edge line
line p9 WG0 0 ; connect woofer mount edge to waveguide line
}
Depending where you cross your tweeter you may want to modify these settings as well.
; -------------------------------------------------------
; ABEC Project Settings
; -------------------------------------------------------
ABEC.SimType = 2 ; 2= Free Space, 1= Infinite Baffle
ABEC.SimProfile = 0 ; 0 = CircSym
ABEC.MeshFrequency = 33000
ABEC.NumFrequencies = 1000
ABEC.f1 = 200 ; [Hz] (increase to your tweeter cutoff)
ABEC.f2 = 20000 ; [Hz]
I'm not sure this is the right way to approach your simulation but maybe it will give you ideas.
Last edited:
You can activate portions of the woofer in the bolded lines. If you modify the dust cap to look like your tweeter you probably want a higher resolution than I used to properly model your high frequencies (more than 10). Or maybe you don't need to worry about that in CircSym mode, I'm not sure.
Sorry. DECREASE the number. Lower than 10 not higher.
Also, I realized you might want to make the horn larger than the woofer to go from the woofer cone to a waveguide. You'd attach the start of the waveguide somewhere close to the woofer cone surround. And you might want to use R-OSSE rather than OSSE to shape and rollback the waveguide.
This is how you might start a R-OSSE from just outside the driver surround.

Source.Contours = { ; Dayton DC200-8 Woofer
zoff -30 ; -24 = external mount, -30 = flush mount, -49 = recessed mount w/ 19 mm plywood, -32 = rear flush mount
point p1 12 0 20 ; center of dome
point p2 0 35 20 ; inner edge of cone
point p3 24 75 20 ; outer edge of cone/ inner edge of surround
point p4 31 82 20 ; peak of surround
point p5 24 89 20 ; outer edge of surround
point p6 24 93 0 ; outer edge of divot/ inner edge of mount bracket
point p7 31 93 0 ; inner peak of mount bracket
;point p8 31 104 0 ; outer peak of mount bracket
;point p9 24 104 0 ; outer edge of mount bracket
cpoint c1 -50 0 ; center of dome arc
cpoint c2 24 82 ; center of surround arc
arc p1 c1 p2 10 ; dome arc
arc p3 c2 p4 0 ; inner half of surround arc
arc p4 c2 p5 0 ; outer half of surround arc
line p2 p3 0 ; cone line
line p5 p6 0 ; divot line
line p6 p7 0 ; divot to peak mount line
;line p7 p8 0 ; inner to outer peak mount line
;line p8 p9 0 ; outer peak to mount edge line
line p7 WG0 0 ; mount edge to waveguide line
}
Source.Velocity = 2 ; move in axial direction
; -------------------------------------------------------
; OSSE Horn Settings
; -------------------------------------------------------
;Throat.Diameter = 208 ; 208 = outer edge of woofer mount
;Length = 1 ; 20
;Throat.Angle = 1
;Coverage.Angle = 1 ; 20
;OS.k = 0
;Term.s = 2 ; 2
;Term.q = 0.99 ; 0.99
;Term.n = 4.54 ; 5.45
R-OSSE = {
R = 200 ;
a = 50 ;
r0 = 93 ;
a0 = 50 ;
m = 0.76 ;
r = 0.30 ;
q = 3.65 ;
k = 18.6 ;
b = 0.0 ;
arcterm = 0 ;
}
Rot = 12
This produces errors in the node formation for me. If you want to PM your ABEC project I can look to see if I can notice anything wrong.Here's a slightly simplified example giving similar results
Thanks, not sure what the point is if the example produces errors too? 🙂If you want to PM your ABEC project I can look to see if I can notice anything wrong
White silica sand. It would be completely white if I used a white cement but I didn't go to that lengths. I don't want it white anyway. I hoped for a more gray color, this is more like marble, probably I will add some pigmented finish.


Last edited:
Looking sharp. Now add a concrete enclosure and you can permanently install these in your garden. 😛
After building a bunch of waveguides, you start seeing things and wondering, "would that work as a waveguide?"
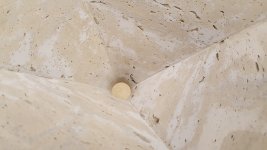
Got dinner last night and noticed the cast ceramic sink looked like a good candidate lol
Got dinner last night and noticed the cast ceramic sink looked like a good candidate lol
Or the other way - would that waveguide work as a sink? 🙂
Every waveguide can become a sink but not every sink can become a waveguide 🙂
Because for me the error is created somewhere in Ath, if you already have an ABEC project I can look at that to see if something looks wrong there.Thanks, not sure what the point is if the example produces errors too? 🙂
If I may, I would change it slightly - but not every sink can become a good waveguide 🙂Every waveguide can become a sink but not every sink can become a waveguide 🙂
There are actually a lot of sinks, acting as waveguides...
The concrete horn, right after demolding -

I never pass up a chance to post Zoolander memes even though the horn isn't finished yet. Excited to see another concrete horn in the thread. Looking forward to learning best practice with concrete + forms and molds from everyone who makes them. In addition, this shape as well as the ATHex allows additional materials. Also especially curious to see how concrete and other materials affect measurements because I'm currently struggling with measurements on a single enclosure I want to match with two different R-OSSEs. Earl Geddes mentioned how the horn material/construction can cause sound artifacts but I won't understand it until I see a practical example.
- Home
- Loudspeakers
- Multi-Way
- Acoustic Horn Design – The Easy Way (Ath4)