Hello my friends,
Today i made a new ruban with an overhung coil of 3,4cm large (till now i made only 3 cm or 2.6cm large coil) and small 8*8mm cuts instead of triangles and what do you now, in this case i dont have that nasty dip at aprox 1,2 khz but instead an even nastyer peak in the upper band.
I'll post my results tomorrow. Now i can see how is your ruban sounding Michel.
I will post my impressions tomorror too.
Cheers
Sergiu
Attachments
Hello all,
Today i will show what i just discovered this week. My research from this week is in the elastic spots (where you have to put the elastics) and a larger width coil (overhung@3.4cm width) with small cuts as yours Michel and bigger triangles like mine vs no cuts. My coments are noted into the measurement graphs and my conclusions are:
* i prefer elastics to be aded at 5mm by 5 mm (two soft elastics used and medium tensioning used);
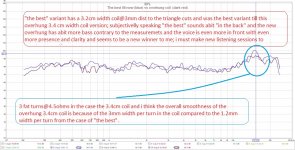
* you should try my cuts Michel (triangles described into my measurement pics)because they will transform your ruban in a better and even refined one;
* i still have to listen to them both today and take my decision for my final combo used for my personal ruban; in this final listening session i will make my decision based on the sound flavour liked and tastes, and believe me this will be a hard decision because they both sound stagerring;
*the adenum of hard laqueur is a real must to prevent bending in time (in my region the humidity is very high) and better sound dispersion perceived.
I have a one last thing to test and then i have no more tests to do. I wrote down all my ideas and discoveries on this thread and in my notebook.
Then i will start the construction phase for my last personall speaker.
Cheers
Sergiu
Today i will show what i just discovered this week. My research from this week is in the elastic spots (where you have to put the elastics) and a larger width coil (overhung@3.4cm width) with small cuts as yours Michel and bigger triangles like mine vs no cuts. My coments are noted into the measurement graphs and my conclusions are:
* i prefer elastics to be aded at 5mm by 5 mm (two soft elastics used and medium tensioning used);
* you should try my cuts Michel (triangles described into my measurement pics)because they will transform your ruban in a better and even refined one;
* i still have to listen to them both today and take my decision for my final combo used for my personal ruban; in this final listening session i will make my decision based on the sound flavour liked and tastes, and believe me this will be a hard decision because they both sound stagerring;
*the adenum of hard laqueur is a real must to prevent bending in time (in my region the humidity is very high) and better sound dispersion perceived.
I have a one last thing to test and then i have no more tests to do. I wrote down all my ideas and discoveries on this thread and in my notebook.
Then i will start the construction phase for my last personall speaker.
Cheers
Sergiu
Attachments
-
 3.4 cm coil with no cuts.jpg110.8 KB · Views: 674
 -
 9mm square cuts aded@green=elastics at 5 mm@yellow is elastics at 1 cm.jpg188.4 KB · Views: 597
 -
 Elastics at 5 mm (from top) is green and 1 cm from top is blue.jpg94.8 KB · Views: 555
 -
 no cuts vs rectangular cuts.jpg131.4 KB · Views: 550
 -
 3.4cm coil@ 9 mm square cuts aded.jpg92 KB · Views: 193
 -
 the best vs overhung.jpg185.4 KB · Views: 186
 -
 square vs rectangular cuts.jpg165.4 KB · Views: 173
 -
 small square cuts vs rectangular cuts.jpg167.9 KB · Views: 254
 -
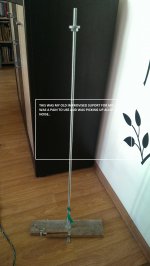
 IMAG0283.jpg751.6 KB · Views: 304
Last edited:
Hi Sergiu,i'm back from 2 weeks hollidays and i read your last posts : looks like you've finally reached the end of investigations .
can you make a brief summary of how you think your best version is ?:
what i understood is :
overhung AL coil 3 turns 6ohms
elastic suspension 5mm/5mm
Canson Paper 120G/m2 square cuts on front side triangles on the back side ?
lacquer on the wings, in the first third close to the coil
thats it ?
I permit myself a small point to discuss:
All your experimentations have been made without "baffle" (the 2 lateral cheeks V shape ) and it surely has an influence on the response arround 1000 and lower ... what you think?
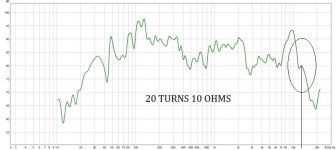
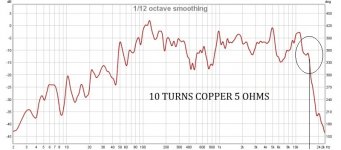
i've parallelled my coil 10 turns 3ohms , looks like the hights have significantly improved ,and i will post the curve soon
Cheers
Michel
My next experimentation is about building an AL coil with kitchen AL. i think of cutting a long ribbon arround 3mm large and stick it on a former as a coil by folding it perpendicular at each corner. The difficult part is to cut nicely a small 3mm large roll from a a kitchen roll... if you have any idea you're welcome 😉
Michel
can you make a brief summary of how you think your best version is ?:
what i understood is :
overhung AL coil 3 turns 6ohms
elastic suspension 5mm/5mm
Canson Paper 120G/m2 square cuts on front side triangles on the back side ?
lacquer on the wings, in the first third close to the coil
thats it ?
I permit myself a small point to discuss:
All your experimentations have been made without "baffle" (the 2 lateral cheeks V shape ) and it surely has an influence on the response arround 1000 and lower ... what you think?
i've parallelled my coil 10 turns 3ohms , looks like the hights have significantly improved ,and i will post the curve soon
Cheers
Michel
My next experimentation is about building an AL coil with kitchen AL. i think of cutting a long ribbon arround 3mm large and stick it on a former as a coil by folding it perpendicular at each corner. The difficult part is to cut nicely a small 3mm large roll from a a kitchen roll... if you have any idea you're welcome 😉
Michel
Here it is :
less turns (10) = more highs
unfortunatly the 2 curves were'nt done the same day and at totaly same levels so i can't conclude anything about the efficiency but no mutch difference by hearing ...
You have too mutch highs your side and your coil is 3 turns : may be 5 or more would flatten your upper frequency response ?
cheers Michel
Attachments
Hi Michel,
I'm sorry for the late replay. I will post my answers tomorrow. I'm on holydays too. 🙂
Cutting a 3mm trace for the coil from an Al kitchen foil is a piece of cake now for me. Its very simple but i have to admit that it was a real pain at the begining. I had allot of dissasters hapening at the begining but hey, it has worh it.
Cheers
Sergiu
Nope, ading more turn didnt flatten the upper responce. If i measure this speaker off axis you will see a very smooth frecv responce in the hights... That peak looks like a phenomena that's appearing very frecvent on this speaker..
Cheers
Sergiu
Ps: i made two 24 cm tall rubas to stack them on the same pole plates (motor/ruban). Will measure tomorrow.
Cheers
Sergiu
Ps: i made two 24 cm tall rubas to stack them on the same pole plates (motor/ruban). Will measure tomorrow.
Hi Michel,
I posted my answers into your post.
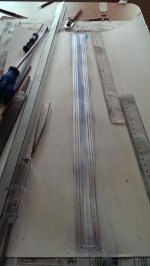
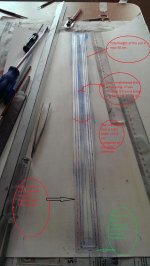
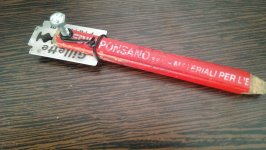
I'ved attached the tool that i used for cutting into the very thin Alu coil. 🙂 Its combined with a 50cm plastic ruler. 😎
I posted my answers into your post.
Hi Sergiu,i'm back from 2 weeks hollidays and i read your last posts : looks like you've finally reached the end of investigations .
can you make a brief summary of how you think your best version is ?:
what i understood is :
overhung AL coil 3 turns 6ohms
actually it is 4.5 ohms 😉
elastic suspension 5mm/5mm
soft elastics (two pcs twisted togheter for top and bottom) and the holes are made at 5mm from top(or bottom) and 5 mm from the edge of the last turn from the coil
Canson Paper 120G/m2 square cuts on front side triangles on the back side ?
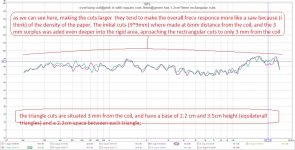
as a matter of fact there should be triangles on both sides (2.2 to 2.4cm base lenght by 3.5cm hight@equilaterall triangles)
lacquer on the wings, in the first third close to the coil
We have laqueur (for a 50cm height ruban) a spot of 17 cm wide by 50cm height (centered) on both sydes of each sheet of paper for each facecovered with a thin layer of laq for the best hight dispersion and another thin coat after the bonding process is finished, onto the 11cm by 50cm height area (centered) for increased rigidity
Then the coil has to be cutted directly onto a syde of the membrane (a ruban has two pcs of paper sheets) for low mass. After this you have to apply laq for the bonding striclty onto the 4cm by 50cm height and apply a square of super glue onto the exterior edges of the coil (very precise) and dots of super glue onto the interior of the coil (where you dont have turns). Then (a very important step) when you press the sheets to bond put something between them to open the wings so that the glue doesnt bond everithing together.
LEt the ruba dry and pressed for 24 hours than make the cuts that i mentionned in my earlyier cuts.
thats it ?
Well it seems that this is it, but you have to be extremely delicate at cutting the coils and the bonding process or else could ruin everything....
I permit myself a small point to discuss:
All your experimentations have been made without "baffle" (the 2 lateral cheeks V shape ) and it surely has an influence on the response arround 1000 and lower ... what you think?
I thing that the baflles only concentrates the sound to a smaller area and increases the spatiallity effect. Will see more after i will finish the final coils.
i've parallelled my coil 10 turns 3ohms , looks like the hights have significantly improved ,and i will post the curve soon
Cant wait to see your responce curves.
Cheers
Michel
My next experimentation is about building an AL coil with kitchen AL. i think of cutting a long ribbon arround 3mm large and stick it on a former as a coil by folding it perpendicular at each corner. The difficult part is to cut nicely a small 3mm large roll from a a kitchen roll... if you have any idea you're welcome 😉
Michel
I'ved attached the tool that i used for cutting into the very thin Alu coil. 🙂 Its combined with a 50cm plastic ruler. 😎
Attachments
Hi Michel,
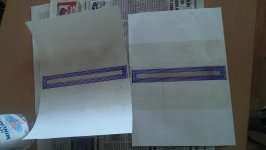
Here is an ideea of how i make my own coils. You will see in the pics bellow that first of all i roll the paper conviniently for the bonding process (for 24 to 48 hours ITS THE FIRST THING TO DO) in a way that they wil remain like rolls before bonding and assembly process. This subtle detail prevents future deformations caused by bending the cils in the final assembly and gives a legeur assembly and centering process. Then i apply the anti moisture THIN laq coat that i sayed earlyer in my posts and after complete dry (1-2hours) i apply another thin coat of laq strictly on the surface where the coil (on the paper sheet) will be bonded and cutted. Hint: make a template with paper adhesive tape first then apply the laq and the 3.4 cm width thin Al backing foil. This template will prevent spreading laq everywhere...
After applying the Al foil make the traces and spaces with a pen and then trace the coil routes with a marker so that you will not cut the coil by mistake.
Then (THIS IS VERY IMPORTANT) cut the traces fast because if tha laq completely dryies bellow the coil you could rip the traces when you take off the surpluss between the traces. Try not to touch the traces accidentally with your forearm because the traces will stick to it and will peel off and you will need to throw away the coil with the paper and make another one.
After the coil is finished, remove the marker traces from the Al with thinner then apply a VERY THIN LAYER (spread it very well) of laq onto strictly the coil and let it dry till complete dry (almost a day for laq from beneath the coil to dry) . Then solder the traces to copper wires with flux. Hint : try to take the terminal of the coil outsyde of the bonding (active area) and solder them there. This will ensure the best contact area and will help on future troubleshooting. Apply laq and close with laq and adhesive tape onto the copper wire terminals because this will prevent the wire to vibrate and snap.
The bond the sheets toghether with a square of super glue (directly onto the exterior edges of the coil) + dots in the midele and laq (on a 4 cm width by the total heights of the cil area) as i sayed in my earlyer posts and apply force directly on the 4 cm area where laq is applyied and NOT MORE and place some laudry hooks between the sheets (4 on each syde) so that the paper sheets will bond evenly stricltly onto that area. Hint: the laq is applyed first, then apply very fast the sg then bond the sheets together very fast.
Hint: stick the coil onto the finest faces of the paper because this will give the best contact possible.
DONT APPLY too much laq than i told you or then needed, because this will drop efficiency and the ruba will loose abit of responce and senzitivity because of the increased mass.
Beware of what you do and what you modify because every mistake with laq, cuts or uneven contact will modify something in the speaker responce (dB: peaks and dips, buzzing, drop in frecv or unwanted resonances). The diy making of this speaker is very delicate and sensitive and i sugest if your nor in the move or felling sick or angry STAY AWAY from the fabrication process or there will be consequencess and you will have to start all over again so another key secret is pacience.
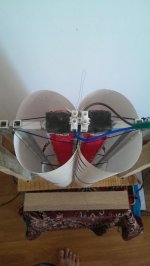
Bellow are some pics with some of my latest prototypes and my latest progress.
Cheers
Sergiu
Here is an ideea of how i make my own coils. You will see in the pics bellow that first of all i roll the paper conviniently for the bonding process (for 24 to 48 hours ITS THE FIRST THING TO DO) in a way that they wil remain like rolls before bonding and assembly process. This subtle detail prevents future deformations caused by bending the cils in the final assembly and gives a legeur assembly and centering process. Then i apply the anti moisture THIN laq coat that i sayed earlyer in my posts and after complete dry (1-2hours) i apply another thin coat of laq strictly on the surface where the coil (on the paper sheet) will be bonded and cutted. Hint: make a template with paper adhesive tape first then apply the laq and the 3.4 cm width thin Al backing foil. This template will prevent spreading laq everywhere...
After applying the Al foil make the traces and spaces with a pen and then trace the coil routes with a marker so that you will not cut the coil by mistake.
Then (THIS IS VERY IMPORTANT) cut the traces fast because if tha laq completely dryies bellow the coil you could rip the traces when you take off the surpluss between the traces. Try not to touch the traces accidentally with your forearm because the traces will stick to it and will peel off and you will need to throw away the coil with the paper and make another one.
After the coil is finished, remove the marker traces from the Al with thinner then apply a VERY THIN LAYER (spread it very well) of laq onto strictly the coil and let it dry till complete dry (almost a day for laq from beneath the coil to dry) . Then solder the traces to copper wires with flux. Hint : try to take the terminal of the coil outsyde of the bonding (active area) and solder them there. This will ensure the best contact area and will help on future troubleshooting. Apply laq and close with laq and adhesive tape onto the copper wire terminals because this will prevent the wire to vibrate and snap.
The bond the sheets toghether with a square of super glue (directly onto the exterior edges of the coil) + dots in the midele and laq (on a 4 cm width by the total heights of the cil area) as i sayed in my earlyer posts and apply force directly on the 4 cm area where laq is applyied and NOT MORE and place some laudry hooks between the sheets (4 on each syde) so that the paper sheets will bond evenly stricltly onto that area. Hint: the laq is applyed first, then apply very fast the sg then bond the sheets together very fast.
Hint: stick the coil onto the finest faces of the paper because this will give the best contact possible.
DONT APPLY too much laq than i told you or then needed, because this will drop efficiency and the ruba will loose abit of responce and senzitivity because of the increased mass.
Beware of what you do and what you modify because every mistake with laq, cuts or uneven contact will modify something in the speaker responce (dB: peaks and dips, buzzing, drop in frecv or unwanted resonances). The diy making of this speaker is very delicate and sensitive and i sugest if your nor in the move or felling sick or angry STAY AWAY from the fabrication process or there will be consequencess and you will have to start all over again so another key secret is pacience.
Bellow are some pics with some of my latest prototypes and my latest progress.
Cheers
Sergiu
Attachments


Thank you very mutch Sergiu, it will help me a lot
remember me again the liquid you use to sold coper wire on the AL coil please
cheers
Michel
remember me again the liquid you use to sold coper wire on the AL coil please
cheers
Michel
This is the best till now Michel. It has been tested and works like charm. I buyed two pcs but now i realisead that its really too much. One botle is enought for allot of coils to be made. Here is the link. The seller is very ok. I buyed from him and Wrine also... Flux Used for Soldering of Aluminum Stainless Steel Nickel Copper | eBay
Hello my friends.
I just came from a long vacation trip. I browsed the threads through the phone but its not the same.
Michell how is your progress? What did you find?
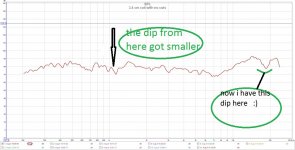
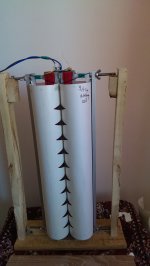
Now I want to post my the results from my small rubas @24cm@7ohm@10turns Al coil@3.4cm width@23cm tall (exterior dims).
As you can see in my pic bellow they also suffered two dips in the mids department because of the small traces (instead of large fat traces as in the 50 cm ruba). But this can be covered with ease as i tested in my earlyer posts if fatter (larger) traces are done for the coil and if, lets say, an almost 3.5 ohm impedance is not a problem for the 24cm ruban.
Stacking the small rubans together didnt gave more dB to my ears it only improved vertical dispersion, but i havent measured them stacked because if dB's where to be improved i should have perceived this as almost doubled sound pressure, but this didnt happened.
More dB's where perceived when smaller impedance was used on the JLH 69 amp, but oddly on the Jean Hiraga "Super Classe A" amp wasnt the case. I think its because of their construction (jlh has 10Wat 8ohm and 15~18w at 4 ohms and Hiraga has the same output power and controlling this aspect very well)..😎 I dont have the courage to measure the speakers through the Hiraga amp because i already fried a matched set of outputs from mistake when testing the rubans at the begining of my journey without filters.
In the 50cm ruban, the impedance is not a problem because there is allot of space to be covered by the coil.. 😉
The conclusion is that smaller rubans can be used if small impedance of 3~4ohms is not an issue. 😎
Cheers
Sergiu
I just came from a long vacation trip. I browsed the threads through the phone but its not the same.
Michell how is your progress? What did you find?
Now I want to post my the results from my small rubas @24cm@7ohm@10turns Al coil@3.4cm width@23cm tall (exterior dims).
As you can see in my pic bellow they also suffered two dips in the mids department because of the small traces (instead of large fat traces as in the 50 cm ruba). But this can be covered with ease as i tested in my earlyer posts if fatter (larger) traces are done for the coil and if, lets say, an almost 3.5 ohm impedance is not a problem for the 24cm ruban.
Stacking the small rubans together didnt gave more dB to my ears it only improved vertical dispersion, but i havent measured them stacked because if dB's where to be improved i should have perceived this as almost doubled sound pressure, but this didnt happened.
More dB's where perceived when smaller impedance was used on the JLH 69 amp, but oddly on the Jean Hiraga "Super Classe A" amp wasnt the case. I think its because of their construction (jlh has 10Wat 8ohm and 15~18w at 4 ohms and Hiraga has the same output power and controlling this aspect very well)..😎 I dont have the courage to measure the speakers through the Hiraga amp because i already fried a matched set of outputs from mistake when testing the rubans at the begining of my journey without filters.
In the 50cm ruban, the impedance is not a problem because there is allot of space to be covered by the coil.. 😉
The conclusion is that smaller rubans can be used if small impedance of 3~4ohms is not an issue. 😎
Cheers
Sergiu
Attachments


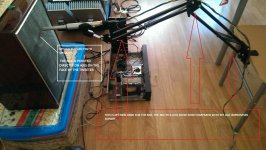
nice finding dude !! already thought it had to be something mechanical good job finding out what it was! ! cool drawing btw 🙂 haha
Hello my friend,
How are you? Have you discovered something else on the ruban or working on other things?
I found why i had those huuuuuuge 110% distorsions. It was because of the uncalibrated mic preamp... 🙂))
As you can see bellow now (with all the measuring chain calibrated) i have 2.92% second harmonic dist but this is because of the membrane wich is rubbing in my "classic" design wich is one of my first attempts from 5 months ago. I think this is still the lowest dist measure made by myself till now (compared to classic ferrite round speakers). I havent tested stats or other exotics.
You where right, this speaker does have small THD.
Cheers
Sergiu
Attachments
Last edited:
🙂 good job, 2,5 is still high what do the final ones say ?
And I indeed stopped with the rubas again I might pick It up later on🙂 I know myself can't let these rest for ever I always do this with old projects , they go in a separate box and will get them our layer in and try again 🙂
And I indeed stopped with the rubas again I might pick It up later on🙂 I know myself can't let these rest for ever I always do this with old projects , they go in a separate box and will get them our layer in and try again 🙂
Thanks my friend.
I want to show you something unteresting that i found these days after calibrating the mic preamp.
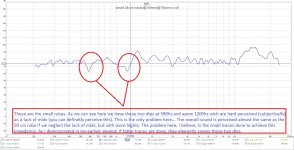
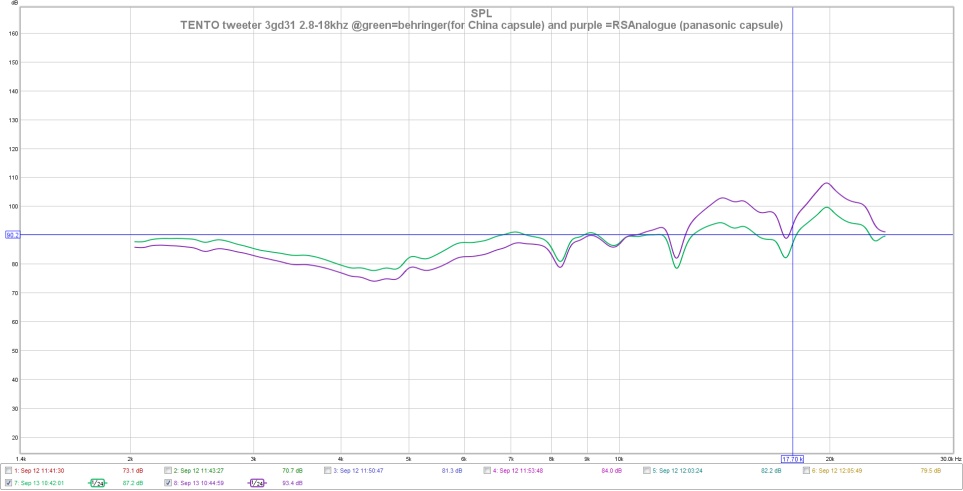
I was curious about the fact that my mic was measuring that nasty peak from 10 to 24khz in each config and each mod that i did till now, so i began to search the web to see whats going on...
And what i just found was amazing, it looks like Behringer is no longer using the Panasonic electret capsules because they are obsolete for a while. So , now they are using chinese c**p wich (because big profits expectations) are not quality controlled inspected anymore (just fault or ok pass) at the chinese fabric and at Behringer fabric we still dont know if they are QQ inspected . Unfortunatelly they did not provide a .cal file for different batches or each individual mic serial and they kept using the .cal file for the panasonic or whatever because, i found on the web a bunch of .cal files wich where not ok or incomplete, or the cal files corrected only the bass region and kept the upper region intact.
After browsing allot of hours on the web i found the recomended .cal file for the, i quote "Prime Performance, Amazing Affordability" cheap c**py chinese electret capsules, here: https://musicgroup-prod.mindtouch.u..._Can_I_Download_The_ECM8000_Calibration_Data?
Just to see if this .cal file is ok i tested it first on my old closed bafle speakers. The speakers are russian TENTO type rated at 40w sinus@89dB@63-18khz from 1987 but refurbished and changed magnets and i made custom new filters for them.
I buyed a new arm for the mic because the old one was hard to use and was picking up allot of noise, and redo the phantom and preamp psu's with quieter regulated psu's and redid a calibration for all the chain.
So theoretically, after almost 29 years the tweeter should still have +-5dB (originally it had almost +-3dB when it was new) but practically nowadays with the old .cal file from RSAnalogue (wich seemed to be the best till now) i had a huuuuge peak between 11khz to 18 khz (like my old rubans case) and a big hole between 3.5khz and 5.5khz wich is unacceptable 😡😡😡😡😡😡 😱😱😱🙁🙁🙁.
But if you look closely at the new measurements with the Behringer .cal file for China capsules you will still see an almost +-5dB from 2khz to 18khz (dont take into consideration the 20khz peak because i took the tweeter too high) wich is exactly as it should be.
I atached the pics bellow.
Cheers
Sergiu
The morale: instead of buying allot of c**p keep your money and buy a calibrated mic, or buy a cheap one and send it to calibration or if you dont have money borrow a calibrated one or else you will spent a pile of money and a ton of time correcting a problem in your accoustics that wasn't really there because the calibration file compounded a deficit in the mic.
Ps: i today i remeasured the "classic" ruban and will post the results tomorrow. It seems that in the end , my friend, Wrine,we have a +-10dB from 200hz-24khz wich is decent. That's why i couldnt hear the nasty 11khz-24khz peak, BECAUSE IT WASNT THERE....😡😡😡😡😱😱😱
I want to show you something unteresting that i found these days after calibrating the mic preamp.
I was curious about the fact that my mic was measuring that nasty peak from 10 to 24khz in each config and each mod that i did till now, so i began to search the web to see whats going on...
And what i just found was amazing, it looks like Behringer is no longer using the Panasonic electret capsules because they are obsolete for a while. So , now they are using chinese c**p wich (because big profits expectations) are not quality controlled inspected anymore (just fault or ok pass) at the chinese fabric and at Behringer fabric we still dont know if they are QQ inspected . Unfortunatelly they did not provide a .cal file for different batches or each individual mic serial and they kept using the .cal file for the panasonic or whatever because, i found on the web a bunch of .cal files wich where not ok or incomplete, or the cal files corrected only the bass region and kept the upper region intact.
After browsing allot of hours on the web i found the recomended .cal file for the, i quote "Prime Performance, Amazing Affordability" cheap c**py chinese electret capsules, here: https://musicgroup-prod.mindtouch.u..._Can_I_Download_The_ECM8000_Calibration_Data?
Just to see if this .cal file is ok i tested it first on my old closed bafle speakers. The speakers are russian TENTO type rated at 40w sinus@89dB@63-18khz from 1987 but refurbished and changed magnets and i made custom new filters for them.
I buyed a new arm for the mic because the old one was hard to use and was picking up allot of noise, and redo the phantom and preamp psu's with quieter regulated psu's and redid a calibration for all the chain.
So theoretically, after almost 29 years the tweeter should still have +-5dB (originally it had almost +-3dB when it was new) but practically nowadays with the old .cal file from RSAnalogue (wich seemed to be the best till now) i had a huuuuge peak between 11khz to 18 khz (like my old rubans case) and a big hole between 3.5khz and 5.5khz wich is unacceptable 😡😡😡😡😡😡
😱😱😱🙁🙁🙁. But if you look closely at the new measurements with the Behringer .cal file for China capsules you will still see an almost +-5dB from 2khz to 18khz (dont take into consideration the 20khz peak because i took the tweeter too high) wich is exactly as it should be.
I atached the pics bellow.
Cheers
Sergiu
The morale: instead of buying allot of c**p keep your money and buy a calibrated mic, or buy a cheap one and send it to calibration or if you dont have money borrow a calibrated one or else you will spent a pile of money and a ton of time correcting a problem in your accoustics that wasn't really there because the calibration file compounded a deficit in the mic.
Ps: i today i remeasured the "classic" ruban and will post the results tomorrow. It seems that in the end , my friend, Wrine,we have a +-10dB from 200hz-24khz wich is decent. That's why i couldnt hear the nasty 11khz-24khz peak, BECAUSE IT WASNT THERE....😡😡😡😡😱😱😱
Attachments

That sucked dude !!! Well right now you don't know where you are at at all. 🙁. So not calibrated , so it's a guessing game now. The minidsp should be calibrated , I don't know to what extend . Measuring you old speakers is not really a way of having an idea on how the curve should be . Not sure if you ever measured them with a calibrated mic in this same setup. 🙁 try get hold on a minidsp it uses usb wich also eliminates the pre amp in m opninion
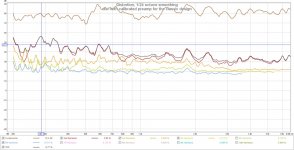
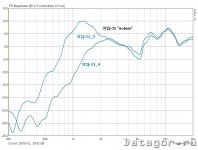
The measurement are not bad this time. You can look at this link and you will see the tweeter as it is http://www.wasp.kz/Stat_PC/multimedia/3gd-31/1_3gd-31.gif. The pics are made by a rusian fellow.
Here it is the original graph:

And here is the catalogue sheet

And here is what i russian guy measured

So i think i pretty darn close. The measurements can differ from tweeter to tweeter in time but now, with this calibration i'm there. I have readed in a blog and on a russian site that these tweeters still remains even nowadays in +-5dB from 2.5khz to 18khz.
I'm pretty satisfied now.
Cheers
Sergiu
Here it is the original graph:
And here is the catalogue sheet
And here is what i russian guy measured
So i think i pretty darn close. The measurements can differ from tweeter to tweeter in time but now, with this calibration i'm there. I have readed in a blog and on a russian site that these tweeters still remains even nowadays in +-5dB from 2.5khz to 18khz.
I'm pretty satisfied now.
Cheers
Sergiu
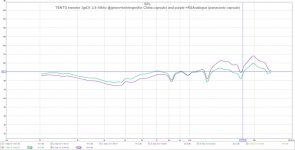
and here is another one measured in 2014 by a russian guy:
Couldnt post the graph so i will post the blog directly:
http://datagor.ru/practice/loudspea...ovok-3gd-31-novyy-vzglyad-30-let-spustya.html
You have to use google translate
and here is mine:
Couldnt post the graph so i will post the blog directly:
http://datagor.ru/practice/loudspea...ovok-3gd-31-novyy-vzglyad-30-let-spustya.html
You have to use google translate
and here is mine:
Last edited:
So basically all my old measurements graphs till now still remains good and valid if you add a +5dB from 2khz to 7khz and a rough -10db from 15khz to 24 khz. The real problem was only at the high registry where i had that peak... I'm not taking into account the 5dB lower sensitiviti from 2 to 7 khz because the graph remains the same there, only fewer dB wich is not such a big problem...
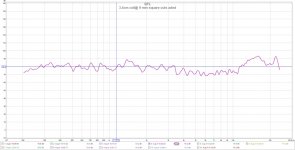
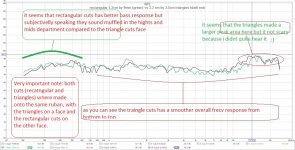
Still frustrating tough. It should have been easier to be ok from the first time... I'm really pissed right now. I cannot go back and redo the measurements alltought i still have all the previous attemps kept in my balcony. But i think i can live with that because these two variants the "classic" and the overhung 3,4 cm coil still remains the best sounding (subjectivelly speaking) till now, and everyone who listened to them till now (including two musicians) have the same opinion. Its just a matter of taste between wich one of them to chose at the end for my final version. The classic its one of my first attempts and sounds like a good tube amp and the voice is a bit in the back like you like my friend. The overhung 3.4 cm seems to have more hights and the voice is like very close, inducing the feeling like you are in the recording room and the singer sings right at you...
I told you that my ears are still valid. 😎
Even if i redo all my measurements i will still come back to the classic and overhung 3.4 cm.
Will post my final measurements about these two tomorrow.
Cheers
Sergiu
- Home
- Loudspeakers
- Planars & Exotics
- A DIY Ribbon Speaker of a different Kind