Or cheaper in Ukraine, ????? ??? ???????????? ??????
Take a look at H-30
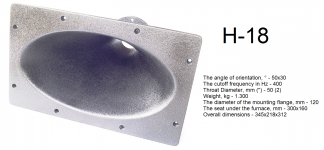
Thanks sharing, mayby their H-18 would work two-way as in builds this thread, okay dispersion is only 50*30 but throat is 2 inches which cover to middle of surround on a SB65WBAC25-4.
Attachments
Excellent! If you eq the fr so it is linear at 45dgr you should get a mild recess at 3khz for direct sound only. It could be a winner!I ended up using hot melt glue to fill the gaps and bond the insert to the horn. I was also able to shape the hot glue as it cooled to a pretty smooth profile. I then put a layer of black electrical tape over the glue for the joint temporarily for smooth transition.
Measurements show that it was quite successful in boosting the output by about +2.5dB and smoothing it out - compared to taping over the holes to simulate a pristine horn.
I concentrated on the 30 deg measurement in detail to see this effect (red=big holes, blue=repaired, green=holes taped over):
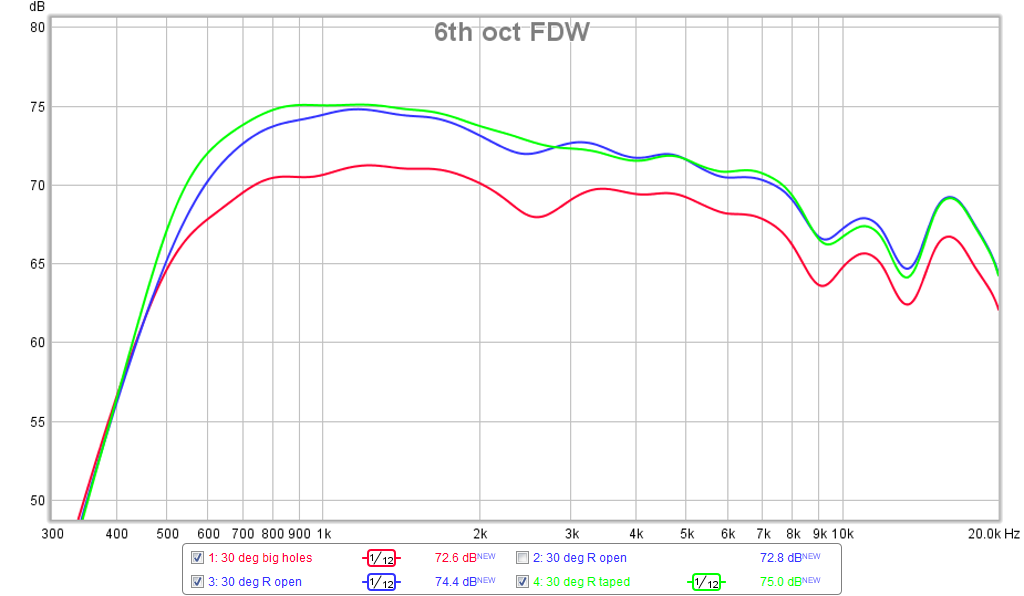
There is still a mild dip at 2.5kHz but the overall shape follows the pristine horn pretty well that I am satisfied with this performance. The taped over holes also has a bit more bass extension.
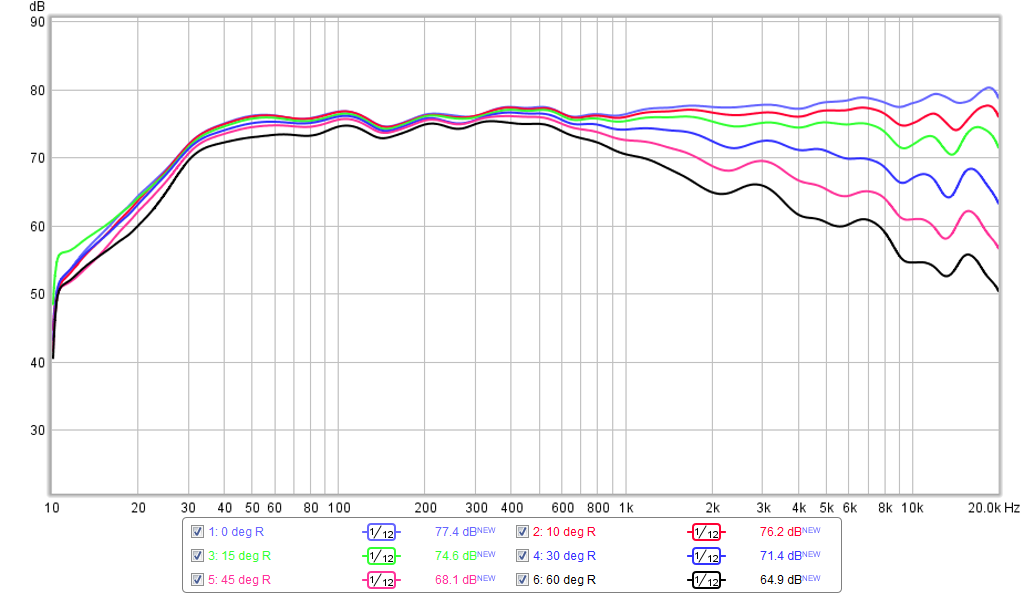
And here are polars with woofer running :
Excellent! If you eq the fr so it is linear at 45dgr you should get a mild recess at 3khz for direct sound only. It could be a winner!
Thanks! I will take a look at the EQ strategy - currently it is aiming for flat at 10deg. If I apply additional EQ based on 45deg, it would result in a mild depression over most angles at 3k whixh is sort of in the middle of the "presence" region. There is not much I can do about the resonances above 15k - probanly will leave that alone as it requires a steep Q filter that would add a lot of phase turn. But I can can get your suggestion and see what happens. I still have two more sets of 7 holes to drill and see what that does.
Progress on second woofer mount and holes
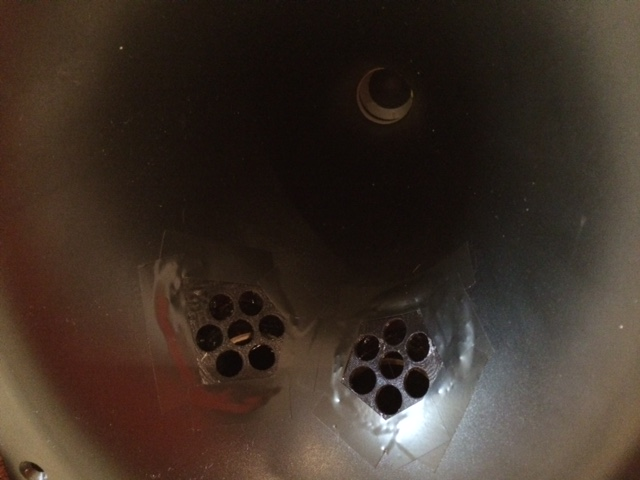
Qnty 7 x 7/16in dia holes drilled with assistance of 3d printed template:
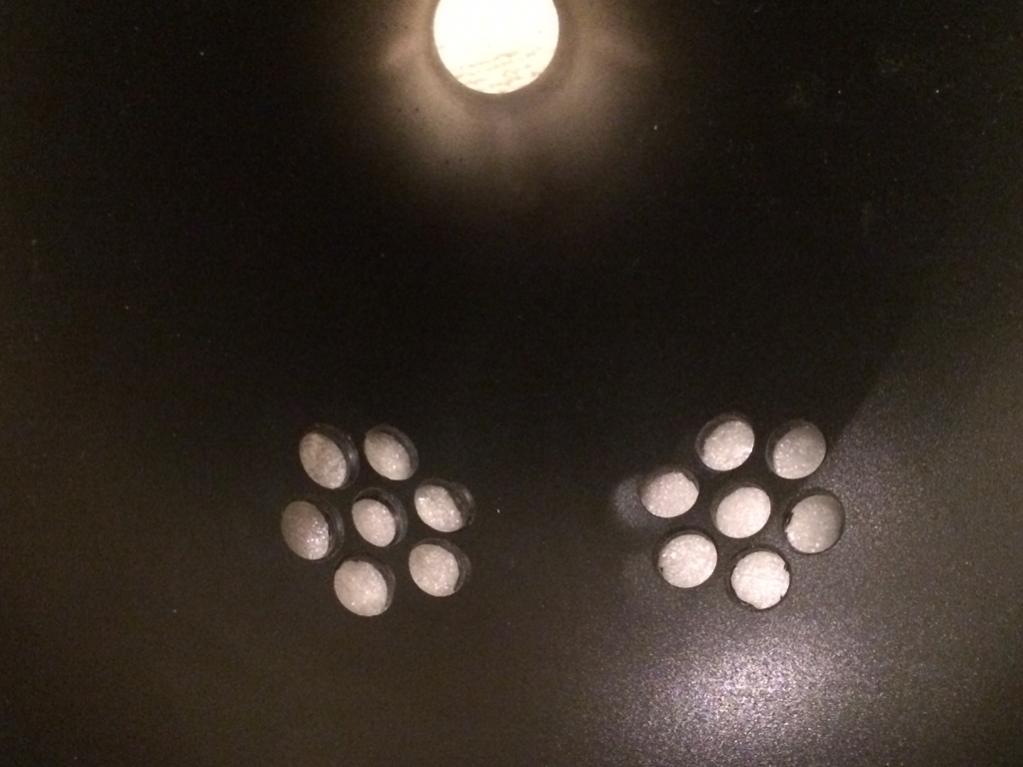
Second woofer mounted on horn:

Side view of woofers mounted on horn with ruler showing how final enclosure should be just at 17in high with wood thickness included:

I am waiting for the volume filler plug to be printed and can then mount everything together with another set of foam core spacer rings for the bezel, and then take another set of measurements.
Qnty 7 x 7/16in dia holes drilled with assistance of 3d printed template:
Second woofer mounted on horn:
Side view of woofers mounted on horn with ruler showing how final enclosure should be just at 17in high with wood thickness included:
I am waiting for the volume filler plug to be printed and can then mount everything together with another set of foam core spacer rings for the bezel, and then take another set of measurements.
Attachments

Nice work X!
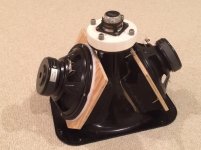
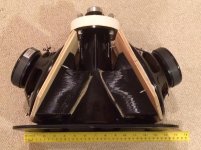
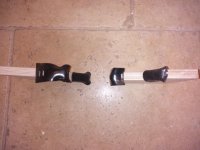
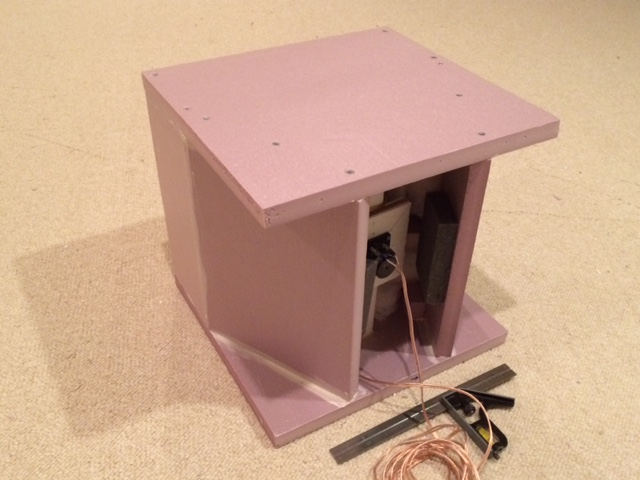
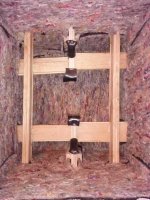
I am making progress two, here are some shots of the bracing and cradle half way through construction. You can see the sorbothane sheeting on the contact points.
I am making progress two, here are some shots of the bracing and cradle half way through construction. You can see the sorbothane sheeting on the contact points.
Attachments


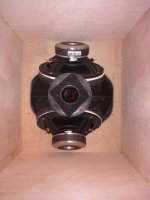
Nice work there too Bushmeister! Your box looks quite a bit bigger than minimal size needed to hold the horn. Are you aiming for a larger format or deeper bass extension with larger box volume for sealed?
I have to get to work on my "Starfish" rear chamber which is basically 5 legged radially aligned Daggers with a rear deflector cone to allow a very flat low profile yet low coloration rear sealed chamber. It will be 3d printed of course.
I have to get to work on my "Starfish" rear chamber which is basically 5 legged radially aligned Daggers with a rear deflector cone to allow a very flat low profile yet low coloration rear sealed chamber. It will be 3d printed of course.
Last edited:
I think it is a bit of an optical illusion - the sides are only an inch out from the woofer magnets and the edge of the horn - if you look at the first picture, you can see how close the front baffle edges are to the magnets/horn edge.
I think with all the bracing, the rest of the cradle in situ, all the extensional damping, rubber, wool felting etc, there will be very little room around the horn left!
I don't reckon on more the 25-30 litres once fully loaded. What I really didn't want, was to spend all this time creating a wonderful speaker design with CD, excellent FR, excellent SR, etc, etc, only to put it in a substandard box that rings and robs it of the magic.
The braces are 1 inch thick solid oak, whilst the cradle is birch ply. I will be adding further braces and layering up shortly. Then measurements will hopefully start tomorrow.....
How can anyone DIY without a mic???
Do yourself a big favor and call it a new year's present to yourself and get one. Download REW and away you go.
I like the UMIK-1. Even better, get one that is independently calibrated for $20 more from Cross Spectrum Labs.
One of the most important tools you can have as a DIY'er. The DATS v2 is the other tool.
srsly
I don't know what I would do without these two
I think it is a bit of an optical illusion - the sides are only an inch out from the woofer magnets and the edge of the horn - if you look at the first picture, you can see how close the front baffle edges are to the magnets/horn edge.
I think with all the bracing, the rest of the cradle in situ, all the extensional damping, rubber, wool felting etc, there will be very little room around the horn left!
I don't reckon on more the 25-30 litres once fully loaded. What I really didn't want, was to spend all this time creating a wonderful speaker design with CD, excellent FR, excellent SR, etc, etc, only to put it in a substandard box that rings and robs it of the magic.
The braces are 1 inch thick solid oak, whilst the cradle is birch ply. I will be adding further braces and layering up shortly. Then measurements will hopefully start tomorrow.....
Yes, it must be the wide angle lens effect. Your box is certainly well braced and sturdy. What are the external dimensions? I am going with 20/32in (16mm) ply on walls and 3/4in on front baffle. I am aiming for 11in wide x 17in tall x 13in deep.
**** For the record *** A correction on my earlier stated equivalent CSA for the ports with 7 holes. It's not 36mm dia equivalent but much smaller 29mm. However, the ports are only 1/8in deep and behind a 2in diam plenum so it may actually be much better than a 36mm dia port that is 60mm long.
Last edited:
Yes, it must be the wide angle lens effect. Your box is certainly well braced and sturdy. What are the external dimensions? I am going with 20/32in (16mm) ply on walls and 3/4in on front baffle. I am aiming for 11in wide x 17in tall x 13in deep.
External dimesions are:
18 inches wide (the horn is 15 inches wide) so with the 18mm ply wood this allows 1 inch either side clearance - just enough for damping, rubber and felt layers with a few mm to spare.
20 inches tall - Horn is 12 inches tall, but with woofers mounted on largest sides each woofer adds 2.5 inches height. So again - just over an inch clearance either side.
16 inches deep - to accommodate the rear chamber of the SB65.
X - I would strongly advise leaving at least an inch all around your horn on all dimensions - if only to stuff fiberglass in.
IMHO, suppressing standing waves and cabinet vibrations via a good quantity of stuffing and decent damping/absorption on sealed cabinet walls is really important - particularly with heavy ply - foam-core probably is already well damped, but ply needs a fair bit of extensional damping or CLD techniques to work well.
I will be using 4mm silentcoat for extensional damping, then 2mm rubber mat bonded to 15mm wool felting (this is an expensive underlay that uses 100% recycled wool felt and I have found works really well in speakers) - for further damping and absorption of reflections.
Is is probably worth making the box a little bit larger to accommodate these features rather than have to make another box further down the line, because you feel it may be colouring the sound.
X calculate the horn with volvotreter sheet, why not use the 4 pi? I have done it free air making horn much bigger, because we do not use it for PA why not use the wall, or the corner, making it considerably smaller, like you do here.
I go make horn 3.9 cm longer and throat smaller, so I can make a better plug. the sheet did calculate that conform the parameters of the speaker, now it is 14,6 cm2 and not 20,3 cm2.
thanks
I go make horn 3.9 cm longer and throat smaller, so I can make a better plug. the sheet did calculate that conform the parameters of the speaker, now it is 14,6 cm2 and not 20,3 cm2.
thanks
External dimesions are:
18 inches wide (the horn is 15 inches wide) so with the 18mm ply wood this allows 1 inch either side clearance - just enough for damping, rubber and felt layers with a few mm to spare.
20 inches tall - Horn is 12 inches tall, but with woofers mounted on largest sides each woofer adds 2.5 inches height. So again - just over an inch clearance either side.
16 inches deep - to accommodate the rear chamber of the SB65.
X - I would strongly advise leaving at least an inch all around your horn on all dimensions - if only to stuff fiberglass in.
IMHO, suppressing standing waves and cabinet vibrations via a good quantity of stuffing and decent damping/absorption on sealed cabinet walls is really important - particularly with heavy ply - foam-core probably is already well damped, but ply needs a fair bit of extensional damping or CLD techniques to work well.
I will be using 4mm silentcoat for extensional damping, then 2mm rubber mat bonded to 15mm wool felting (this is an expensive underlay that uses 100% recycled wool felt and I have found works really well in speakers) - for further damping and absorption of reflections.
Is is probably worth making the box a little bit larger to accommodate these features rather than have to make another box further down the line, because you feel it may be colouring the sound.
You are going all-in on the dampening schemes! The woofer sealed chamber handles frequencies below 600Hz for me, and hopefully, that range is not so susceptible to coloration as is the critical telephone band and midrange from 600Hz to 6kHz. I am aiming for compact and won't have much clearance, but may use non-parallel walls, open cell grey foam, BASF melamine acoustic foam (Mr Clean Magic Erasers), and fiberglass stuffing in the rest of the cavity. In my experience, this should work (although may not work as well yours). The area where having more room and great dampening is in reduction of induced noise which shows up as HD (although it may be broad spectrum sound).
For the critical telephone band, the special Starfish rear chamber on the SB65 will hopefully take care of that. If that design doesn't work, I will go with standard Dagger.
Your 18x20 baffle, although not small will give you excellent bass with less baffle step loss and the slight rectangular shape may be enough to reduce even length edge diffraction effects. You are well ahead of me with a box almost completed.
Last edited:
X calculate the horn with volvotreter sheet, why not use the 4 pi? I have done it free air making horn much bigger, because we do not use it for PA why not use the wall, or the corner, making it considerably smaller, like you do here.
I go make horn 3.9 cm longer and throat smaller, so I can make a better plug. the sheet did calculate that conform the parameters of the speaker, now it is 14,6 cm2 and not 20,3 cm2.
thanks
I am not sure why you say boundaries change the size of the horn. It changes the bass level SPL capability in that wall mount is 2pi (+3dB), floor/wall edge mount is 1pi (+6dB) and corner mount is 1/2pi (+9dB) in the bass region tapering off up to, say 900Hz. It doesn't change the lowest frequency that the horn is designed to have directivity control or horn loading gain. But maybe you are more interested in horn loading gain and are saying that if corner mounted, you have 9dB gain in low end so make horn that much smaller?
Akabak takes all that into account in where you specify reflection boundaries (the 3 types listed above) and it accounts for distance from each of those boundaries. Note that it assumes at most 3 wall as in a corner with all other walls infinitely far away as it does not do room modes.
So if you want to use corner boundary gain to get 9dB, you can probably make the low cutoff for horn gain at say 800Hz vs 400Hz and make it half the size.
I personally don't like how it sounds next to a wall or corner - I like to mount in free space on a stand for best imaging. There is floor bounce cancellation to deal with but hopefully with narrow directivity, you can reduce or avoid it.
If I fill the triangular region between the woofer boards and horn wall with expanding foam to take up volume and put this in a rectangular prism box, I still need to reduce volume by about 3 liters to hit 11 liter goal for the woofers.
If I angled the top and bottom half way like I did on uTrynergy (below), I may get exactly what I need, plus reduce parallel walls, add self bracing, make more compact.
I am not sure why you say boundaries change the size of the horn. It changes the bass level SPL capability in that wall mount is 2pi (+3dB), floor/wall edge mount is 1pi (+6dB) and corner mount is 1/2pi (+9dB) in the bass region tapering off up to, say 900Hz. It doesn't change the lowest frequency that the horn is designed to have directivity control or horn loading gain. But maybe you are more interested in horn loading gain and are saying that if corner mounted, you have 9dB gain in low end so make horn that much smaller?
Akabak takes all that into account in where you specify reflection boundaries (the 3 types listed above) and it accounts for distance from each of those boundaries. Note that it assumes at most 3 wall as in a corner with all other walls infinitely far away as it does not do room modes.
So if you want to use corner boundary gain to get 9dB, you can probably make the low cutoff for horn gain at say 800Hz vs 400Hz and make it half the size.
I personally don't like how it sounds next to a wall or corner - I like to mount in free space on a stand for best imaging. There is floor bounce cancellation to deal with but hopefully with narrow directivity, you can reduce or avoid it.
Hi X
little mistake here, I do not mean for the bass, but the whole horn respons itself, such like 300hz to 20 khz, special the 300 hz, to 1 khz part is I think what matters.
my horn is in free air bigger then on wall, with the respons 300Hz to 20 Khz.
that is what I meant. Plus I jave not such big room here, in Holland houses are not that big so need to put horns on wall, but above the floor.
regards
Bushmeister,
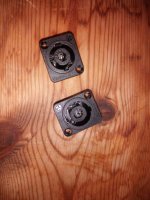
Great work on the cabinet. What are you doing for wire connections? Dual binding posts or Speakon 4-pole connectors?
Great work on the cabinet. What are you doing for wire connections? Dual binding posts or Speakon 4-pole connectors?
I may be completely off base, but when you measure HD using a frequency sweep, you have only one speaker being tested at a time, as a frequency moves accross spectrum. Would there be any modulation of the tweeter cone when woofer is moving at the same time? Kind of like intermodulation distortion measurement...

- Home
- Loudspeakers
- Multi-Way
- A Bookshelf Multi-Way Point-Source Horn