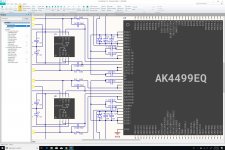
This design for connectors is bad, because it does not prevent the incorrect mounting of the DAC board on the PSU board. Instead, we need to flip one of the connectors in order to get an asymmetrical layout. We will do that in the next revision.
You should reorganize the parts layout functionally. Parts should be located very close to where they will be needed. No sense in adding unnecessary inductance to components, also the idea is to prevent unwanted electromagnetic coupling (stray coupling) between sensitive parts of circuitry. The evaluation board does a reasonably good job of that.
To clarify, from AK4499 data sheet:
EXTCL1N O External Capacitor connection pin. This pin should be
connected to 1 µF to VSSL1.
VSSL1 us the analog ground for channel L1.
I see, that makes sense. But that contradicts the schematic of page 59, which seems to combine VSSL1 and VSSR1 into a single ground, and the same for VSSL2 and VSSR2. I did what you suggested on the updated schematic. Please let me know if this is what you had in mind.
Attachments
The series resistors are chosen to dampen any ringing on the high speed digital signals. The best value depends on the particulars of the implementation. The resistor values can be determined empirically by looking at the waveforms with a good, high-bandwidth scope and adjusting resistor values to maintain nice, square waveforms without ringing or with minimal ringing at the edge transitions.
It looks like I might have bitten more than I can chew here...
Does that mean that we won't know which resistor value to use until we have made a first prototype with the final form factor and PCB layout? Can we start with the current values (51Ω + 5.1Ω) at least? And with such a tight form factor, what kind of layout should I design in order to make it easier to test different resistor values without having to do too much soldering with surface mounted components?
How high should be scope's bandwidth be? I have a 200MHz 2GSs Teledyne LeCroy WaveAce 2024. Will that be sufficient? If not, what should I get?
The clock pads are unpopulated on the eval board. With a good ground plane and distributed bypass caps, a single decoupling cap is usually preferred. However, the square edges of a clock oscillator involve frequencies at odd harmonics of the fundamental. In the can of the dac clocks clock edges frequencies would go up to several hundred MHz and perhaps above 1 GHz. In that case, very low series inductance of decoupling caps is very important. The idea is to keep the resonant frequency of the capacitance and the series inductance very high, while keeping decoupling impedance low. The book you have, Ott, describes and explains the factors you should be considering.
Fair enough, but if we wait until I've fully digested Ott's book, I think we might as well wait for AKM to release two or three more generations of DAC chips... I know that you like to make things absolutely perfect, and I do as well, but we also have to take into account my very limited knowledge and the very steep learning curve that I've put myself on... I'm not complaining here, just trying to be realistic and pragmatic. So, if we had to make an educated guess, would it be fair to say that we can start with what AKM did for their reference board, which is what I've put on the schematic?
Please let me know if this is what you had in mind.
Not exactly, what you showed before schematically was fine. In this case all grounds around the dac chip go to one local ground plane. The point was that when doing layout for the caps they should have a short physical ground path between the associated pins for that dac channel (as there will be local circulating currents through the caps and that ground path), but they should still be connected to the local analog ground plane.
If you are going to drive a remote USB board from local clocking on the dac board, you will almost certainly have to use a buffer chip to drive the lines. One line to the dac chip, and one to the USB board. Also you need two clocks, 49.152Mhz and 45.1584Mhz. The NDK SDA clocks have an enable pin to chose which one is in use. The signal telling you which clock should be enabled will come from the USB board. Each clock will need its own bypassing. There should be a dedicated 3.3v regulator for the clock modules. I would recommend to use ADM7150. The caps required for use with it are described in the applications section of the ADM7150 data sheet. For a clock buffer chip, would suggest NB3L553. Its data sheet describes what it needs in the way of bypass caps. Also, you will need a logic inverter chip to select one clock or the other based on a single signal from the USB board. The logic inverter will need power bypassing too. One example of some circuitry that shows much of what you might use can be found at: The ο1 precision master clock
Wow! This is awesome Mark. I think I now understand what has to be done. These are some of the clearest instructions you've given me so far. This is massively helpful. Thank you! I'll get working on all this right away.
Now we're starting to build our own schematic, with new content, not just replicating what AKM has done. This is really exciting...
Not exactly, what you showed before schematically was fine. In this case all grounds around the dac chip go to one local ground plane. The point was that when doing layout for the caps they should have a short physical ground path between the associated pins for that dac channel (as there will be local circulating currents through the caps and that ground path), but they should still be connected to the local analog ground plane.
Now I am really confused. So, what you're saying is that we want all these to go to the same VSSL plane essentially, instead of breaking down a VSSL layer into four separate VSSL sections. Is that correct? If so, I should go back to the original schematic indeed.
Next time, in the rare instances that I get something right, please let me know it's right. This will save me some useless iterations. Thanks!
You should reorganize the parts layout functionally. Parts should be located very close to where they will be needed. No sense in adding unnecessary inductance to components, also the idea is to prevent unwanted electromagnetic coupling (stray coupling) between sensitive parts of circuitry. The evaluation board does a reasonably good job of that.
That's very much what I am trying to do. My post was only related to the orientation of the J5 and J6 connectors, which should not be symmetrical from each other in order to prevent the incorrect mounting of the DAC board on the PSU board.
And as far as I can tell, there is no way to bring the critical components like small decoupling capacitors any closer than they are on the PCB right now.
If you see something that could be improved, let me know.
Does that mean that we won't know which resistor value to use until we have made a first prototype with the final form factor and PCB layout? Can we start with the current values (51Ω + 5.1Ω) at least?
Sure, or if the lines are very short then maybe 0-ohm resistors would be okay. That might work for clock signals to the dac chip. Lines going the the USB board would probably look better with some damping. Also, learning how to design transmission line PCB traces can help a lot with maintaining signal integrity. Connectors can appear as impedance discontinuities and cause reflections and ringing on the line. Vias are best avoided as much as possible too. Don't know what features are in the PCB design software you are using, some can do a lot of the work for you. Also, Chris719 may have some useful ideas for you on sending clock signals around 🙂
A 200MHz scope is enough to see the first odd harmonic at around 150MHz. The next odd harmonic would be up a little less than 250MHz. Normally, the specified bandwidth of a scope is where the frequency response is down 3dB, appearing about 70% of the true amplitude. Ideally, one would like to have a scope with bandwidth 10 times higher than the highest frequency to be observed in order avoid inaccuracy of the displayed waveform. With clocks and fast edges it means very expensive scopes would be needed for serious professional use. Those of us doing DIY may have to do our best with whatever we can muster. I have a 600MHz scope, but maybe someone else in the thread has a better one.
Last edited:
...<If>I get something right, please let me know it's right. This will save me some useless iterations. Thanks!
If unsure, please ask before doing work making changes 🙂
Sure, or if the lines are very short then maybe 0-ohm resistors would be okay. That might work for clock signals to the dac chip. Lines going the the USB board would probably look better with some damping. Also, learning how to design transmission line PCB traces can help a lot with maintaining signal integrity. Connectors can appear as impedance discontinuities and cause reflections and ringing on the line. Vias are best avoided as much as possible too. Don't know what features are in the PCB design software you are using, some can do a lot of the work for you. Also, Chris719 may have some useful ideas for you on sending clock signals around 🙂
A 200MHz scope is enough to see the first odd harmonic at around 150MHz. The next odd harmonic would be up a little less than 250MHz. Normally, the specified bandwidth of a scope is where the frequency response is down 3dB (IIRC). Ideally, one would like to have a scope with bandwidth 10 times higher than the highest frequency to be observed in order avoid inaccuracy of the displayed waveform. With clocks and fast edges it means very expensive scopes would be needed for serious professional use. Those of us doing DIY may have to do our best with whatever we can muster. I have a 600MHz scope, but maybe someone else in the thread has a better one.
Got it!
If we have very specific measurements to make, I have access to very high-end equipment ($500K scopes, $50K probes, that kind of stuff...) from my team in Basel, Switzerland, but they're quite busy, so I don't want to bother them too much. That being said, I'm in Europe once a month, so we can easily schedule some regular measurement sessions if necessary.
Also, they just installed their Essemtec Fox pick and place machine and an ASSCON VP800 oven. I'm going to get some training on these machines early next year, so we might be able to use them for small production runs.
I still need to find a place where I could get access to a good audio analyzer though...
Maybe my local community college has something like that...
Last edited:
If unsure, please ask before doing work making changes 🙂
I'll do that!
There is one more issue we haven't talked about: In some cases it is necessary for the dac board designer to arrange to mute the analog outputs in order to prevent pops from being heard by users. It is only an issue with certain cases involving DSD. The timing of such pops is predictable and described in AK4499 data sheet. There is also a graphical figure showing the timing. Typical solutions might involve relays to short the output to ground, FETs to do the same, or perhaps some other approach. It is something that could be done on the XLR board you have briefly referenced.
If you are going to drive a remote USB board from local clocking on the dac board, you will almost certainly have to use a buffer chip to drive the lines. One line to the dac chip, and one to the USB board. Also you need two clocks, 49.152Mhz and 45.1584Mhz. The NDK SDA clocks have an enable pin to chose which one is in use. The signal telling you which clock should be enabled will come from the USB board. Each clock will need its own bypassing. There should be a dedicated 3.3v regulator for the clock modules. I would recommend to use ADM7150. The caps required for use with it are described in the applications section of the ADM7150 data sheet. For a clock buffer chip, would suggest NB3L553. Its data sheet describes what it needs in the way of bypass caps. Also, you will need a logic inverter chip to select one clock or the other based on a single signal from the USB board. The logic inverter will need power bypassing too. One example of some circuitry that shows much of what you might use can be found at: The ο1 precision master clock
The clock modules need 3.3V, so we need to use the ADM7151, which has an adjustable output from 1.5V to 5.1V, right? The ADM7150 is fixed at 5V as far as I can tell. Or did I miss something?
There is one more issue we haven't talked about: In some cases it is necessary for the dac board designer to arrange to mute the analog outputs in order to prevent pops from being heard by users. It is only an issue with certain cases involving DSD. The timing of such pops is predictable and described in AK4499 data sheet. There is also a graphical figure showing the timing. Typical solutions might involve relays to short the output to ground, FETs to do the same, or perhaps some other approach. It is something that could be done on the XLR board you have briefly referenced.
That makes sense.
Putting that stuff on the XLR board would be best, because the DAC board will be full very quickly.
If you are going to drive a remote USB board from local clocking on the dac board, you will almost certainly have to use a buffer chip to drive the lines. One line to the dac chip, and one to the USB board. Also you need two clocks, 49.152Mhz and 45.1584Mhz. The NDK SDA clocks have an enable pin to chose which one is in use. The signal telling you which clock should be enabled will come from the USB board. Each clock will need its own bypassing. There should be a dedicated 3.3v regulator for the clock modules. I would recommend to use ADM7150. The caps required for use with it are described in the applications section of the ADM7150 data sheet. For a clock buffer chip, would suggest NB3L553. Its data sheet describes what it needs in the way of bypass caps. Also, you will need a logic inverter chip to select one clock or the other based on a single signal from the USB board. The logic inverter will need power bypassing too. One example of some circuitry that shows much of what you might use can be found at: The ο1 precision master clock
The NB3L553 is a 4:1 clock fanout buffer, but we only need two outputs for each of the two clocks, so we'll need two of these, right? And if so, why not use a pair of 2:1 buffers?
The ADM7150 is fixed at 5V as far as I can tell. Or did I miss something?
Yes, you did. From ADM7150 data sheet page 23, the part number for SOIC packaging is:
ADM7150ARDZ-3.3
or...
ADM7150ARDZ-3.3-R7
The R7 variant comes on a reel. Non-R7 comes in a tube.
Other packages also available.
The NB3L553 is a 4:1 clock fanout buffer, but we only need two outputs for each of the two clocks, so we'll need two of these, right? And if so, why not use a pair of 2:1 buffers?
How many depends on the the circuitry you design. Only one clock will need to be used at any one time.
The part mentioned has very low jitter and skew. If you have another part that is as good or better, that should also be okay.
Yes, you did. From ADM7150 data sheet page 23, the part number for SOIC packaging is:
ADM7150ARDZ-3.3
or...
ADM7150ARDZ-3.3-R7
The R7 variant comes on a reel. Non-R7 comes in a tube.
Other packages also available.
Of course! Sorry for that.
How many depends on the the circuitry you design. Only one clock will need to be used at any one time.
The part mentioned has very low jitter and skew. If you have another part that is as good or better, that should also be okay.
I see. That makes sense.
Well, if this part is known to work, I don't mind wasting two outputs. It's not like we'll find a much smaller part anyway...
- Home
- Source & Line
- Digital Line Level
- 8 × AK5578EN + 8 × AK4499EQ ADC/DAC Boards