One of the two celestions sent to me by Pat was a close match to one of the four I already measured. So now I have all the drivers I need for Bill's project. I'll post more as I progress on this.
The next step is to get the 3D printer up and running, which is a bit of an undertaking, especially for a dipstick like me. I could detail my efforts in that regard here or in a separate thread if anyone's interested.
The next step is to get the 3D printer up and running, which is a bit of an undertaking, especially for a dipstick like me. I could detail my efforts in that regard here or in a separate thread if anyone's interested.
Yes please. I've had my printer up and running for 8 months, but only recently changed over to the Volcano, as I wanted to make sure I could print well with a 0.4mm nozzle. I was/am a complete novice and so it hasn't been the smoothest of rides ... Lessons learned so far with my Creality CR10S and Cura:
1. Do the initial printer build as carefully as possible. I thought that I'd done a decent job first time round, but then re-built it when my wife insisted on having the dining table back. I definitely got the build plate running better on the second build.
2. Check how flat your build plate is - both the heated bed and the glass plate (if applicable). Mine are both cupped, and I've had to pad out various areas on the heated bed with painter's tape to try to get the glass top as flat as possible, as it helps adhesion. I'll probably end up replacing the glass at some stage.
3. Levelling the bed properly to get a good "0" z height across the build plate is crucial to getting good adhesion. I do this manually first sliding thin paper between the heated hot end and the bed at various points, and then print out single layer squares across the build plate to make sure I'm getting good adhesion everywhere. I'm now using manual mesh bed levelling to tweak things further.
4. On adhesion, I use blue painter's tape, as I only print PLA. I've tried plain glass, pritt stick on glass, normal tape, etc. Where a model has a small footprint, I print using rafts, or sometimes brims. If you can get good adhesion though, you don't need either.
5. Start with cheap PLA using your printer's stock hot-end and nozzle to get a feel for how the software and printer work. I'd then switch quite soon to better filament. I use rigid ink. At this point, it's worth checking your printer's calibration, i.e., that it extrudes 100mm when it's supposed to, etc.
6. If your prints aren't turning out quite right, there are some great trouble-shooting guides on-line with suggestions as to how to fix under- and over-extrusion, zits and blobs on the surface, and so on.
7. When I switched over to the Volcano and a 1.2mm nozzle, I've had to spend quite a lot of time messing around with different settings to get better looking prints. Flaws that aren't really an issue with a 0.4mm nozzle at 0.2mm layer heights get very visible at 0.8mm layer heights. My biggest challenge has been getting decent looking surfaces/seams, as I was getting gaps in the walls at the end of a line, and then over-extrusion at the start of the next line. The print speed, coasting, retraction and extrusion values needed to be tweaked incrementally, so as to work well together. And I adjust where the seam appears for each print. Sadly, there aren't any shortcuts to experimenting with the settings in your software for this, as each printer is likely a bit different. There also isn't much help on the internet on the right settings to use to print at the larger nozzle sizes.
8. I have to print slowly. With a 0.4mm nozzle I was able to get good looking prints at 50mm/s. With a 1.2mm nozzle, I get good prints at 4-8mm/s. Faster than this stresses the stock extruder on my printer. So, I'm still looking at a 24hrs+ to print half of Bill's waveguide. I'll have to upgrade the extruder at some point. You may be lucky and be able to print faster.
I'm now finally at the point where I'm just about ready to print the waveguides. If you need any help, please shout.
Stephen
Stephen -- I'm a little surprised at that speed. I can run about 40mm/sec with a 1mm nozzle before the heater can't keep up with the plastic flow. Do you have the 40W heater element in your Volcano? reprap.me has 80W heaters (for 24V) and 60W heaters (for 12V or 24V), though I haven't tried either.
Someone on one of the 3DP forums did an analysis that indicated the fastest (in terms of cubic mm of plastic per second) should happen with around a 0.8mm to 1mm nozzle, and a 40W heater.
I had a flat bed when I started and cheap mirror tile worked fine on mine, I later found some flat 5mm glass sheet which I'm pretty sure would hold flat even if the bed weren't. I have very good luck with PLA on glass with a coating of hair spray (but of course parts with little bed contact still need rafts). I don't sweat 'good-lucking' much on waveguide prints, I only focus on strong and stable. They look neat, but if a seam does line up or if there is a rough area or a loose strand, it's not a big deal, Have to keep in mind that the wavelengths involved are 17mm and larger. For cosmetics, coating with something after printing and painting could be done if the horn is going to be on display.
Stephen --
This isn't the discussion I read before, but similar results -- Volcano hitting extruder limit? | Duet3D
Make sure your nozzle is clear (do an "Atomic Pull" whenever you are changing filament or nozzle or when starting a big print).
Edit: found it. -- Print speed, filament, extruder, nozzle : how fast? - Filament - FolgerForum
Though it looks like your 1.2mm should actually go faster (volume/sec). And should approach about 30mm/sec (I found that chart a little optimistic, though).
Notice the comment about "insulating the hot end", too. I started with some ceramic cloth wrapped around the heat block with kapton tape, which served well for about a year. But the ceramic cloth is nasty stuff to handle (makes fingers feel funny, like fiberglass cloth) and as time goes by gets fuzzy stuff all over. I know some people have used bandage cotton instead and report good results. Just Kapton tape by itself is said to help a lot. Now I use a silicone "sock" -- I haven't done any high volume speed printing since, but it seems to work as well if not better than the cloth.
Last edited:
Bill - Thanks for those links. I'd seen the tables, but not the forum posts. I can print more quickly (up to 40 mm/sec), but layer adhesion at corners, surface quality and overhangs suffer. I use a silicon sock for the Volcano, and my part cooling fans are about as low as they can go to avoid air blowing directly on to the hot end. I don't have any blockages at the moment (but have in the past from dust on the PLA - what a pain to clear!). I've been printing at 185 after printing various temperature towers, etc. and as recommended for rigid ink PLA. I'll increase the temperature to see how that helps boost the speed. I'm running a 40w heater, and so there should be plenty of capacity there. More testing to do ... I know I shouldn't obsess about getting the waveguides 'perfect' given the wavelengths, but I'm tending towards having them visible. I've sanded some other PLA models down and painted them, and they do come out well, but it's a fair amount of work and I quite like the lined-look of the prints. Print time isn't really a big concern, although I'd prefer to get it down to less than 20 hours.
Stephen
Stephen
Stephen,
The corners are affected by acceleration and "jerk" settings, so you might get better results with different settings than you have? For what it's worth, these are what I have ATM (in the "configuration.h" file, through the Arduino program). Of course, different printer, so these may not be appropriate for yours:
--------------
#define DEFAULT_MAX_ACCELERATION { 2500, 2500, 200, 1000 }
/**
* Default Acceleration (change/s) change = mm/s
* Override with M204
*
* M204 P Acceleration
* M204 R Retract Acceleration
* M204 T Travel Acceleration
*/
#define DEFAULT_ACCELERATION 900 // X, Y, Z and E acceleration for printing moves
#define DEFAULT_RETRACT_ACCELERATION 600 // E acceleration for retracts
#define DEFAULT_TRAVEL_ACCELERATION 2500 // X, Y, Z acceleration for travel (non printing) moves
/**
* Default Jerk (mm/s)
* Override with M205 X Y Z E
*
* "Jerk" specifies the minimum speed change that requires acceleration.
* When changing speed and direction, if the difference is less than the
* value set here, it may happen instantaneously.
*/
#define DEFAULT_XJERK 7.0
#define DEFAULT_YJERK 7.0
#define DEFAULT_ZJERK 0.4
#define DEFAULT_EJERK 5.0
I use a mix of 50:50 PVA (white) glue and water brushed onto the glass bed with a brush. Heat up to 55C and let it dry and use that as the layer to print on and the print job won't accidentally peel off. Gives a nice smooth finish vs painter's tape (cheaper and faster too)
I need to get my printer repaired as nozzle is clogged and I took the extruder and filament drive mechanism apart (planetary gear system).
I need to get my printer repaired as nozzle is clogged and I took the extruder and filament drive mechanism apart (planetary gear system).
Bill - thanks - very helpful. I'd reduced the print acceleration setting, but not jerk. That's helped. I've just spent the last day re-calibrating the extruder, line width and X/Y/Z travel steps, and then tweaking the retraction, retraction prime and coast settings. I can print fairly nicely now at 12-15mm/s, and at 18mm/s on larger, less complicated pieces. I'm going to order fresh PLA and have a go at printing one of the horns.
xrk971 - thanks - that's one method that I've not actually tried yet, on the basis of the potential for me spilling the mixture everywhere! I might have to give it a go at some point.
xrk971 - thanks - that's one method that I've not actually tried yet, on the basis of the potential for me spilling the mixture everywhere! I might have to give it a go at some point.
Since I might be posting a bit in this thread, I think I should probably clue people in on what my intent is here: after Tubesguy put his unassembled Folgertech FT-5 V2 up for sale here, I decided to follow the path beaten by Bill and just clone his setup. A result of my entering into this printer project as a complete newb, there's already been a lot of PMing back and forth between Bill and I. He's been extremely patient and generous with his assistance and I hope anything I can add to this thread might be of use to someone coming at this from a starting point not dissimilar to my own.
Bill sent me a pretty comprehensive message a few months back, telling me what to expect and also suggesting which add-ons would make setup and use go more smoothly. Some of these things are purchased off-the-shelf, others are things you have to print. With the exception of the printables and a few remaining unordered bits, most of these extra materials have already arrived. If it's okay with Bill, I'd be happy to share the contents of those messages here (in condensed form) with the caveat that most of it is specific to the Folgertech FT-5 R2 printer.
I apologize if I'm derailing the thread with this little tangent. It is my goal to have two or three of these waveguides printed up before too long and in the course of doing so, maybe inspire some more folks to take the plunge.
Share away, Brinkman. The thread hasn't been all that active lately anyway, not much to derail.
(BTW, a package should be arriving before too long)
(BTW, a package should be arriving before too long)
Thanks again for sending this Bill! I'll hold onto it for the next person who chooses to tread this path....
(BTW, a package should be arriving before too long)
After a wasted day walking the aisles of my local hardware stores (and eventually, HD), I eventually found an inexpensive set of metric nut drivers with 3.0mm, 4.0mm & 5.0mm sizes but I had to go online to get them. The nearest Harbor Freight is a PIA to get to, but they do sell an inexpensive stand that I still might pick up for the printer. For now, the build starts on the kitchen table.
My silicone sheeting is still in China for all I know, hopefully it shows up in the next week. It took Matterhackers three attempts to ship me the right order. While that was a bit unnerving, I did get an extra volcano kit (incl nozzles) out of the deal.
After I get through the first portion of the printer setup I'll review your suggestions before posting them here. I might have something to add. Hopefully this will be up in the next 2-3 weeks, depending on how much free time I can scrounge.
Out of curiosity, did you ever get around to experimenting with this horn in the side-firing woofer configuration?
In this iteration, would the print still be the same, sans the woofer mounts/ports? Or do you think it would be smarter to just use the "stub" print as the basis for a side-firing build?
Last edited:
The Stub print would be more work I think -- the idea of that was for making huge horns. The full 3D printed ones also have roundovers.
You could use the same print, just block up the holes. Or if you need, I can try to redo the STL without the woofer mounts. Last time I looked, I was having trouble figuring out how to do that, but I can try again if you need.
You could use the same print, just block up the holes. Or if you need, I can try to redo the STL without the woofer mounts. Last time I looked, I was having trouble figuring out how to do that, but I can try again if you need.
I’d be willing to construct the speaker with the woofers side-firing but that’s assuming it wasn’t going to require much rework. I was just curious to see how far you went towards a revision. If modifying the STL file isn’t a trivial matter then I’m more than happy to proceed with building it as-is.
Let me take a look at it again when I can. Not feeling too well today (think I got a reaction from a flu shot).
By all means, take care of yourself first. I won’t start building the FT-5 until tomorrow evening, and that’s only if my 2-year-old daughter lets me. So no hurry.
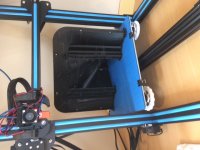
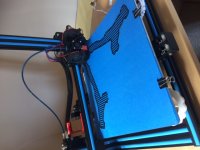
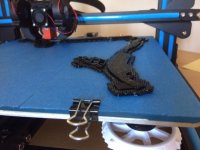
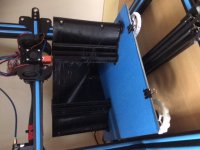
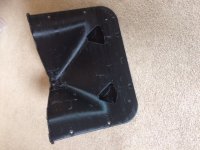
Here's my first complete half, after 26 hours and 53 mins. Unfortunately, it's warped, and so I'll have to fill and paint it. I decided to print it with a raft and supports. This was because I had to abort my first attempt after a couple of hours due to excessive sagging and even worse warping. I'll have to think about how I do the next one.
Attachments
Last edited:
What kind of nozzle and filament are you using? That's about double the time my prints took (and I had no sagging -- you might want to up the part cooling fan speed if that's PLA you're using).
- Home
- Loudspeakers
- Multi-Way
- 3D printed 3-way Unity waveguide home audio speaker