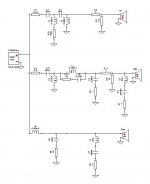
Well, I think you could actually follow my instructions going step by step with a little time (I find the best way of learning is by doing), but the hardest part for a beginner is probably going to be working out the actual xo.
Maybe give it a try but if not I've attached my XSim design below.
Understand that all you are really looking at here is a ballpark estimate - whether the drivers work well together and what level of complexity is required, ie. how many parts and therefore how expensive the xo is going to be. In the end, you should measure and then use those files to create a more accurate xo and probably tweek that a little bit by ear to personal preferences. Remember that in splicing my files, I took the more conservative route to start off with. Reality may in fact be a little different.
For me the negative take-aways from this are the extra notch filters required for the woofer and the mid and perhaps the just sort of bumpy response in the midrange.
Note that I just changed the extension on the XSim file, so just change the extension back to .dxo, and I think that should do it. Maybe make a copy and then play with what I've done in order to learn the function of some of the different filters and/or components. Ask if you are unsure about anything.
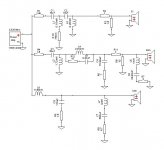
Attachments
Well, I think you could actually follow my instructions going step by step with a little time (I find the best way of learning is by doing), but the hardest part for a beginner is probably going to be working out the actual xo.
Maybe give it a try but if not I've attached my XSim design below.
Understand that all you are really looking at here is a ballpark estimate - whether the drivers work well together and what level of complexity is required, ie. how many parts and therefore how expensive the xo is going to be. In the end, you should measure and then use those files to create a more accurate xo and probably tweek that a little bit by ear to personal preferences. Remember that in splicing my files, I took the more conservative route to start off with. Reality may in fact be a little different.
For me the negative take-aways from this are the extra notch filters required for the woofer and the mid and perhaps the just sort of bumpy response in the midrange.
Note that I just changed the extension on the XSim file, so just change the extension back to .dxo, and I think that should do it. Maybe make a copy and then play with what I've done in order to learn the function of some of the different filters and/or components. Ask if you are unsure about anything.
Ok, so back to the build project 🙂 Yes, completely understand that this is ballpark and until I take real-world measurements the FR's and the XO are as close as can be.
I guess i'm at the phase I've been waiting for all along. Purchase the speakers and start the cab work 🙂 I'm thinking I might fit the drivers to a unfinished baffle rather than cut into the laminated section I have in mind, that will give me a chance to move the drivers around if the measurements aren't optimal.
Thanks once again. Will keep the thread updated with my progress and thank you in advance for help along the way.
Excited to say that i'm back on the build project, after a few months of life getting in the way 🙂
This weekend I've stripped down the existing cabs (see images) and have also been looking at the practicalities of positioning the drivers vs volume and the structure of the cab.
With regards to the positioning of the drivers (see images) I can see two options. The first is to mount the woofer lower on the baffle and divide the cab horizontally to achieve a sealed and vented enclosure. The second option is the mount the woofer higher up and divide the enclosures in a more elaborate way. Mounting the woofer higher up is my preference both aesthetically and I guess its preferable to try and keep the drivers as close to ear level as possible. My first question is.. Is the enclosure on the second option a valid design? With regards to enclosure volume; I think I might fall short by a couple of liters. Should I spread the deficit across both enclosures or reduce down either the Mid or Woofer volumes?
Existing cab strip-down
Driver positioning options.
This weekend I've stripped down the existing cabs (see images) and have also been looking at the practicalities of positioning the drivers vs volume and the structure of the cab.
With regards to the positioning of the drivers (see images) I can see two options. The first is to mount the woofer lower on the baffle and divide the cab horizontally to achieve a sealed and vented enclosure. The second option is the mount the woofer higher up and divide the enclosures in a more elaborate way. Mounting the woofer higher up is my preference both aesthetically and I guess its preferable to try and keep the drivers as close to ear level as possible. My first question is.. Is the enclosure on the second option a valid design? With regards to enclosure volume; I think I might fall short by a couple of liters. Should I spread the deficit across both enclosures or reduce down either the Mid or Woofer volumes?
Existing cab strip-down
An externally hosted image should be here but it was not working when we last tested it.
An externally hosted image should be here but it was not working when we last tested it.
An externally hosted image should be here but it was not working when we last tested it.
An externally hosted image should be here but it was not working when we last tested it.
An externally hosted image should be here but it was not working when we last tested it.
An externally hosted image should be here but it was not working when we last tested it.
An externally hosted image should be here but it was not working when we last tested it.
An externally hosted image should be here but it was not working when we last tested it.
Driver positioning options.
An externally hosted image should be here but it was not working when we last tested it.
An externally hosted image should be here but it was not working when we last tested it.
Hi spark,
Good to see you back at it again.
Let's review. According to Unibox and the manufacturers' specs:
1) the Satori only needs about 3L sealed for a Q = .7. I tend to think that's too small in terms of taking care of the backwave for a good mid, so I would would suggest something larger, maybe about 5L, for a Q around .5, but I'd have to say that 15L is much too large.
2) the Peerless looks good in about 19-20L tuned somewhere around 35Hz with a port about 2" x 9.5".
(Remember these are net volumes - the total volume minus bracing, driver volume, port volume, xo volume, etc.)
So I think you are actually in the fortunate position of having extra cabinet volume to play around with, not the other way around. What I would almost be thinking of is using your existing cabinets as a sort of shell and possibly doubling up your interior walls if you are physically able to get the wood inside and/or using more extensive bracing in the woofer chamber and some kind of rearwave strategy in the mid chamber.
In terms of driver spacing, the rule of thumb is to keep the centers of 2 different drivers spaced within a distance that is equivalent to about 1/2 the wavelength of the xo frequency. So for a tweeter and mid for eg crossed at 3000Hz, the centers should be within about 2.25", since the wavelength at 3000Hz is about 4.5" (wavelength = speed of sound/frequency, where speed of sound = 13,504"/sec). For a mid and woofer crossed at about 350Hz, you are fine with the drivers spaced under about 19.25". So realistically, you won't hear a difference with the woofer in either of your selected positions based on center to center distances. (And just to let you know, in practice this rule is very frequently broken without too much concern.)
But..... (and I think you are figuring out that there's always a 'but' 😉), woofer height from the floor does make a difference in terms of floor bounce, which tends to usually make a small difference down in the 100 - 300Hz area. I'd have to look at some sims but I think the lower position might be a little better for you but if you prefer the looks higher up, then go for that. My previous xo sim was with the woofer at about 22" above the floor. For me the decision might be based on what the existing cabinet (and cabinet bracing?) accommodates most easily. I also tend to prefer giving more internal cabinet depth behind a driver so that more stuffing can be employed to reduce the reflected energy returning back through the cone. So for this reason, I'm not keen on the internal structure of your 2nd driver position option, although to be clear I don't have any problem with the actual driver location just the depth of the internal chamber behind the woofer.
Hope that helps.
Hi spark,
Good to see you back at it again.
Let's review. According to Unibox and the manufacturers' specs:
1) the Satori only needs about 3L sealed for a Q = .7. I tend to think that's too small in terms of taking care of the backwave for a good mid, so I would would suggest something larger, maybe about 5L, for a Q around .5, but I'd have to say that 15L is much too large.
2) the Peerless looks good in about 19-20L tuned somewhere around 35Hz with a port about 2" x 9.5".
Hi jReave,
Thanks for the quick reply! Ah ok yes sorry, I read the specs as 15L from the datasheet for the Satori but forgot (its been a while) 5L was the way to go.
So I have plenty of room for the Peerless volume wise now 🙂
In my images the Peerless is at 20". I can push that to 22" but would need to move the Satori up closer to the SB tweeter. The Response Modeling didn't seem as favorable when I did that. Looking at other designs and thinking about the goal of the point source for the mid and tweeter being as close as possible, maybe I should move the mid up closer to the tweeter anyway?
Revised layout
An externally hosted image should be here but it was not working when we last tested it.
Thanks again
edit: I should be able to tweak the bracing to suit the driver layout 🙂
Sorry, my reply was a little rushed. Will investigate a rear wave strategy and I plan to upgrade the walls, now there's plenty of space to play around with 🙂
That layout looks better. Tweeter and mid spacing looks just fine like that.
If that is more or less 5L now behind the mid, I might just lower the woofer and the panel between the mid and the woofer chambers just a little to give you more than 5L so you'll have the extra volume to play with in terms of adding more wood and perhaps some panel damping material to the mid chamber. If that's not a pain to make happen. Guess you'll need to lower that bottom woofer panel as well.
For the mid chamber, depending on how much volume you have to play with, I think I would either:
1) add 2 or 3 layer of increasingly smaller extra panels of wood to the top, bottom and sides so that you end up something like an inverted cone, so the vertical cross-sectional area keeps getting smaller as the chamber gets deeper. I'll draw a picture if that's not clear, or
2) go with the diffuser strategy used here that I linked to earlier.
Plus, in a larger chamber for the mid, I also like to use very high density mineral fibre insulation in the back (something like this Roxul fibre board if you can find it and if you are inclined to pay for it because you usually have to buy a big bag of it), lighter density in the middle (something like memory foam) and then the fluffier, pillow-like stuffing stuff just behind the driver.
For the woofer chamber, I would try to do horizontal, window braces about every 5" or so, plus something vertical in the middle to prevent the braces from flexing as well. Might be easier said than done to get them in good and tight in a pre-existing cab though. If the braces may not sit perfectly tight against the panels, use a construction adhesive as opposed to wood glue though. Line the walls with either the heavy fibre board or the memory foam depending on what you have available (or both, covering the rockwool with the memory foam so that you effectively seal the Roxul stuff so it can't get into the driver or out the port).
That layout looks better. Tweeter and mid spacing looks just fine like that.
For the mid chamber, depending on how much volume you have to play with, I think I would either:
1) add 2 or 3 layer of increasingly smaller extra panels of wood to the top, bottom and sides so that you end up something like an inverted cone, so the vertical cross-sectional area keeps getting smaller as the chamber gets deeper. I'll draw a picture if that's not clear, or
2) go with the diffuser strategy used here that I linked to earlier.
Plus, in a larger chamber for the mid, I also like to use very high density mineral fibre insulation in the back (something like this Roxul fibre board if you can find it and if you are inclined to pay for it because you usually have to buy a big bag of it), lighter density in the middle (something like memory foam) and then the fluffier, pillow-like stuffing stuff just behind the driver.
Ok great. Thats all making sense and I think I should be able to source an an equivalent fibre insulation product.
With regards to the cone and layering panels. I really like that idea... The best I could think off was a single panel at 45 degrees placed in the middle of the enclosure... I've mocked up two images based on my interpretation of the cone solution. I've only layered two of the sides however understand it needs to be placed on more than that.
Option 1. Slopping inwards to the rear.
Imgur: The most awesome images on the Internet
Option 2. Pyramids 🙂
Imgur: The most awesome images on the Internet
Do either of these match your description?
Option 1 is what I was thinking of.
The inverted cone does a good job of negating reflections although it works better when it's a little longer than the depth of your cabinet. Still worthwhile though I think.
The varying internal dimensions also mean that standing waves are deterred from developing while the extra layers both stiffen the panels as well as add extra mass thereby helping to keep the panel resonance frequencies a little lower which is a good thing for the mid chamber. (For the woofer chamber, you'll be trying to raise the panel resonances by adding in the closely spaced extra bracing).
If you can put vertical braces in between the horizontal braces in the woofer chamber, you might also add one into the mid chamber to ensure thorough top to bottom stiffness.
I also forgot to mention doubling up on the front baffle thickness. I think I mentioned that before but I can't remember for sure.
Hi spark,
I think I need to amend my last recommendation re your mid chamber. I think The strategy is still good but my suggested implementation leaves a little to be desired. Here's why.
One of the oft unmentioned advantages of a 3-way over a 2-way is that you can employ different panel resonance control measures for the mid and woofer chambers. In the case of the mid, you want to try to push the frequency of the panel resonances down below the xo point and in the case of the woofer, you want to push them above the xo point.
So here's how panel resonances work:
1 - increase panel stiffness and the natural resonance goes up in frequency.
2 - increase panel mass and the natural resonance goes down in frequency.
3 - if you increase panel thickness (by glueing 2 or more boards together for eg), you are increasing both mass and stiffness. However, panel resonance frequencies go up exponentially with increases to stiffness but go down only linearly with increases to mass so therefore stiffness wins out and the resonant frequency still goes up.
For the woofer chamber then, extensive bracing divides the panels into smaller sections which will then be stiffer and therefore have higher resonances. Which is good. If there is a chance that they are still fairly close to the xo point then you may want to add panel damping so that just in case the resonance is activated, it won't ring as loud or as long.
But with my mid chamber strategy, adding the extra layers of wood will increase both mass and stiffness and so the panel resonances are going to increase and are still likely to therefore be within the passband of the mid. Not so good. What you need to do instead is add mass without adding stiffness. So a material that is heavy but not totally stiff. Which is actually the definition of panel damping materials.
So your mid chamber would benefit from the shape I suggested but made out of layers of a damping material instead of wood. Hope I'm not too late with this update.
It's up to you what material you use. Bitumen pads are standard but get expensive quickly. I've seen others use vinyl tiles, roofing tiles or even recycled car tire rubber mats. Availability and budget are my usual determining factors.
For a little more info on panel damping, try this currently active thread (although the OP is asking re a 2-way not a 3-way):
http://www.diyaudio.com/forums/multi-way/296691-damp-not-damp-sealed-enclosure-still-confused.html
Hi spark,
I think I need to amend my last recommendation re your mid chamber. I think The strategy is still good but my suggested implementation leaves a little to be desired. Here's why.
One of the oft unmentioned advantages of a 3-way over a 2-way is that you can employ different panel resonance control measures for the mid and woofer chambers. In the case of the mid, you want to try to push the frequency of the panel resonances down below the xo point and in the case of the woofer, you want to push them above the xo point.
So here's how panel resonances work:
1 - increase panel stiffness and the natural resonance goes up in frequency.
2 - increase panel mass and the natural resonance goes down in frequency.
3 - if you increase panel thickness (by glueing 2 or more boards together for eg), you are increasing both mass and stiffness. However, panel resonance frequencies go up exponentially with increases to stiffness but go down only linearly with increases to mass so therefore stiffness wins out and the resonant frequency still goes up.
For the woofer chamber then, extensive bracing divides the panels into smaller sections which will then be stiffer and therefore have higher resonances. Which is good. If there is a chance that they are still fairly close to the xo point then you may want to add panel damping so that just in case the resonance is activated, it won't ring as loud or as long.
But with my mid chamber strategy, adding the extra layers of wood will increase both mass and stiffness and so the panel resonances are going to increase and are still likely to therefore be within the passband of the mid. Not so good. What you need to do instead is add mass without adding stiffness. So a material that is heavy but not totally stiff. Which is actually the definition of panel damping materials.
So your mid chamber would benefit from the shape I suggested but made out of layers of a damping material instead of wood. Hope I'm not too late with this update.
It's up to you what material you use. Bitumen pads are standard but get expensive quickly. I've seen others use vinyl tiles, roofing tiles or even recycled car tire rubber mats. Availability and budget are my usual determining factors.
For a little more info on panel damping, try this currently active thread (although the OP is asking re a 2-way not a 3-way):
http://www.diyaudio.com/forums/multi-way/296691-damp-not-damp-sealed-enclosure-still-confused.html
Hi jReave,
I missed this reply but thankfully i'm not making any cuts until Thursday 🙂
The revised Mid chamber dampening makes sense and will mean a little less woodworking too 🙂 I can see that self adhesive bitumen pads are a much more expensive option, £100-ish for enough to dampen 2 cambers.
Here's what i've got in mind. Do you think its suitable?
https://www.amazon.co.uk/iNSpira-Vi...ords=iNSpira+Vibration/Noise+Reducing+Damping
Update: I've located a cheaper and I think better product?
https://www.polymax.co.uk/rubber-sheet/absorb-soundproofing-sound-absorbtion
Last edited:
Either one of those look like they would work fine in the mid chamber. If you wanted to also use some in on the woofer chamber walls, then the 1st one looks better, more specifically designed for that purpose.
Although it might look like it a 1st glance, I don't think there's much savings with the 2nd one for the same amount of volume of material. Plus I'm not 100% sure but it looks like the 2nd one may also require a separate glue purchase.
Both are still expensive in my opinion. I haven't done the calculations, so I'm not sure how much material you will need. Something that might also work is to combine layers of damping sheets with some layers of wood for the mid chamber, making sure that they are all glued together into one homogeneous mass. So say, 3 layers of 5mm sheets, then 1 layer of about 15mm wood, 3 more damping layers, etc. Or something like that depending on thicknesses of materials.
But then again, for the mid chamber, this strategy uses so much material, that both of the above listed damping compounds are overkill. Nothing wrong with that mind you. I'm a fan of overkill. But a simple diy remedy with some cheap heavy flexible vinyl tiles all glued together would be cheaper in the end. I think.
Your speakers. Your budget. Totally your call.
Overkill yes but I like overkill too 🙂 With regards to the wood layer option. I'm not sure if you have MDF in mind but wouldn't that increase stiffness as opposed to mass? I could create a homogeneous mass by combining thick felt, if you think that might work too?
I don't think thick felt has enough mass for very effective damping. Better at absorbing internal waves and many people use it as such.
With layers of wood + damping material + wood + damping material, the wood layers are not combined directly, so there is no increase to each wood panel's stiffness. Instead it's like separate panels of wood (almost like separate boxes inside each other actually) that are heavily damped on both sides that are all glued together so all the resonances are lowered and heavily damped. Not quite as good as using all damping material but it should cut costs just a little bit.
With layers of wood + damping material + wood + damping material, the wood layers are not combined directly, so there is no increase to each wood panel's stiffness. Instead it's like separate panels of wood (almost like separate boxes inside each other actually) that are heavily damped on both sides that are all glued together so all the resonances are lowered and heavily damped. Not quite as good as using all damping material but it should cut costs just a little bit.
I don't think thick felt has enough mass for very effective damping. Better at absorbing internal waves and many people use it as such.
With layers of wood + damping material + wood + damping material, the wood layers are not combined directly, so there is no increase to each wood panel's stiffness. Instead it's like separate panels of wood (almost like separate boxes inside each other actually) that are heavily damped on both sides that are all glued together so all the resonances are lowered and heavily damped. Not quite as good as using all damping material but it should cut costs just a little bit.
That's all makes sense. I'm going to go with all dampening material rather than layering wood and bitumen. I've located a distributor of the self-adhesive pads and i'm waiting for costs. Fingers cross, it may come in cheaper than the Amazon purchase 🙂
http://www.acoustic.co.uk/userfiles/download/Damping sheet-BIT(2).pdf
For reference, if anyone is looking for a UK suppler of DS 10 Acoustic Damping Sheet (5mm bitumen sheets with adhesive backing), most of the product for sale online seem to be manufactured by CMS Danskin UK
Type DS Acoustic Damping Sheet - CMS Danskin Acoustics
I've ordered 2 x DS 10 sheets from Insulation Express | Specialists in Insulation and Building products
jReave: My calcs for how much dampening material i'll need per cab come out 0.9 square metres. That's 5 x 5mm sheets layered, giving a total depth of 25mm per side of the mid range enclosure.
We have talked/you've already advised that the rear panel will need a different material. However one thing i'm unsure of is; the back of the baffle panel. Should I use the same material as the back panel or layer bitumen sheets?
Sorry, I don't seem to recall mentioning anything in particular about the back panel. More cabinet depth equals more room for insulation equals more absorption of the back wave, so I wouldn't increase thickness very much at the back at all. Maybe add a single 5mm sheet of damping and that's it. Catch me up on what you are thinking.
Front baffle panel? I was thinking about this the other day. Again, to keep the resonance frequency low for the mid baffle, maybe it's better to just double up the thickness of the woofer front baffle panel and keep the mid baffle 1 layer of wood only and then yes, add some damping to the back of it instead. That should keep it pretty quiet. Make sure that there is also about a 45 degree chamfer around the backside of the mid in both the wood and the damping pads so that it has plenty of room to breathe back there.
Might be a good idea to draw up a little diagram so I can have a look at it before starting in on the work?
I may have misunderstood but Roxul fibre board was a suggestion for the back panel? Its easier for me to use the bitumen sheet, so i'm good to go with that.
I'm mocked up two images for the internal dampening layout. Vertical is present in the cab but not included in the mock ups.
1. No chamfer
2.
With a 45 degree chamfer. Is this what you mean?
I've had to order the DS 10 bitumen sheets from amazon, the supplier I located had a minimum order of 10 sheets. There not much difference in cost at all.
I'm mocked up two images for the internal dampening layout. Vertical is present in the cab but not included in the mock ups.
1. No chamfer
An externally hosted image should be here but it was not working when we last tested it.
2.
With a 45 degree chamfer. Is this what you mean?
An externally hosted image should be here but it was not working when we last tested it.
I've had to order the DS 10 bitumen sheets from amazon, the supplier I located had a minimum order of 10 sheets. There not much difference in cost at all.
- Status
- Not open for further replies.
- Home
- Loudspeakers
- Multi-Way
- 3-Way Build Project - Woofer help