Not again, that's completely unnecessary. What crimes have i committed again?Now, if you proceed to press your criteria on me, I'm just going to report your posts written here
😢
Last time replying:
There is a huge difference between friendly pi$$ing contest and just pi$$ing contest; I'm all for first and never involving in second
Have your fun in thread you started with your own amp build.
Thank you.
There is a huge difference between friendly pi$$ing contest and just pi$$ing contest; I'm all for first and never involving in second
Have your fun in thread you started with your own amp build.
Thank you.

I am sorry to have started this quarrel
You didn't, just chill
And, it was not quarrel, just nuisance

Pretty near. 🙂
The amplifiers are drilled, tapped, pre-assembled and almost ready (the metalwork). And I need to take them apart and apply heatsink compound at all of the joints.
The local cap banks for each of the amps are built and almost ready, solderwork remains. They are made to be fairly easily and solidly configured as dual rail or a single rail setup.
Cap pack build. No solder yet.

Heatsink heat transfer incomplete. No heatsink compound yet.

🎺🙂🎸
Heatsink heat transfer incomplete. No heatsink compound yet.
🎺🙂🎸
I would guess that the initial start ups and test runs are just a couple a weeks away. 🎺🙂🎸
Got to find build time between the snowmobile runs, that is in prime season this time of the year here up in the north.
❄️❄️🙂❄️❄️
Got to find build time between the snowmobile runs, that is in prime season this time of the year here up in the north.
❄️❄️🙂❄️❄️
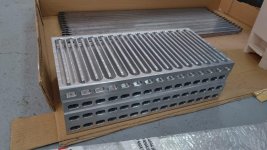
One cooling channel, almost ready. Thermal compound applied between all connecting surfaces.

Two almost ready multi purpose cooling units. Also pre drilled and ready for the LSB and SB Tokin SITs!

Configurable dual/single rail local cap pack. And the spring steel clip for the power transistor, Babelfish MF A1.

🎸🙂🎺
Two almost ready multi purpose cooling units. Also pre drilled and ready for the LSB and SB Tokin SITs!
Configurable dual/single rail local cap pack. And the spring steel clip for the power transistor, Babelfish MF A1.
🎸🙂🎺
No, it's not DanDagostino factory tour...A1 CNC-ed heatsinks...milled from one block of Alu, 400x200x30 mm.
Hope PS will be finished next week. CLC, 4x22mF (Mundorf M-Lytic AG), 300VA transformer per channel
Was listening to proto version on T-bed, still have Zen's original A1 from his early beginnings (mentioned here)
The rest of the chassis will not be finished very fast but...I want to make it unique in appearance...IMHO a very special amp
Attachments

Since i am a such a darn chicken, i have mounted the 1,3 meg bias resistors of all the bias resistors that came with the amp kit.
🙂🙂🙂
As specified in the schematics:
1,3M Ohm - 0,7A bias
820k - 1,05A
680k - 1,2A
330k - 1,7A
243k - 1,85A
What is the startup recommendation?
All possibly Ready for preliminary test this weekend!
🎺🙂🎸

🙂🙂🙂
As specified in the schematics:
1,3M Ohm - 0,7A bias
820k - 1,05A
680k - 1,2A
330k - 1,7A
243k - 1,85A
What is the startup recommendation?
- Variac and ampere/power meter
- Dim bulb setup and power meter
- Dim bulb setup, variac and power meter
- All in Cold Turkey: Just Flip it ON!
All possibly Ready for preliminary test this weekend!
🎺🙂🎸
counting it's not your first rodeo, ................ All in Cold Turkey: Just Flip it ON!

if you lean on rational side, use variac
bulb tester is for poor buggers living Variacless life

if you lean on rational side, use variac
bulb tester is for poor buggers living Variacless life
heck, even I didn't realized (till now) one funny fact - no single trimpot in amp
make your mind, assemble, shoot!

make your mind, assemble, shoot!
- Home
- Amplifiers
- Pass Labs
- MF A1, Kudos to Tim de Paravicini, Ode to my Youth, Babelfishing