Awesome work Juan.
You have the latest version of the file now. Keep going with the component ID's. Its always so much nicer to have those.
PS. NC stands for not connected so add the silkscreen text to the empty slots
We are very lucky to have Juan working on the board. He has the best sprint layout knowledge and experience of anyone I know.
Last edited:
Awesome work Juan.
You have the latest version of the file now. Keep going with the component ID's. Its always so much nicer to have those.
PS. NC stands for not connected so add the silkscreen text to the empty slots
We are very lucky to have Juan working on the board. He has the best sprint layout knowledge and experience of anyone I know.
"PS. NC stands for not connected so add the silkscreen text to the empty slots"
ok good idea ST
I learned from Alex MM, Willy and OS layout references, then me years of practice thanks ST 😀
I see OS note to add the 12 pin to Spooky got it, yes and ID to macros got it ST, is 4:37 pm local time Puerto Rico so tomorrow I will post files if I'm done of course 🙂
Last edited:
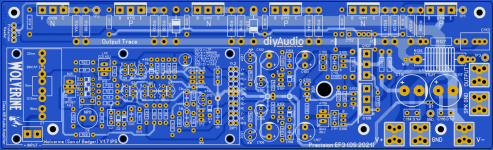
More Clearance
Hi Guys,
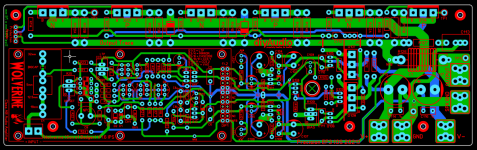
I managed to develop more clearance around the G2 Trace.
I also switched R20 / R19 as advised and made more clearance there too.
Comments in Image.
Juan, Please use this version to Continue with the BOM.
Hi Guys,
I managed to develop more clearance around the G2 Trace.
I also switched R20 / R19 as advised and made more clearance there too.
Comments in Image.
Juan, Please use this version to Continue with the BOM.
Attachments
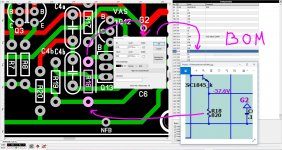
oh nice ok ok, I was doing the Spooky pins are complete not the BOM yet so I'm gonna continue with BOM for the DIYWolverine version you just posted cool 🙂 here are the files sprint for the Spooky IPS with 12 pins now and the blank IPS board too
Attachments
Perfect.oh nice ok ok, I was doing the Spooky pins are complete not the BOM yet so I'm gonna continue with BOM for the DIYWolverine version you just posted cool 🙂 here are the files sprint for the Spooky IPS with 12 pins now and the blank IPS board too
Thanks Juan.
I sure OS will appreciate it.
Thanks Juan!oh nice ok ok, I was doing the Spooky pins are complete not the BOM yet so I'm gonna continue with BOM for the DIYWolverine version you just posted cool 🙂 here are the files sprint for the Spooky IPS with 12 pins now and the blank IPS board too
Have you any progress to the protection pcb? 😉


Hi Guys,
I just ran a current check on all resistors using 65v rails.
Hopefully it will help with your resistor selection.
Check the attached spreadsheet.
View attachment 945590

I just ran a current check on all resistors using 65v rails.
Hopefully it will help with your resistor selection.
Check the attached spreadsheet.
View attachment 945590
Attachments
Last edited:
Almost RTM ??
V1.6.4b (attached).
This is the main project. I like the wolverine , but I like the Spook more.
Attached is the current spook (LT and sprint) .
I'm going to make it easy for the more adventurous in the build guide.
I will explain how a standardized current VAS full IPS can be swapped
for any other IPS.
I have other designs , 10K OEM schematics could be inspiration. 😀
This could be the ultimate class AB "devious playground".
Good thing is , after the Slewmaster .... I know it all works. 0 error.
Hellraiser CFA/ Spook have the Hawksford Cascode. This is why I call
it spooky. Nikko amps use the Hawkford , EF3+ hawksford = sit back
and listen to (really pure) 200w peaks ....wow !!
OS
Attachments
Last edited:
Peerless by Tymphany 835017 12" Aluminum Cone XXLS Subwoofer
Got 2 of these.
Wolverine Xmaxes these , too.
Tool , Pneuma .. yikes!
OS
Got 2 of these.
Wolverine Xmaxes these , too.
Tool , Pneuma .. yikes!
OS
What is the plan for the amp distribution within diyaudio store?
Alternatively, is there a gerber file for the PCB that can be sent to production and a BOM?
thanks
Alternatively, is there a gerber file for the PCB that can be sent to production and a BOM?
thanks
V1.6.4b (attached).This is the main project. I like the wolverine , but I like the Spook more.
Attached is the current spook (LT and sprint) .
OS, just to clarify...the thread title is DIYA store "Wolverine"...will there also be a DIYA store PCB for the Spooky?
Hi OS,
I believe that the PCB is now ready. 🙂
I have been checking it for most of the day.😱
I have reviewed everything including the BOM that
Juan kindly created.😀
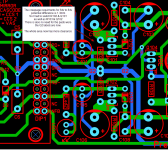
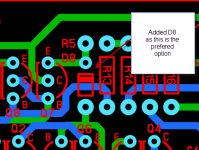
I found a few small thing which I fixed and I also found this
Please see the attached image.
D8 was not actually drawn in, it was only the option R5.
So I updated it to make D8 the primary component and R5 the option.
Also OS what is the value you wish to assign to R5 if it was to be used.
I used a * to indicate that R5 and D3 are options.
Please also look at the silkscreen. Has anything been missed?
Can someone else please review this sprint layout BOM and provide any feedback before the final version is posted.
I believe that the PCB is now ready. 🙂
I have been checking it for most of the day.😱
I have reviewed everything including the BOM that
Juan kindly created.😀
I found a few small thing which I fixed and I also found this
Please see the attached image.
D8 was not actually drawn in, it was only the option R5.
So I updated it to make D8 the primary component and R5 the option.
Also OS what is the value you wish to assign to R5 if it was to be used.
I used a * to indicate that R5 and D3 are options.
Please also look at the silkscreen. Has anything been missed?
Can someone else please review this sprint layout BOM and provide any feedback before the final version is posted.
Attachments
Last edited:
I had to move the input terminal over just a little to allow for the outside dimension of the hexagonal stand off.
We can't just allow for the hole in that location.
We can't just allow for the hole in that location.

- Home
- Amplifiers
- Solid State
- DIYA store "Wolverine" (Son of Badger) .... suggestions ??