As I added more coats of varnish the finish was getting too glossy for my liking. It was also becoming a bit uneven. It just wasn't looking right. Luckily I found a half tin of a water based matt finish polyurethane varnish left over from a previous project. I sanded the cabinets back until all the gloss was broken then applied the new varnish. The colour is a bit lighter in shade and has a more golden tone. The surface now has a lustre more like bare skin. This definitely adds to the organic aesthetics of the cabinets. Kind of lucky that the finish started mucking up as I wouldn't have tried the matt varnish otherwise. In all of the excitement of rescuing the finish and making the sockets I forgot to photograph this stage.
To mount the sockets I first drilled 6mm holes slightly shallower than the length of a socket. This was so a small copper button would sit just proud of the surface. These holes were then tapped with an M8 tap. An undersized tap drill was used to make the thread tighter. A 4mm hole was drilled through the cabinet from the back of the tapped hole for the cable run. I had to buy an extra long bit to do this as the cabinet wall is about 100mm thick at this point.
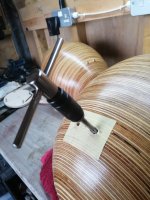
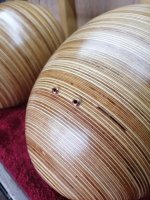
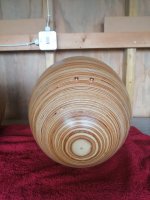
I got really stuck trying to find an elegant way of labeling the sockets. In the end I decided to leave them unlabelled and just remember that, looking from the front, red is on the right.
Niffy
To mount the sockets I first drilled 6mm holes slightly shallower than the length of a socket. This was so a small copper button would sit just proud of the surface. These holes were then tapped with an M8 tap. An undersized tap drill was used to make the thread tighter. A 4mm hole was drilled through the cabinet from the back of the tapped hole for the cable run. I had to buy an extra long bit to do this as the cabinet wall is about 100mm thick at this point.


I got really stuck trying to find an elegant way of labeling the sockets. In the end I decided to leave them unlabelled and just remember that, looking from the front, red is on the right.
Niffy
An airtight contact is important for pure copper, I'd be inclined to lubricate/grease it.
I was going to varnish my speakers and used grain filler in preparation, however it left such a good finish I just waxed over it.
I was going to varnish my speakers and used grain filler in preparation, however it left such a good finish I just waxed over it.
Last edited:
All is not as it seems
Here is a reminder of the internal shape of the cabinet.
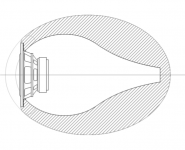
When I was fitting the sockets I played around with the old knuckle rap test. When rapping the cabinet anywhere on the rear two thirds it sounded like knocking on a mature beech tree, really dead. Knocking near the front resulted in a sound that sounded as if the cabinet was made of ceramic. This would suggest that the cabinet is extremely rigid. Initially I was worried that this could result in exaggerated high frequency due to cabinet ringing. Further investigation revealed that the ceramic like sound was not due to the cabinet. Knocking on the cabinet put energy into the air of the bowl. The energy was channelled to the rear by the logarithmic cone that acts like an ear trumpet. It then reflected of the small rear panel and was amplified by the cone that now acted as a horn and projected it out through the front of the cabinet. This is the "beaming like a laser" that Dave mentioned. At this stage the cabinet was completely empty so this result is to be expected. Next I inserted a rolled up duster into the very back of the cone. Now knocking anywhere on the cabinet produced the same dead sound as previously produced by knocking on the rear.
The addition of the duster cannot have damped the cabinet itself. The duster only occupied the last couple of inches of the cone where the cabinet is very thick. It is also located at the other end of the cabinet from where it is being knocked. The sound that was previously produced was not that of the cabinet, it was the sound of the air within it. Just a small amount of wadding completely absorbed this. Talking into the opening at the front of the speaker with the wadding in place seemed to have no reflection, like talking in an anechoic chamber.
This is a great result. It shows that the internal structure of the cabinet should completely absorb the energy from the rear of the driver.
Niffy
Here is a reminder of the internal shape of the cabinet.

When I was fitting the sockets I played around with the old knuckle rap test. When rapping the cabinet anywhere on the rear two thirds it sounded like knocking on a mature beech tree, really dead. Knocking near the front resulted in a sound that sounded as if the cabinet was made of ceramic. This would suggest that the cabinet is extremely rigid. Initially I was worried that this could result in exaggerated high frequency due to cabinet ringing. Further investigation revealed that the ceramic like sound was not due to the cabinet. Knocking on the cabinet put energy into the air of the bowl. The energy was channelled to the rear by the logarithmic cone that acts like an ear trumpet. It then reflected of the small rear panel and was amplified by the cone that now acted as a horn and projected it out through the front of the cabinet. This is the "beaming like a laser" that Dave mentioned. At this stage the cabinet was completely empty so this result is to be expected. Next I inserted a rolled up duster into the very back of the cone. Now knocking anywhere on the cabinet produced the same dead sound as previously produced by knocking on the rear.
The addition of the duster cannot have damped the cabinet itself. The duster only occupied the last couple of inches of the cone where the cabinet is very thick. It is also located at the other end of the cabinet from where it is being knocked. The sound that was previously produced was not that of the cabinet, it was the sound of the air within it. Just a small amount of wadding completely absorbed this. Talking into the opening at the front of the speaker with the wadding in place seemed to have no reflection, like talking in an anechoic chamber.
This is a great result. It shows that the internal structure of the cabinet should completely absorb the energy from the rear of the driver.
Niffy
An airtight contact is important for pure copper, I'd be inclined to lubricate/grease it.
Good plan. I might try that. Thanks.
Niffy
Beautiful workmanship !
How will be the driver wire soldered to the sockets. I guess you will have to solder wire to the copper socket then insert soldered wire in threaded hole and then to removable tags ?
regards
How will be the driver wire soldered to the sockets. I guess you will have to solder wire to the copper socket then insert soldered wire in threaded hole and then to removable tags ?
regards
Hi Hiten,
The socket has the wire soldered into the back of it as shown in this photo. The cable was pre-soldered to the socket before the socket was fitted to the cabinet. I just had to make sure that I rotated the cable as I screwed in the socket to prevent the cable from twisting.
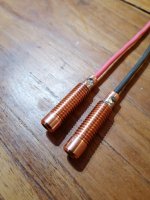
The wire is 2.5^2mm solid core and will be soldered to the tags on the driver.
Niffy
The socket has the wire soldered into the back of it as shown in this photo. The cable was pre-soldered to the socket before the socket was fitted to the cabinet. I just had to make sure that I rotated the cable as I screwed in the socket to prevent the cable from twisting.

The wire is 2.5^2mm solid core and will be soldered to the tags on the driver.
Niffy
Yes, beautiful workmanship. I also like boiled linseed oil for the similar matte/satin deep rich lustre. The oil absorbs into the wood deeply and brings out its natural organic color. The oil hardens and cures to give a hard finish that can be buffed to a satin finish. Wet sanding the second coat with 600 grit paper while oil is wet really makes a nice finish ad the particles of self colored wood mixes with the oil binder (just like oil paint) and fills all the little voids and nooks and crannies for a smooth surface.
This is a great result and similar to my experience with the Dagger rear chamber. The stuffing can be made progressively denser near the back vertex. Lining the walls near the front first 3in or so with felt or melamine foam also helps to absorb the circular tangential and radial reflection modes.
The sound that was previously produced was not that of the cabinet, it was the sound of the air within it. Just a small amount of wadding completely absorbed this. Talking into the opening at the front of the speaker with the wadding in place seemed to have no reflection, like talking in an anechoic chamber.
This is a great result. It shows that the internal structure of the cabinet should completely absorb the energy from the rear of the driver.
This is a great result and similar to my experience with the Dagger rear chamber. The stuffing can be made progressively denser near the back vertex. Lining the walls near the front first 3in or so with felt or melamine foam also helps to absorb the circular tangential and radial reflection modes.
Last edited:
Different ways of absorbing the back wave are interesting, the idea behind the VTL's shallow cabinet is to push the frequency of the reflected wave up high enough so it's easily absorbed.
Hi. Nice project so far.
I was wondering about the internal shape that is designed to absorb the back wave. How does that line up with aiming for a Q of 0.65 with the appropriate volume? According to xrk971's experiments, An Objective Comparison of 3in - 4in Class Full Range Drivers, the freq response is similar to that of a large open baffle (approaching an infinite baffle). Absorbing the back wave also flattens the impedance peak as we discussed here A question about mid-tweeter transmission lines. It seems you would not have the response you were aiming for. I'm just trying to get my head round it.
I was wondering about the internal shape that is designed to absorb the back wave. How does that line up with aiming for a Q of 0.65 with the appropriate volume? According to xrk971's experiments, An Objective Comparison of 3in - 4in Class Full Range Drivers, the freq response is similar to that of a large open baffle (approaching an infinite baffle). Absorbing the back wave also flattens the impedance peak as we discussed here A question about mid-tweeter transmission lines. It seems you would not have the response you were aiming for. I'm just trying to get my head round it.
Hi Stal,
At very low frequency you don't so much have pressure waves propagating through the cabinet as having bulk pressurisation and rarifaction of the entire volume. At low frequencies the cabinet acts as a traditional well stuffed acoustic suspension. As the frequency increases and the a quarter wavelength starts to become shorter than the depth of the cabinet, around 250hz, the absorption line effect becomes dominant.
I am not aiming to produce a closed transmission line, this would require the logarithmic cone to be around a metre long. A transmission line this length would have a much greater volume and would not act as an acoustic suspension. If it did you would probably get a rather low Q, 0.5-0.55.
I'll attempt to read through the threads that you have linked to but as they are quite long this might take a while (especially as I anticipate being distracted by new speakers soon)
Niffy
Yes thats what I was little worried about. Looks like robust and well made.I just had to make sure that I rotated the cable as I screwed in the socket to prevent the cable from twisting.
regds.
To summarise, xrk971 uses a sealed 'Dagger' or 'Cone' in many of his designs, 10F/8424 & RS225-8 FAST / WAW Ref Monitor, which he says approximate to his open baffle test board. Also Dave 'planet10' often uses a short tapered but open ended transmission line to the same affect. These designs are not large or long. I'm seeking clarity for my own WAW build which is not quite finished.Hi Stal,
At very low frequency you don't so much have pressure waves propagating through the cabinet as having bulk pressurisation and rarifaction of the entire volume. At low frequencies the cabinet acts as a traditional well stuffed acoustic suspension. As the frequency increases and the a quarter wavelength starts to become shorter than the depth of the cabinet, around 250hz, the absorption line effect becomes dominant.
I am not aiming to produce a closed transmission line, this would require the logarithmic cone to be around a metre long. A transmission line this length would have a much greater volume and would not act as an acoustic suspension. If it did you would probably get a rather low Q, 0.5-0.55.
I'll attempt to read through the threads that you have linked to but as they are quite long this might take a while (especially as I anticipate being distracted by new speakers soon)
Niffy
Finishing touches
I've completed the final stages of construction.
First off I have stuffed the cabinets. I am using twaron elves hair from mundorf. It is a chopped strand aramide fibre very similar to kevlar. A small amount fluffs up a surprising amount. Mundorf recommends using 10g per litre. This would require 45g per cabinet so this is the amount that I started with. I inserted the elves hair so that there is an equal amount per unit length of the cabinet. This means that the stuffing is around 35 times as densely packed at the rear of the cabinet as in the centre of the main bowl. In the end I settled on using 37g per cabinet. The hair being very loosely packed just behind the driver and packed about as tightly as I could at the back.
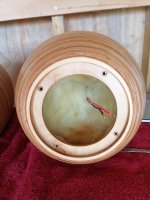
Mounting the drivers was a little more difficult than in a square box, the cabinet had a habit of rolling around and there was nowhere to rest the driver whilst attaching the cables. The technique that worked was to sit the cabinet on a folded up towel and attach the driver with extra long bolts. A small set of mole grips helped. This way I had both hands free for soldering. The driver could then be slid down the bolts which were then replaced with shorter ones.
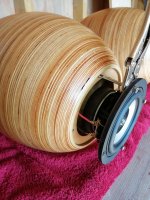
The bolts used are black stainless steel button heads with a hex socket. These are surprisingly expensive compared to regular stainless and look a lot nicer than standard black high tension bolts.
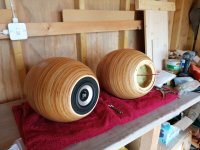
The rebate for the driver turned out to be accurate to within a tiny fraction of a millimetre. The driver sits perfectly flush with the front of the cabinet with absolutely no gap visible around the edge.
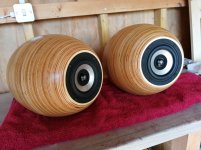
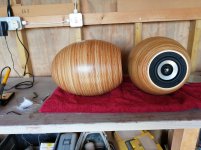
The shape and finish are pretty much perfect. They definitely don't fall into the boring square box category so at least one of my design goals has been met.
Niffy
I've completed the final stages of construction.
First off I have stuffed the cabinets. I am using twaron elves hair from mundorf. It is a chopped strand aramide fibre very similar to kevlar. A small amount fluffs up a surprising amount. Mundorf recommends using 10g per litre. This would require 45g per cabinet so this is the amount that I started with. I inserted the elves hair so that there is an equal amount per unit length of the cabinet. This means that the stuffing is around 35 times as densely packed at the rear of the cabinet as in the centre of the main bowl. In the end I settled on using 37g per cabinet. The hair being very loosely packed just behind the driver and packed about as tightly as I could at the back.

Mounting the drivers was a little more difficult than in a square box, the cabinet had a habit of rolling around and there was nowhere to rest the driver whilst attaching the cables. The technique that worked was to sit the cabinet on a folded up towel and attach the driver with extra long bolts. A small set of mole grips helped. This way I had both hands free for soldering. The driver could then be slid down the bolts which were then replaced with shorter ones.

The bolts used are black stainless steel button heads with a hex socket. These are surprisingly expensive compared to regular stainless and look a lot nicer than standard black high tension bolts.

The rebate for the driver turned out to be accurate to within a tiny fraction of a millimetre. The driver sits perfectly flush with the front of the cabinet with absolutely no gap visible around the edge.


The shape and finish are pretty much perfect. They definitely don't fall into the boring square box category so at least one of my design goals has been met.
Niffy
Elves hair? Hmmm... ;-) I notice that Hificollective no longer sells it but the hair of angels or unicorns is still available. [sigh]
On this side of the pond I'd have been expecting you'd be using Acousta-stuf which seems similar, maybe?
http://www.madisound.com/pdf/acousta-stuff.pdf
In a much less tapered line (a transmission line) Roger Sanders specified "constant impedance" stuffing -- which in the end meant he added a handful or two of extra stuffing behind the driver.. the opposite of your scheme. But then yours is a closed path.
I think you hit the bull's eye with the finish. Very lovely.
They're smaller than I imagined though. And now my imagination w.r.t. stands has veered somewhat:
https://vignette.wikia.nocookie.net/memoryalpha/images/2/21/Apollo%27s_hand_grips_the_Enterprise%2C_remastered.jpg/revision/latest?cb=20090326204341&path-prefix=en
Last edited:
I had a question:
With all the cabinet material at the rear how are they for balance?
Does the weight of the driver at the front balance out the weight of the ply at the back?
With all the cabinet material at the rear how are they for balance?
Does the weight of the driver at the front balance out the weight of the ply at the back?
@scott
Effy said he has a unique idea.
While we're waiting (patiently) for the reveal I was just egging him on. ;-)
Effy said he has a unique idea.
While we're waiting (patiently) for the reveal I was just egging him on. ;-)
- Home
- Loudspeakers
- Full Range
- Jordan Eikona Translam Ellipsoid
