Carlos Blake mk
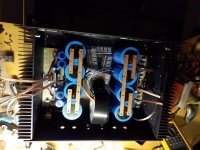
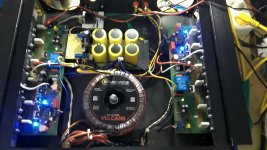
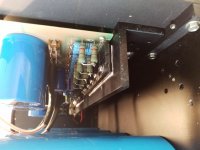
Can't wait to power up the dx blame mkiii by Carlos, just waiting for akane emitter resistors, the amp holds two 1200 watt toroidals, only one shown, capacitors are sprauge 21000uf 100v
Can't wait to power up the dx blame mkiii by Carlos, just waiting for akane emitter resistors, the amp holds two 1200 watt toroidals, only one shown, capacitors are sprauge 21000uf 100v
Attachments

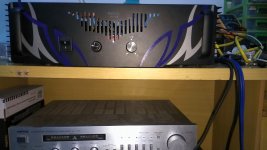
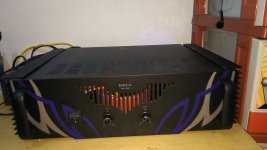
😛..let's hope the monster sings like an angel..Holy, man!
What a monster 😀

First DIY up and running!


Long post, sorry! I'm just very excited I actually made a working thing.
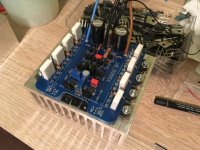
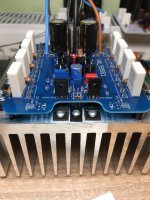
Got my MX50SE stereo prototype build put together and tested this weekend. I'm in the process of making a wooden enclosure with the same dimensions of a MacBook Air box (+1" height for heatsink clearance) so that's why the components are residing in one currently 🙂 Everything fits with room to spare I just have the heatsink outside the box for ease of hookup.
The preamp/toneboard is powered on but not connected because it's an utter piece of garbage. Stay away from any double NE5532 pre kits that at all resemble this one. It clips to hell with any added bass or if turned up more than halfway. Also it's a linear volume pot instead of logarithmic so the first quarter turn does nothing and then the volume jumps up quickly. Junk.
I have a Chromecast Audio hooked directly to the amp modules so I can use my phone to control volume--which is good because these things are LOUD. The sound is crystal clear, no audible distortion or clipping even at an uncomfortable volume. There's absolutely no hiss or hum either which I was surprised about because I have all signal/power grounded to a ground bus on the PSU board and then protective earth from the mains cable hooked directly to the bus as well.
The heatsink was pulled from a Sony two channel receiver with four small Sanken output transistors. I was delighted to find that the screw taps on the sink perfectly fit one of the wide output Sankens on each of the MX50SE boards. The other two are temporarily clamped until I can drill and tap a spot for them.
Other than that I just gotta get an IEC fused power socket, RCA jacks, speaker posts, clean up and make permanent all the internal wire connections, figure out if I'm going to use coax or twisted pair RCA cable for the input signal, and stuff it all in a box!
A huge thank you to this forum for the help and inspiration to do this!
Long post, sorry! I'm just very excited I actually made a working thing.
Got my MX50SE stereo prototype build put together and tested this weekend. I'm in the process of making a wooden enclosure with the same dimensions of a MacBook Air box (+1" height for heatsink clearance) so that's why the components are residing in one currently 🙂 Everything fits with room to spare I just have the heatsink outside the box for ease of hookup.
The preamp/toneboard is powered on but not connected because it's an utter piece of garbage. Stay away from any double NE5532 pre kits that at all resemble this one. It clips to hell with any added bass or if turned up more than halfway. Also it's a linear volume pot instead of logarithmic so the first quarter turn does nothing and then the volume jumps up quickly. Junk.
I have a Chromecast Audio hooked directly to the amp modules so I can use my phone to control volume--which is good because these things are LOUD. The sound is crystal clear, no audible distortion or clipping even at an uncomfortable volume. There's absolutely no hiss or hum either which I was surprised about because I have all signal/power grounded to a ground bus on the PSU board and then protective earth from the mains cable hooked directly to the bus as well.
The heatsink was pulled from a Sony two channel receiver with four small Sanken output transistors. I was delighted to find that the screw taps on the sink perfectly fit one of the wide output Sankens on each of the MX50SE boards. The other two are temporarily clamped until I can drill and tap a spot for them.
Other than that I just gotta get an IEC fused power socket, RCA jacks, speaker posts, clean up and make permanent all the internal wire connections, figure out if I'm going to use coax or twisted pair RCA cable for the input signal, and stuff it all in a box!
A huge thank you to this forum for the help and inspiration to do this!
Member
Joined 2009
Paid Member
Channel 1 tested and running good😛
nice !
This is a really nice amplifier, uncle Carlos did a good job and drew inspiration from some very good people as well as his own experience.
Last edited:
Channel 1 tested and running good😛
Excellent approach to PSU arrangement!

Real power rails 😎
Don't be afraid of the chassis in the diystore. Can really reduce your difficulty in that respect. Nice work BTW
I won't just give it away (like my 20 amps on diya 😀).
I like AB analog reproduction ...... but Tesla was right , 50 or 60hz is "dino".
Connex electronics - is my baseline - SMPS300RE | Connex Electronic
I'm hooked - 95.4% eff. + every safety feature + good PFC. (below)
A badger or slewmaster connected to this has UN - measurable PSRR.
My design uses a more advanced sine based controller that also allows
realtime output changes - smart class G !!!
2 pair output devices on any AB amp = 250W.
Your big bulky 40KG amp turns into a 10kg one with far superior specs.
No more melted screwdrivers , a blown output stage will not emit "magic
smoke" for long (or at all).
I have shorted and abused the connex SMPS - it is SOLID ! Actually better
than the best PC SMPS's.
OS
I'm using an SMPS500R in my Q-Watt (mono block) amplifiers. These amps have been in use on a daily basis for almost two years now.They are rock solid!
Pictures here (post #382, page 39): https://www.diyaudio.com/forums/chip-amps/301100-watt-project-39.html#post5067279
50W is RMS. No need to write 50Wrms.
If you measure RMS it will br RMS. If you measure peak to peak it will not be RMS. We do need to write the unit it was measured in.
- Home
- Amplifiers
- Solid State
- Post your Solid State pics here