I don't get the last two posts. I thought my post 2338 made it clear that I'm not changing anything. I said it was a question based on my curiosity. I consider the question ancient history that doesn't need any more discussion.
A little flustered, but I'll get over it!
Vin Vout test with 400hz wave: passed
Listening test: exceeds expectations. Holly cow, I can't believe it!
Even my wife can tell, I played a pop song she likes which repeats the chorus one last time at the end, except it's accapela solo this time. I was explaining to my wife, it's not about how loud the stereo will get, but more about how quiet it will get. It's so obvious that the parts inbetween the words are DEAD SILENT, and the subtle things like taking a breath are crystal clear and present! It's just super awesome, oh not to mention it will go super loud too. I cranked it for a while, and everything stays nice and cool, and Mod86 never sweats.
I'm flustered cause I just want to sit and listen to music now, but I gotta go deliver a BBQ Grill to a picnic. I'm sure I'll have fun anyway.
Cheers!
Yep. If you also have 0 V DC on the output of the MOD86 amps, proceed with the following:
If this checks out, the amp is ready for use.
- Create a 5-second long 400 Hz test tone at -3 dBFS using wavtones.com.
- Connect your audio player to the amp and play the test tone on repeat.
- Turn up the volume until you get a good strong signal (say 100 mV RMS AC) on the input of the MOD86 (measure from pin 2 to pin 3 of the input connector).
- Measure the output voltage with your AC voltmeter. You should have Vout = 10*Vin, so 1.0 V RMS AC for 100 mV in.
Tom
Tom,
I use a sine wave generator but your above instructions are a great idea. Perhaps you should include it in the next revision of your excellent Modulus-86 instructions.
You have already written a dissertation in there for power supply and heat sink requirements/requirements 😉
Best,
Anand.
I use a sine wave generator but your above instructions are a great idea. Perhaps you should include it in the next revision of your excellent Modulus-86 instructions.
Will do. I became aware of wavtones.com just a few weeks ago. The instructions for how to generate a test tone etc. made it into the design doc for the LM3886DR. They'll migrate into the MOD86 doc as well eventually.
You have already written a dissertation in there for power supply and heat sink requirements/requirements 😉
That's certainly true of the Rev. 1.0 - 2.0 of the MOD86 (and PAR86, I think). I cleaned it up considerably for Rev. 2.1 and it seems to do a better job of answering people's heat sink questions.
Listening test: exceeds expectations. Holly cow, I can't believe it!
Awesome! I'm glad you like it.
Tom
I used an iPhone app called Audio Tools by Performance Audio. It will make sine waves, square waves, much more, I can stream the sine wave to AppleTV, then it goes through the toss link optical out to the DAC. Its only a few bucks, and while there are other free ways to get a sine wave, being able to use it wirelessly makes it a decent value because of its convenience.Tom,
I use a sine wave generator but your above instructions are a great idea. Perhaps you should include it in the next revision of your excellent Modulus-86 instructions.
You have already written a dissertation in there for power supply and heat sink requirements/requirements 😉
Best,
Anand.
As cool as sine waves are, I'm going to listen to music now 😎
I used an iPhone app called Audio Tools by Performance Audio.
Good to know. Most apps cost significantly less than what many people spend for a cup of coffee. While I do enjoy coffee, I would argue that apps like that do provide more utility than a cup of coffee.
As cool as sine waves are, I'm going to listen to music now 😎
That sounds like a rational thing to do.
Tom
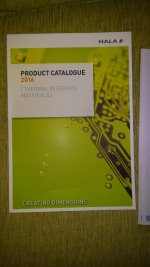
I may have mentioned I found info, on the web, about IC clips made by HALA. They make one specifically for TO-220 ICs. They and all their distributors seem to be in Europe. I sent them an email asking where I could by a small quantity of about 12. I didn't get a response.
Surprise...FEDEX pulled up yesterday with a package from Germany. They sent me 12 free samples, their 2016 catalog and a nice letter signed, by a live person, in ink. It listed the name of the person to contact If I had any questions.
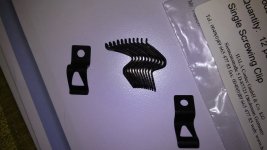
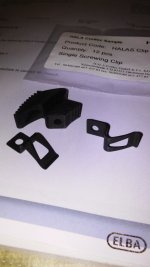
It appears they are a large company specializing in thermal interface materials. The clips I got, are very well made and have an anti-corrosion coating. The mounting and IC contact surfaces are parallel and flat. I put all 12 on my granite surface plate and no wobble.
I'm not tied to them in any way...just was impressed with the scope of products and the quality of what I got. Here are a few pics. The 3rd pic is looking straight down at 10 bunched together. The geometric repeat-ability is quite good.
Surprise...FEDEX pulled up yesterday with a package from Germany. They sent me 12 free samples, their 2016 catalog and a nice letter signed, by a live person, in ink. It listed the name of the person to contact If I had any questions.
It appears they are a large company specializing in thermal interface materials. The clips I got, are very well made and have an anti-corrosion coating. The mounting and IC contact surfaces are parallel and flat. I put all 12 on my granite surface plate and no wobble.
I'm not tied to them in any way...just was impressed with the scope of products and the quality of what I got. Here are a few pics. The 3rd pic is looking straight down at 10 bunched together. The geometric repeat-ability is quite good.
Attachments
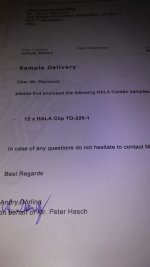
Surprise...FEDEX pulled up yesterday with a package from Germany. They sent me 12 free samples, their 2016 catalog and a nice letter signed, by a live person, in ink. It listed the name of the person to contact If I had any questions.
It appears they are a large company specializing in thermal interface materials. The clips I got, are very well made and have an anti-corrosion coating. The mounting and IC contact surfaces are parallel and flat. I put all 12 on my granite surface plate and no wobble.
Dang! Isn't it amazing what you can get if you ask nicely? They look like nice clips. They'll come in handy for your Parallel-86 build.
Tom
The pics of the lm4870 made me think it was not a TO-220 but the data sheet cleared up that misconception. I now know it is a TO-220 package, so the HALO clips will work with it, but you knew that.
The data sheet recommends a couple of ways to secure an lm4870 to a heatsink. One is like the Rowland pic, with a bar across it. Instead I'll make use of the HALO clips, using two per lm4870. They will mount, via two holes I'll tap in each heatsink, just above the top of the lm4870. That should spread out the clamping force, as well as a bar would, plus nothing to make.
The data sheet recommends a couple of ways to secure an lm4870 to a heatsink. One is like the Rowland pic, with a bar across it. Instead I'll make use of the HALO clips, using two per lm4870. They will mount, via two holes I'll tap in each heatsink, just above the top of the lm4870. That should spread out the clamping force, as well as a bar would, plus nothing to make.
Technically, neither the LM3886 nor the LM4870 is a TO-220. They are in the style of the TO-220, sort of the stretched limo of the TO-220 world. The clips should still work.
Interesting. TI calls it a TO-220 package, in at least two places, in the LM4870 data sheet. I didn't check the LM3886 sheet. They are dimensionally quite different except for the front to back thickness. What is the actual or real name?
The pics of the lm4870 made me think it was not a TO-220 but the data sheet cleared up that misconception. I now know it is a TO-220 package, so the HALO clips will work with it, but you knew that.
What matters for the clips is the width of the package and the thickness. The thickness of the TO-220 is 3.56 to 4.82 mm (according to JEDEC). The LM3886T and LM3886TF are 4.5 mm ±0.12 mm thick (according to TI). So the LM3886 will fit fine with a TO-220 style clamp.
The LM4780 is 0.177" ±0.005" (4.5 mm ±0.13 mm) thick (TI). So that'll work with a TO-220 clamp as well.
The Aavid clamp that I recommend is actually for a TO-247 package. A TO-247 measures 4.7 mm to 5.3 mm in thickness. I selected that clip because it was wide enough to cover the LM3886. I may look around for a wide TO-220 style clip, but on the other hand, I was getting fine results with the Aavid clip, so I'm leaning towards "ain't broken, don't fix".
One is like the Rowland pic, with a bar across it.
I've tried that. It's a pain to get to work. The reason the green caps on the Parallel-86 are spaced the way they are is actually so you can get a screwdriver in between the caps and tighten the screws on the clamping bar.
An externally hosted image should be here but it was not working when we last tested it.
However, as I said, it's a pain to use a clamping bar. There's also the little detail that the metal back may extend all the way to the edge of the mounting half-holes on the LM4780 package. This has caused some people to short out the VEE supply to the heat sink with spectacular fireworks and destroyed circuits to follow.
Instead I'll make use of the HALO clips, using two per lm4870.
That is by far the best idea!
Technically, neither the LM3886 nor the LM4870 is a TO-220. They are in the style of the TO-220, sort of the stretched limo of the TO-220 world. The clips should still work.
True.
Tom
TO-220 clips
I also thought there might be some risk with screws, in the mounting holes on the LM4870, shorting out on the uninsulated back. When I was thinking of using a bar, like the Rowland pic and, mentioned in the LM4870 data sheet, I was going to make the tapped holes outside the LM4870 perimeter and use a wider bar.
Then I got the HALA clips and as mentioned I'm using two per LM4870. That will provide clamping pressure across the wider LM4870. Also both the LM3886 and LM4870 data sheets show the same main body thickness of .177+-.005. I think two HALA TO-220 clips should be ideal.
I new the Aavid was for a TO-247.The Aavid clamp that I recommend is actually for a TO-247 package. A TO-247 measures 4.7 mm to 5.3 mm in thickness. I selected that clip because it was wide enough to cover the LM3886. I may look around for a wide TO-220 style clip, but on the other hand, I was getting fine results with the Aavid clip, so I'm leaning towards "ain't broken, don't fix".
There's also the little detail that the metal back may extend all the way to the edge of the mounting half-holes on the LM4780 package. This has caused some people to short out the VEE supply to the heat sink with spectacular fireworks and destroyed circuits to follow.
Tom
I also thought there might be some risk with screws, in the mounting holes on the LM4870, shorting out on the uninsulated back. When I was thinking of using a bar, like the Rowland pic and, mentioned in the LM4870 data sheet, I was going to make the tapped holes outside the LM4870 perimeter and use a wider bar.
Then I got the HALA clips and as mentioned I'm using two per LM4870. That will provide clamping pressure across the wider LM4870. Also both the LM3886 and LM4870 data sheets show the same main body thickness of .177+-.005. I think two HALA TO-220 clips should be ideal.
Looks like Aavid P/N MAX07NG or MAX08NG (the one I recommended) are the ones that are useful for TO-220 mounting. Technically, the 07 is for TO-220. The 08 is for TO-247. Note the difference in clamping force, though. I wonder if there's any functional difference between the two when used to clamp an LM3886 or LM4780.
Attached screen shot is from the Mouser catalog.
Tom
Attached screen shot is from the Mouser catalog.
Tom
Attachments

I noted a manufacturing difference in the old, discontinued LM3886T. It results in a stability difference. If you have the LM3886T and a Modulous86, then you could use a 25-0-25vac transformer. Parts Express has a few left at Ebay item # 221975530912
If your house is very big, it may be worth paying more for a suitable thermal interface and the materials to use it (shoulder washer, Arctic Ceramique, huge mica). A fifth more watts will make about a decibel (which is not important). However, the old LM3886T is slightly more stable and that will sound more pleasant when loud (which is vital if you needed loud often).
Most of us don't have a house big enough to think about that. Fortunately, for the few that do, the matter is not expensive at this time. The big thermal interface parts are hard to find, but the rest is not difficult at all.
you could add in a spacer plate ~0.5mm (~24awg) to ~1mm (~18awg) thick, to make up the thickness difference and restore the clamping force of the To247 clip. 20, or 22awg would be perfect.What matters for the clips is.......... the thickness. The thickness of the TO-220 is 3.56 to 4.82 mm ..........The LM3886T and LM3886TF are 4.5 mm ±0.12 mm thick ................
The Aavid clamp that I recommend is actually for a TO-247 package. A TO-247 measures 4.7 mm to 5.3 mm in thickness. .............
Dang! That guy knows, like, everything!you could add in a spacer plate ~0.5mm (~24awg) to ~1mm (~18awg) thick, to make up the thickness difference and restore the clamping force of the To247 clip. 20, or 22awg would be perfect.
I add a small insulating 'shoe'/tip to the metal clips to avoid accidental shorting of pins as a general precaution (heatshrink is okay) - a bit pedantic maybe, but better safe than sorry
One problem with 'bars with 2 screws' or 'saddle clamps' is the difficulty of applying even pressure across the surface of the device unless the bar is profiled (with a 'curve', for example) - this works okay, but too much trouble, IMO.
If you're really pedantic, you can use tension/pressure indicator washers between the clip and the chip - not sure where you'd find them these days ...
A 247 IC package nominal thickness is .197. A 220 package is.177 thick. The 16.9 lbs force of the max08ng must be less when used on the thinner 220 package. That alone wouldn't make me raise the lm3886.
The width of the 08 is 18mm vs 12mm of the 07. That should further reduce the force. Many torque specs., I've seen for chips and clips, list the pressure over some area (cm or mm2). Just sayin and I'm not gonna do an experiment.
However, a hand held fish scale and some high test fish line or steel leader line would show the force. Just pull up until a, maybe .002, feeler gage can be slipped between the lm3886 and max08. Bottom line: maybe the force of the 08 is reduced so it ends up being close to the 07. There must be a reason the force is lower for the to-220 package.
Mounting spec from the LM4870 data sheet.
maximum torque of 50 N-cm. Additionally, it is best to use washers under the
screws to distribute the force over a wider area or a screw with a wide flat head.
To further distribute the mounting force a solid mounting bar in front of the package and secured in place with the two mounting screws may be used. Other mounting options include a spring clip. If the package is secured with pressure on the front of the package the maximum pressure on the molded plastic should not exceed 150N/mm2. I dont know if the mm2 is the surface of the lm4870 or the surface area of the bar. If it is the surface area of the IC, does anyone one know what the resultant force would be?
- Home
- Amplifiers
- Chip Amps
- Modulus-86 build thread