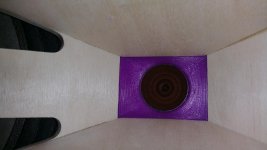
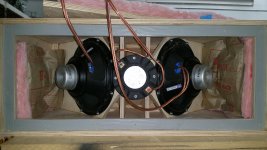
Okay, I'll print a thicker adapter before first sound. I got everything mounted, and it seems (luckily) that I have about another 12mm distance between the CD and back wall to play with! That will give me enough room to avoid any sudden expansions.
Thanks for the tips, guys! 🙂
First sound likely tomorrow! (today 😉)
Thanks for the tips, guys! 🙂
First sound likely tomorrow! (today 😉)
Attachments
Really cool progress on your build, thanks for the detailed documentation for us to follow.
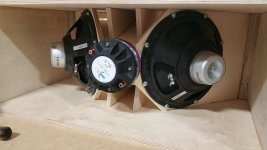
Really cool that you implement 3d printed components aswell! The cd you use seem to be a bit deeper than the neo celestion but a bit more shallow than the ferrite one, so to use the ferrite one with the thicker adapter might result in it not fitting. Not a problem for you but for anyone else if you consider to offer the 3d printer files in public (do you?)
Really cool that you implement 3d printed components aswell! The cd you use seem to be a bit deeper than the neo celestion but a bit more shallow than the ferrite one, so to use the ferrite one with the thicker adapter might result in it not fitting. Not a problem for you but for anyone else if you consider to offer the 3d printer files in public (do you?)
Okay I just measured and it's only 9mm extra. Not quite enough to totally prevent expansion at the corners, but it's sooo much better overall.
Attachments
Really cool progress on your build, thanks for the detailed documentation for us to follow.
Really cool that you implement 3d printed components aswell! The cd you use seem to be a bit deeper than the neo celestion but a bit more shallow than the ferrite one, so to use the ferrite one with the thicker adapter might result in it not fitting. Not a problem for you but for anyone else if you consider to offer the 3d printer files in public (do you?)
Thanks, and absolutely! As others have said, it's kinda the perfect application for a 3D printer. Luckily they are pretty cheap these days. I got my gigabot just as they started to boom, on a kickstarter.
I am more than happy to share the 3D STL files. I wish I could just attach them directly to the post, they are just a few Mb too big.
Seems like an online repository with plans and 3d print files would be nice to have. Between Fin and I, there is a host of digital CAD stuff available to build this speaker design.
That would be awesome Jenny, My colleague @ work has bought a 3D printer recently and asked me if I happen to know some ideas or examples to test print. Seems like a win win situation 😉
That's great! PM me your email and I'll send some files your way. They aren't the easiest to print (big flat base likes to warp, so it will be a good test). Have to make sure you get the bed level and the first layer just right for it to stick throughout the print. A heated bed will help immensely. I kept mine at 71C and its been kicking things out really well.
PVA:water blend brushed on as base layer will keep the parts stuck until you need to lift it off (glass or metal bed). Need a heated bed though.
JG: your speaker looks amazing - I would not have been able to resist firing up with what you have. If you need more room a small bump out chamber for the CD magnet could work.
JG: your speaker looks amazing - I would not have been able to resist firing up with what you have. If you need more room a small bump out chamber for the CD magnet could work.
Jenny,Okay I just measured and it's only 9mm extra. Not quite enough to totally prevent expansion at the corners, but it's sooo much better overall.
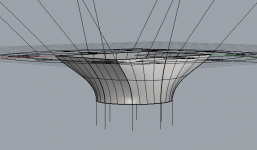
Better than your previous semi-parabolic throat design, but will have narrowing HF horizontal response compared to the SynTripP throat design.
No one seems to care about the top octave anyway 😉....
Art
Since her CD has a larger volume than the Celestion the cab size could be slightly adjusted in the future for this issue without it really affecting overall design right? We'd have to run the numbers maybe... That said, I am with XRK with the chamber.
Anyone know if can you just hand off these 3d printer files on a thumb drive to a CNC shop and have this stuff made?
Anyone know if can you just hand off these 3d printer files on a thumb drive to a CNC shop and have this stuff made?
Phase plug jig
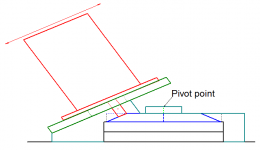
Well here is the idea I had for making the phase plug with a router. It’s hard to post such basic drawings after looking at the CAD drawing that have been posted, but I hope everyone will get the idea.
It’s basically a mount for a router that has a sloped surface to hold the router at the phase plug angle.
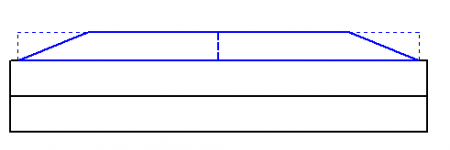
The phase plug would be mounted on riser blocks to get it off the work surface. The phase plug would have a hole in the center to act as a pivot point.
The jig would then sit over the phase plug and aligned by an alignment pin that would go through the jig and into the center of the phase plug.
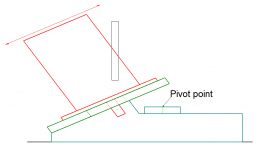
This would allow the router to be rotated around the plug and cut the appropriate slope. Several passes of the router would have to be made by sliding the router up and down the inclined surface. The diameter of the phase plug could be adjusted by the depth of the router.
There are a few details that would need to be worked out but that’s the basic idea.
Well here is the idea I had for making the phase plug with a router. It’s hard to post such basic drawings after looking at the CAD drawing that have been posted, but I hope everyone will get the idea.
It’s basically a mount for a router that has a sloped surface to hold the router at the phase plug angle.
The phase plug would be mounted on riser blocks to get it off the work surface. The phase plug would have a hole in the center to act as a pivot point.
The jig would then sit over the phase plug and aligned by an alignment pin that would go through the jig and into the center of the phase plug.
This would allow the router to be rotated around the plug and cut the appropriate slope. Several passes of the router would have to be made by sliding the router up and down the inclined surface. The diameter of the phase plug could be adjusted by the depth of the router.
There are a few details that would need to be worked out but that’s the basic idea.
Attachments

Hey guys, I am throwing my 3D files up on a Google Drive folder. This gives access to the root directory
Jenny's SynTripP Files on Google Drive
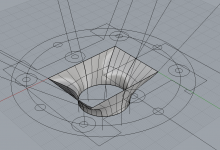
Right now it's both a sketchup export (.SKP/NURBS) for editing yourself and the polygonal model (.STL) for printing / machining.
xrk- I had thought about that. Would be easy to implement later down the road since the throat adapter is indeed removable and the back plate could easily be modified!
On second glance, I may be able to get the throat adapter at 21mm (max it can be for me without modifying back plate) with no narrowing expansion by reducing the blend radius. It wouldn't be as smooth around the corners, but I think it can be done.
rocksteady- Cool idea with the angled router jig! I hadn't thought about that!
Jenny's SynTripP Files on Google Drive
Right now it's both a sketchup export (.SKP/NURBS) for editing yourself and the polygonal model (.STL) for printing / machining.
xrk- I had thought about that. Would be easy to implement later down the road since the throat adapter is indeed removable and the back plate could easily be modified!
On second glance, I may be able to get the throat adapter at 21mm (max it can be for me without modifying back plate) with no narrowing expansion by reducing the blend radius. It wouldn't be as smooth around the corners, but I think it can be done.
rocksteady- Cool idea with the angled router jig! I hadn't thought about that!
Is that throat adapter more shallow than intended for the celestion CD due to your CD being deeper than the celestion one? I tried following the discussion about it earlier in the thread but was rather confused
Osse,Is that throat adapter more shallow than intended for the celestion CD due to your CD being deeper than the celestion one? I tried following the discussion about it earlier in the thread but was rather confused
There does seem to be a fair amount of confusion regarding the throat.
Near as I can tell, Fin's throat dimension conversion from imperial to metric resulted in a different throat (his is semi-parabolic) than my original design. Jenny has changed her throat design from Fin's, but it still is different than the original, being deeper, which will result in some VHF narrowing. That said, the deeper throat will load the crossover region better, which may compensate somewhat for the smaller diaphragm driver she is using.
Art
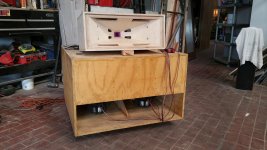
First sound yesterday! I spent the day tinkering and being kinda blown away with the way vocals sound.
Still have to build the secondary horn and do some modifications to the throat, but it seems like a great start
Time to bust out the Dayton measurement mic!
Still have to build the secondary horn and do some modifications to the throat, but it seems like a great start
Time to bust out the Dayton measurement mic!

Fin,
I have seen tests of the Driverack PA+ that show the midrange is reversed polarity from low and high, which will create a "hole" in the crossover regions for speakers not requiring a reversal.
Art
Just took a peek at mine on my two channel CRO.
Phasing of my DRIVERACK PA+
LOW = In Phase
MED = REVERSED
HIGH = REVERSED
Sorry folks! I got caught in a time warp after listening to it. Been hooked ever since.. finding myself going back to listen more and more and rewarding every time 🙂 I did a day of light EQ and got everything filled in from top to bottom. Still need to add the secondary horn.
I am already done with some of the next horn, it's coming together nicely as well.
Today I've mainly been working on a new fold for my sub- posting for that the faital pro vs 3015lf thread where I did the initial build. Looking for something a little bit more practical to move around.
I am already done with some of the next horn, it's coming together nicely as well.
Today I've mainly been working on a new fold for my sub- posting for that the faital pro vs 3015lf thread where I did the initial build. Looking for something a little bit more practical to move around.
Attachments


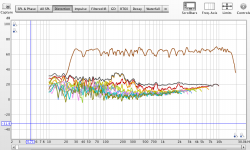
How are the distortion graphs?
Not sure if this is the right way to view it, but I just pulled this from that same overall measurement as the previous post
Attachments
- Home
- Loudspeakers
- Multi-Way
- SynTripP: 2-way 2-part Virtual Single Point Source Horn