Push-Pull Slot Loaded.What is PPSL?
Two woofers firing in to a plenum (slot) one reversed in direction (magnet in the slot) and polarity. Push pull reduces even order distortion. PPSL is typically used in BR or sealed cabinets, but can also be used in FLH and TH, though a slot may not be required in a TH to use PP.
Thanks for the sims. I will play with them soon. As for hornresp, I have had troubles with being taunted by a new update being available but when installed it's still then prior one ??? I've tried the damping thing a few times in Hornresp and definitely don't know what I'm doing. Isn' the filter for crossovers?
So that is PPSL. I was aware of the cancel 2nd order harmonics benefits. Now I get the idea of "slot" or "plenum"; sure on a TH you just mount two drivers side by side (but one facing the other way)...
I have seen it done in one of Bateman's horns (he has a lot, doesn't he???) 🙂
I am prepared to do that, but I wanted to combine the idea and also do a "push-push" that helps to cancel out cabinet vibration. I realize this would need more complex internals. I've seen at least one TH design (sorry don't know the name) that may use this: it's two drivers and mirrored pathways. Just would make the plumbing more complicated 🙂
So that is PPSL. I was aware of the cancel 2nd order harmonics benefits. Now I get the idea of "slot" or "plenum"; sure on a TH you just mount two drivers side by side (but one facing the other way)...
I have seen it done in one of Bateman's horns (he has a lot, doesn't he???) 🙂
I am prepared to do that, but I wanted to combine the idea and also do a "push-push" that helps to cancel out cabinet vibration. I realize this would need more complex internals. I've seen at least one TH design (sorry don't know the name) that may use this: it's two drivers and mirrored pathways. Just would make the plumbing more complicated 🙂
Push push and PPSL , as described in this thread ( drivers moving towards or away from each other in unison) are the same
I have a confession to make
I haven't built the tapped horn monster. Nor have I made any great progress with composite materials.
I took the two Alpine 15" drivers and .... [sob!] I...I....
Perpetrated a normal subwoofer.
It's okay, I know lots of people do it. It's even acceptable sometimes...
I'll post some photos (why?) later maybe. You'll not be surprised to know it is down to usual Sodermizer standards, which is to say "****-poor"! It is a 24" cube of not-quite-correctly-cut panels of MDF and ply, so far 100% Gorilla glued. The drivers are compound push-push or push-pull whatever it is, the one that allegedly reduces distortion. I'm still short one side (it's the bottom right now). So technically it is a vented with a really big port. Sounds ok. I will no doubt add more bracing and did I mention it needs caulked? Not good if you can see through some of the corners.
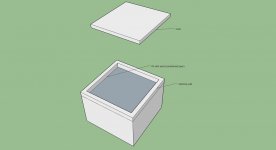
Here it is (yawn)
The not-TH sub continues apace. Here is a photo of it nearly completed. After reading much here and else where about internal bracing, the consensus seems to be (1) engineering studies show it is pretty close to useless or (2) most cabinet makers do it much more elegantly than the Soldermizer method. Mine is basically, cut a 2x2 or similar to length, slap some Gorilla glue on each end, spritz water where it'll go, and then gently ram it into position. So far so good. (Of course, that is what the guy who jumped from the top floor of a skyscraper said while still in transit!)
One unsolved question is how permanently to attach the top. Many of you have access panels. Well, until otherwise motivated, I am trying caulk for a "seal" and then will screw down the cover.
In a way it's fitting for my low standards build: the best available piece to cut to size for the top was the horrid OSF that cracked apart when I brought it home days ago.
It took about 20 minutes for the cat to jump on top of the (now uncovered) speaker and get wet caulk on her paws. Ah, pets!
There are a few buzzes I can't track down (yet). Is it possible to get a totally buzz free cabinet? Don't get me wrong, it's a big improvement over my Ijit I TH (still awaiting a bonfire opportunity.)
Attachments

The not-TH sub continues apace. Here is a photo of it nearly completed. After reading much here and else where about internal bracing, the consensus seems to be (1) engineering studies show it is pretty close to useless or (2) most cabinet makers do it much more elegantly than the Soldermizer method. Mine is basically, cut a 2x2 or similar to length, slap some Gorilla glue on each end, spritz water where it'll go, and then gently ram it into position. So far so good. (Of course, that is what the guy who jumped from the top floor of a skyscraper said while still in transit!)
One unsolved question is how permanently to attach the top. Many of you have access panels. Well, until otherwise motivated, I am trying caulk for a "seal" and then will screw down the cover.
In a way it's fitting for my low standards build: the best available piece to cut to size for the top was the horrid OSF that cracked apart when I brought it home days ago.
It took about 20 minutes for the cat to jump on top of the (now uncovered) speaker and get wet caulk on her paws. Ah, pets!
There are a few buzzes I can't track down (yet). Is it possible to get a totally buzz free cabinet? Don't get me wrong, it's a big improvement over my Ijit I TH (still awaiting a bonfire opportunity.)
Dang, that's one ugly cabinet. A sure fire "audio-raspberry award" winner. Take a bow and read out your dedications 🙂 At least it's not a ripole.
To be honest, the bracing is about right for a minimalist scheme (of course, in the pic, the top-bottom isn't braced).
Here is what I can suggest if you insist on building another box for these drivers.
1. bracing is most important around the center of panels and you've mostly got it right using your bracing method.
2. Try and make sure that the max distance between unbraced areas does not exceed 8"
3. Another trick is to minimise the dimensions of the driver faces (less stress on those faces) and compensate by increasing the other dimensions.
4. I normally don't suggest this but you might benefit from doubling up the thickness of the faces that the driver is mounted on.
5. Sometimes, if you arrange the drivers magnet - to - magnet and jam a brace tightly between the magnet (thus physically coupling the drivers), you can improve the vibration cancellation (though you won't get the benefits of non-linearity cancellation).
I suspect (hope) that this cabinet is a test mule, so feel free to experiment to your heart's content.
OR
you could build a TH/T-TQWT which is inherently self braced (just a little more needed between the walls). I'm away from my windows PC so can't re-sim the design but if you're serious about attempting another build, contact me and I'll try and figure a workable design).
Last edited:
Yes, but it requires using good materials assembled to close tolerances, and lots of fasteners help insure a cabinet remains buzz free after being used and moved around.Is it possible to get a totally buzz free cabinet?
Using sweepable sine waves makes it easier to track down buzz than using music.
Good luck, happy hunting!
Last edited:
"Audio-Raspberry", that pretty much describes my Sub's noises when the music hits a loud, wrong frequency: PFFFFFFFFFFFFFFFFFFFFFFFFFFFFFFFT!
I agree, it is butt-ugly, and yes, a test mule, a victim to experiment upon, whatever...
I'm going to dry and brace the top cover first. Also bought some rubber/foam "Soft Linking Mats" and more glue at Lowe's tonight. I may want to experiment with "constrained layer damping" which might be as simple as MDF+glue+rubber + glue + ceramic tile I have on hand.
"Audio-Raspberry", that pretty much describes my Sub's noises when the music hits a loud, wrong frequency: PFFFFFFFFFFFFFFFFFFFFFFFFFFFFFFFT!
I agree, it is butt-ugly, and yes, a test mule, a victim to experiment upon, whatever...
I'm going to dry and brace the top cover first. Also bought some rubber/foam "Soft Linking Mats" and more glue at Lowe's tonight. I may want to experiment with "constrained layer damping" which might be as simple as MDF+glue+rubber + glue + ceramic tile I have on hand.
Here's how I would brace for cheap, given your situation. Cut up a wedge brace and nudge it in with a mallet or some scrap wood and you should be able to get it in pretty tight. Much better than jamming scrap in and seeing what sticks, literally.
If you want to play with constrained layer damping, you could build fashion a shallow wooden "gasket" and fill the gap with sand and then cover up with some more mdf.
Attachments

Last edited:
Thank you for the wedge suggestion. I did, in fact, have one brace come loose but I replaced it with a smaller cut-to-size, glue and push into position method. The others seem to be holding. One is dubious but still there. I have added a vertical brace from center bottom to center top and added a screw at center of lid to bite into it. It seems to be working but too soon to tell. Meanwhile, I have split the MDF in three places from screwing the lid back on, darn! I may be building the next revision sooner than planned 🙂
Tonight, read up some on the CLD. Sand is rarely mentioned, but green glue, just using titebond II, or even silicone between MDF/Ply layers. I am attracted to the bitumen pad idea (I did not know bitumen = asphalt). I have visions of renting a hot asphalt cooker and paving a set of panels. Talk about a mess. Would it really work? If so, it might be possible to build an outer box, have the panels pre-cut for an inner box, and then have all ready when a coating of hot asphalt is applied, and then "float" the panels to the interior of the enclosure? Any audiphiles work for the Highway Department and want to give it a try?
Oh yeah, my preliminary test of scrap plywood + Gorilla Glue + the "Soft Linking Mats" (claims to be "high quality EVA" -- not sure what plastic that is?) + a ceramic tile, all this makes a very secure bond. Do any of you propeller heads here know whether to be a constrained layer the layers must be unbroken? Or for example, could a larger plywood panel have many smaller pieces of flexible inner layer ("rubber") + inner hard layer (e.g. tile)?
For the matter, if the CLD is a valid concept, one finishing option for an appalling box such as mine might be to cover it with tiles of my choice.
Last edited:
I've never done CLD with tiles. Am sure it could look nice, but the added mass, like sand adds alot of weight. Don't believe it's required or necessary.
My MLTL tube sub is only a vinyl mat sandwiched between two sonotubes and total thickness (unfinished) is less than 3/8". The outer layer has been split lengthwise and use strap clamps for compression.
Mastic adhesive alone would work for the constrained layer.
http://www.earsc.com/pdfs/engineering/understandingdamping.pdf
EAR is in Park 500 in NW Indianapolis, few miles down the road from where I use to live. Have a friend that works for them. The little yellow viscoelestic ear plugs you find at HD/Lowes/Menards etc are made by them.
Thank you for the wedge suggestion. I did, in fact, have one brace come loose but I replaced it with a smaller cut-to-size, glue and push into position method. The others seem to be holding. One is dubious but still there. I have added a vertical brace from center bottom to center top and added a screw at center of lid to bite into it. It seems to be working but too soon to tell. Meanwhile, I have split the MDF in three places from screwing the lid back on, darn! I may be building the next revision sooner than planned 🙂
Tonight, read up some on the CLD. Sand is rarely mentioned, but green glue, just using titebond II, or even silicone between MDF/Ply layers. I am attracted to the bitumen pad idea (I did not know bitumen = asphalt). I have visions of renting a hot asphalt cooker and paving a set of panels. Talk about a mess. Would it really work? If so, it might be possible to build an outer box, have the panels pre-cut for an inner box, and then have all ready when a coating of hot asphalt is applied, and then "float" the panels to the interior of the enclosure? Any audiphiles work for the Highway Department and want to give it a try?
Oh yeah, my preliminary test of scrap plywood + Gorilla Glue + the "Soft Linking Mats" (claims to be "high quality EVA" -- not sure what plastic that is?) + a ceramic tile, all this makes a very secure bond. Do any of you propeller heads here know whether to be a constrained layer the layers must be unbroken? Or for example, could a larger plywood panel have many smaller pieces of flexible inner layer ("rubber") + inner hard layer (e.g. tile)?
For the matter, if the CLD is a valid concept, one finishing option for an appalling box such as mine might be to cover it with tiles of my choice.
1. The CLD layer doesn't need to be broken, IT's main purpose is to absorb the mechanical energy due to vibrations (and convert it to heat).
2. Pay more attention to your bracing (cheaper too) and the need for CLD diminishes. See Large Ported Dayton HO18's - Page 23
EVA = Hot melt glue
https://en.wikipedia.org/wiki/Ethylene-vinyl_acetate
What bracing does for large low frequency wavelengths, CLD does for midbass and up. This is where alot of box coloration comes from.
From the aspect of a reticulated surface (tile), having a single outer layer helps to damp lower frequencies structurally. Using tile as THE surface treatment would reduce this aspect unless added to an already existing solid outer layer making it 5 layers deep, eg tile, CLD, outer layer, CLD, inner layer.
I'm on the right track...
The bracing technique I used is similar to what is suggested in the above post (purely by luck and it is the easiest, laziest method.) Cut to size, adhesive on both ends and wedge into position. At least for now, it seems to have quelled the worst resonances in my Frankenclosure [TM] -- hey I invented a new one! 🙂
I've become quite well informed on the value of CLD thanks to Greeb's link and other research. While I can't hear a difference and didn't test, something as simple as glueing a flexible layer (my exercise mat, EVA = ethylene vinyl acetate) + outer layer such as ceramic tile, on the outside of my Frankenclosue [tm] should make an effective CLD as those who use a box-within-a-box technique. OK, so some craftsmen can make it look line fine furniture. Then there are hacks like me who make something that should never see the light of day, which should only live in a basement obscured by ancient boxes of junk
Since there are as many possible flexible layers as uninformed hobbyists to promote each
is there data on which materials provide the best isolation? I imagine they all work, to one degree or another...now, if anyone sees a close-out deal on 1000 mouse pads, jump on it.
Last edited:
The bracing technique I used is similar to what is suggested in the above post (purely by luck and it is the easiest, laziest method.) Cut to size, adhesive on both ends and wedge into position. At least for now, it seems to have quelled the worst resonances in my Frankenclosure [TM] -- hey I invented a new one! 🙂
I've become quite well informed on the value of CLD thanks to Greeb's link and other research. While I can't hear a difference and didn't test, something as simple as glueing a flexible layer (my exercise mat, EVA = ethylene vinyl acetate) + outer layer such as ceramic tile, on the outside of my Frankenclosue [tm] should make an effective CLD as those who use a box-within-a-box technique. OK, so some craftsmen can make it look line fine furniture. Then there are hacks like me who make something that should never see the light of day, which should only live in a basement obscured by ancient boxes of junk
Since there are as many possible flexible layers as uninformed hobbyists to promote each
is there data on which materials provide the best isolation? I imagine they all work, to one degree or another...now, if anyone sees a close-out deal on 1000 mouse pads, jump on it.
Since you're intent upon heaping further uglification on the poor cabinet, allow me to suggest a few more approaches. Not stricty for subwoofers but the principles are somewhat applicable.
Construction Techniques
If I could build like that...
I would probably be like a few men I've met in my life, who have just a high school educiation but make $75-100K a year because they are good cabinet makers. And then there are people like me who are at the other end of the Bell Curve!
"Quickly Igor! Fetch the caulk! There is an air leak in our creation!"
Attachments

I would probably be like a few men I've met in my life, who have just a high school educiation but make $75-100K a year because they are good cabinet makers. And then there are people like me who are at the other end of the Bell Curve!
"Quickly Igor! Fetch the caulk! There is an air leak in our creation!"
Look at the plaster board recommendations. An easy/cheap way to mass load your cabinets.
Mass loading reduces vibrations via brute force
Bracing reduces vibrations via strategic targeting of vibration
Constrained layer damping converts mechanical energy to heat.
Personally, my strategy is to build all the wrong cabinets first. Eventually, there will be nothing left to build except designs that work.
Amongst my past horrors were the 18 ft sonotube, the sealed shiva sub and the king of do-nothing-devices, the ripole.
Zobsy, I seem to be following your path 🙂 18 ft tube? Wow, mine was only 12 foot. I had to look up Ripole, still don't understand them (that is probably the obsession I have scheduled for next year.) What did you finally end up with, your own "right" design, if you will?
- Status
- Not open for further replies.
- Home
- Loudspeakers
- Subwoofers
- Help the Ijit -- build his 1st Tapped Horn