Yes that should be possible for sure. I thought of using jst connectors, but I wanted to use angled type. I did not had these around so that's why Ichoose to use only pin headers. Most other connecters would do equally well.
Well I have a bunch of connector types lying around. Will most likely use angled headers as well. As many cable assemblies will fit them. I am a little unsure of what connectors I will use for the i2c assembly though. Would be nice to have them angled and low profile as well. The oled is a lot less thick than a normal lcd solution so I hope that I can make it very slimline. Idealy the phoenix terminal would be the highest part on the piggyback and the display would be mounted with 5-6mm spacers. The "display box" only rise about 4mm above the PCB on the oled, so this should be very small and tidy solution 🙂
1. The Adum I2C isolator is indeed a very useful component. I will add this to the list.
What chip are you using? Where are you buying it from?
Best regards,
Mattias
Hi Mattias,What chip are you using? Where are you buying it from?
Best regards,
Mattias
It is the Adum1250. I bought it from Farnell. Digikey also sells it.
You asked a week ago if the controller can also be used for multi channel operation. That's possible when you set the quantizer setting to 6-bit for each input. Besides that you need to set the jumpers underneath the DAC board according to page 22 of Leon's Intergration guide.
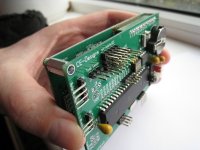
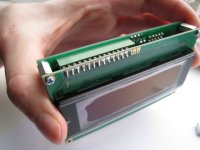
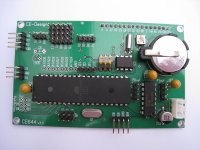
I did a revision of my original design. The first one contained a small mistake, the (supposed to be) isolated gnd of the I2C isolator connects to the boards ground plane. This is corrected. Besides that I added the pcf8574at for driving an LCD. My first design needs to be used with the LCD ExtraIO from electroFUN, but the new one allows any hd44780 based LCD, OLED or VFD to connect directly to the controller. Also added a 3.3v LDO voltage regulator to have 3.3v outputs as well. I hope that these PCBs arrive a lot faster than my last order. That took almost a month! 😕
v1.1 is up and running.
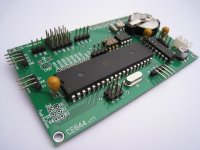
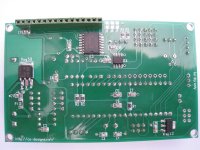
Finally I have finished my controller!
The first prototype contained a small mistake where the ADuM1250 was not really isolating. While I was correcting this I added the PCF8574AT port expander and a 3.3v low drop voltage regulator to the controller. This port expander is used to drive the LCD, OLED or VFD, thus saving seven I/O's from the microcontroller that now can be used for any other application. The 3.3v regulator adds a 3.3v breakout to the controller.
I wrote an article about my controller where most features get highlighted. It's published to my website.
Attachments
Firmware and manual available
The firmware for my controller is available now and is accompanied by a simple manual. It took me a very long time to get it ready. Very little time and many requests to include all kind of different features made me think that it would never be released. 😀
I was only able to test it with my Buffalo III in stereo configuration, 4 spdif inputs, sidecar, OTTO II, so no hard guaranties that it is completely free of errors.
While I was at it I did also release a version that can be used with the Arduino Uno in combination with my shield. It has some of the same functions as the other firmware.
Both can be downloaded here: Downloads
That's a very good job!
Have you also included the possibility to control more than one Buffalo?
I have an active multiway system and I'm using an Arduino with GLT firmware to control two BII
I would like to switch to your system but would like to be sure if your firmware can handle two Buffalo
Have you also included the possibility to control more than one Buffalo?
I have an active multiway system and I'm using an Arduino with GLT firmware to control two BII
I would like to switch to your system but would like to be sure if your firmware can handle two Buffalo
If glt's firmware can do it than mine should be able to do it too. It's based on his work. How are you using glt's firmware exactly? What have you done with it to control your two BII's?That's a very good job!
Have you also included the possibility to control more than one Buffalo?
I have an active multiway system and I'm using an Arduino with GLT firmware to control two BII
I would like to switch to your system but would like to be sure if your firmware can handle two Buffalo
If glt's firmware can do it than mine should be able to do it too. It's based on his work. How are you using glt's firmware exactly? What have you done with it to control your two BII's?
well, it's long time I'm not updating the code. I'm a little bit lazy so I'm sticking on ver. 09g of GLT code and can't remember well what if any mod I've made to the code.
The main job is to issue any write command to both address 0x90 and 0x92
At that time GLT have made some change to his code upon my request.
Thanks Rich. The ce328 firmware is also suitable for your system. You'll like it's interface. Much nicer than the version you got from me earlier on.Highest marks Robert! Top notch design, well layed out site, excellent instructions.
thx. I'll do my best, but I can't compete with you. The amount of information you're publishing is simply amazing. Where do you find that much time??? If it wasn't for you I would have struggled much more with controlling the es9018.Corpius, very nice documentation!, Congrats.
One of my next projects would be to create some code for my two OPUS DAC's. I'm planning to build a integrated amplifier that includes the OPUS DAC's in dual mono. I want to have analog inputs as well, so I'm still looking for some ways to achieve these. Perhaps a miniDSP or something would the trick. Any suggestions maybe?
So basically you're writing all commands to the registers of both DAC's. That's more or less the same as setting it to dual mono, exept for the mono part of course 🙂 how about the DAC polarity? Anti-phase or in-phase?well, it's long time I'm not updating the code. I'm a little bit lazy so I'm sticking on ver. 09g of GLT code and can't remember well what if any mod I've made to the code.
The main job is to issue any write command to both address 0x90 and 0x92
At that time GLT have made some change to his code upon my request.
Corpius,
I tried to purchase your controller but could not get your shopping cart to work. I am sorry to waste bandwidth here but I could not even contact you through your website. I registered under the name xluorp on your website.
Mike
I tried to purchase your controller but could not get your shopping cart to work. I am sorry to waste bandwidth here but I could not even contact you through your website. I registered under the name xluorp on your website.
Mike
Thanks Rich. The ce328 firmware is also suitable for your system. You'll like it's interface. Much nicer than the version you got from me earlier on.
thx. I'll do my best, but I can't compete with you. The amount of information you're publishing is simply amazing. Where do you find that much time??? If it wasn't for you I would have struggled much more with controlling the es9018.
One of my next projects would be to create some code for my two OPUS DAC's. I'm planning to build a integrated amplifier that includes the OPUS DAC's in dual mono. I want to have analog inputs as well, so I'm still looking for some ways to achieve these. Perhaps a miniDSP or something would the trick. Any suggestions maybe?
A wolfson would be great, would be nice to be able to select all filters and dithering at every sample rate.
Wen you say mini-dsp do you mean for oversampling or for active crossover?
Other libraries are involved too
I forgot to mention on my here and on my site that some additional libraries are needed to work with the firmware. I added this info to my site:
I forgot to mention on my here and on my site that some additional libraries are needed to work with the firmware. I added this info to my site:
In order to use the code the LiquidCrystal library from F Malpartida and the RTC library from JeeLabs both needs to be used. Download them both. Unpack them and replace the original LiquidCrystal library by the new one in the libraries folder of the Arduino software. Copy the RTC library folders and files to the libraries folder. Restart the Arduino software for the changes to take effect.
You got a PM.Corpius,
I tried to purchase your controller but could not get your shopping cart to work. I am sorry to waste bandwidth here but I could not even contact you through your website. I registered under the name xluorp on your website.
Mike
Well I have not been doing some proper investigation on the miniDSP products, but I assumed that I can use them to take both analog and digital signals and use it for volume control. Perhaps a descent analog volume control is better.A wolfson would be great, would be nice to be able to select all filters and dithering at every sample rate.
Wen you say mini-dsp do you mean for oversampling or for active crossover?
Thx! 🙂Brilliant work Robert! 🙂
- Status
- Not open for further replies.
- Home
- Source & Line
- Digital Line Level
- ES9018 I2C controller