Finding a use foir some tiny Emerson flat screen speakers JINGL I S065F43 * ohm 10 watt

It looks like a lot of changes since I was here years ago. Changes in circumstances mean I do a lot less in speaker building.
But I pulled apart a discarded Emerson flat screen tv from the curb to find a circuit board I could practice soldering on.
Inside were two speakers with the number as

JINGL I S065F43
8 ohm 10 watt J3KJ

Some one on may be able to trace any info. Google didn't turn up much from the number.
On Ebay they show to sell for $11.00 but that might be inflated. What I'm wondering is are they at least full range?
I find that repurposing old separate boom box or modular size boxes will at least get sound out of some small speakers
for the desktop. I'm not looking for any bass quality.

I think I got a screen shot made to look at just from an ad.

Attachments

  • emerson.png
    emerson.png
    733.4 KB · Views: 33

C/E/X PA Flat to 30 (FT30) PA TH Awesomeness

This thread is a continuation of woody1's thread (flat to 40Hz) which can be found here: http://www.diyaudio.com/forums/subwoofers/170749-15-tapped-horn-rcf.html

Epa, Xoc1 and others have been contributing their time and effort in attempt to help me reach my goal: Flat to 30Hz with as much clean output as possible - XTRA points for breaking physics and keeping it small. Heh.

We have found 15" drivers are limited by xmax far before maximum power is reached.

Here's where we left off:

Post 73 (Epa) @ 2.83V
30Hz = 95.28 dB
40Hz = 98.58 dB
3.3 dB difference

cres2.jpg


Post 98 (Xoc1) @ 2.83V
30Hz = 96.17 dB
40Hz = 100.74dB
4.57 dB difference, so step from 30 to 40 Hz is 1.27 dB more...

197479d1290430180-15-tapped-horn-rcf-bms18n850v2-6-fold-th-1.jpg

197480d1290430180-15-tapped-horn-rcf-bms18n850v2-6-fold-th-2.jpg


My REAL 6 Fold mod (I meant to post) @ 2.83V
30Hz = 98.29
40Hz = 98.48
0.19 dB difference, so step from 30 to 40Hz is 4.38 dB less AND 2.12 dB more output at 30Hz

18N850v2REAL6foldmod690WInputParameters.jpg

18N850v2REAL6foldmod690WSPLResponse.jpg

18N850v2REAL6foldmod690WDiaphragmDisplacement.jpg

18N850v2REAL6foldmod690WSchematicDiagram.jpg


What's your take on this version?


Post 98 is more efficient at both frequencies as would be expected as it is bigger. External is 600 litres compared to 397 for post 73.
Biggest misgiving I have about the post 73 design is the small S3 dimension.
At 1236 this is about the same size as SD. You can see how tight the mouth is positioned to the rear of the driver. This would require care and adjustment to make it work due to the driver seriously restricting the mouth. I suppose an access panel would be needed to actually get the driver in the box!😱

restriction is not to bad because of the neodinium magnet.
ff%20iets.jpg

i designed the post 73 th for the use in a cardroid sub aray.
this is why its symetric.
i like xco1 model 2,its a easier bild but for me a little to big.

i wil work this weekend on it to give you al the details😉
meanwile here are some designs,most of them are posted here.to make your choice more diffecult😛
kies.jpg

Must they (post 73) be used in a cardioid sub array? Will I/we loose any performance if they're not?


yes the idea was to make the front parts removeble 🙂
(Referring to post 73)

ok lets make it 15mm.i think 18 is a bit over the top.
horizontal there are only small spaces ,and vertical wil do some bracing in the middle.
front wil be removeble in one piece.
it might be a good idee to send you the dwg,dxf file when im finnished.
then you can make a 1 on 1 print on A0 paper(it fits)in the copy store.
cost about 4 euro here on this side of the pond🙂

justin ,we need to make a new topic,because this has no longer anything to do with woodys design ,:nownow:

Welcome 🙂


Any others: feel free to post your design if you believe it betters any of these and fits the goal posted above. Many thanks!

Justin

Shipping compression drivers to Germany from USA - Export rules

Has anyone ever shipped compression drivers to Germany from the USA? When filling out the customs documents, its saying that speakers are a restricted item. I dont understand why, aside from perhaps the solder in them adhering to ROHS standards. Its actually the US customs being picky here, not the EU or Germany.

Anyone else been in this situation?

FM Alignment Question- Pioneer SX-737

I need to know if this is normal or not. When aligning the 737, things go fine until T5. T5 couples the mixer into the ceramic filters. I find adjusting it has almost no effect on the signal amplitude, even though I'm right down near the noise where I peaked everything else. Anybody done one of these or similar?

Attachments

  • SX737_T5.jpg
    SX737_T5.jpg
    311.3 KB · Views: 40

Yet another TDA1387 NOS DAC with tube output

So, I've had a quad paralleled TDA1387 from Tek Products laying around for a few years now waiting for a project and I recently had some renewed interest in doing something with it. After a couple of false starts I've arrived at this configuration - NOS with passive I/V and LP filter followed by a current source loaded cathode follower at the output.

Attachments

  • c3slcf.jpg
    c3slcf.jpg
    99.6 KB · Views: 806

Tokin THF-51S: bias voicing & flavor?

I’ve been devouring every THF-51S thread I can find—µ-Follower, DEF, Sissy-style buffers, you name it. Rather than ask for drawings, I’d love to pick your brains on how you coaxed the best out of this beast:
  1. Bias voicing – I see followers running anywhere from 1.6 A @ 28 V (BAF2015 rebuilds) up to 3 A @ 62–70 V in the 45 W/70 W µ-Follower monsters. How did you settle on your Iq/Vds pair, and what happened to the 2nd-harmonic line as you crept hotter or cooler?
  2. Thermal chores – 200 W dissipation per monoblock turns these into winter space-heaters. Any success stories with quiet fans or clever chimney cases that didn’t blunt the sonics?
  3. Front-end flavor – Pure iron for voltage gain vs. the 12-JFET buffer route: what differences did you hear in mid-band texture or sound-stage “air”?
Appreciate the insights!!!

XRK Audio Etsy Store

This is a thread to make announcements and highlight new products that will be coming out in my shop on Etsy.

Here is the link to the store:
https://www.etsy.com/shop/XRKAudio

Products to highlight as of May 3, 2023 are:

RTR BTSB with Tube Buffer - HypeSET (preorder):
https://www.etsy.com/listing/147415...499&click_sum=cca02e94&ref=shop_home_active_1

RTR BTSB Panel Mount buffer:
https://www.etsy.com/listing/137689...619&click_sum=dd1364a2&ref=shop_home_active_2

RTR SSR Speaker Protection:
https://www.etsy.com/listing/932716...41&click_sum=483bacd9&ref=shop_home_active_15

RTR TPA3255 Class D amplifier:
https://www.etsy.com/listing/755264...34&click_sum=c1251dcf&ref=shop_home_active_24

And I will soon add pre-orders for the HyperSET - a BTSB with a SE triode tube buffer and volume control - please stay tuned.

Hafler DH110 Preamp Line Section Voltages

I have a a Hafler DH110 pre amplifier. First, this unit works, but has the following issue. The left channel voltages to the transistors are reading about .3 to .4 volts lower than the right channel. Second, what I have done is verify the left channel voltage drops on all the resistors and against the right channel. These are shown in the attached PDF file. Third, I checked every voltage at each transistor to validate the right channel and left channel voltage discrepancies. Fourth, I have included all my voltage measurements in the PDF file with a schematic. Lastly, my question is this, why is the left channel lower when the power rails are both 23.1V? Each resistor is showing this voltage on the rail side of the resistor. So the rail voltage going to the left or right channel resistors are spot on the 23.1V. Again the unit works, but the amperage draw on the output Q13 and Q14 is 8.1ma on the left channel while the right channel is 13.5ma due to the votage drops on R34 and R35. I did notice that the right channel differential pairs bases run about 12 to 21 mv on the right channel and on the left these volates are 1 to 2 mv. The only thing I can think of is that there is a faulty transisor in the drive path, but I do not know if this thinking is correct. I do have the BC series of transistors to replace everything on the left channel, but do not know if they require matching or if changing them all out is a wise decision. So I am asking for some help from the DIY community to solve this low voltage problem. I am open to all the DIY experts becasue I am at a loss of ideas.

Attachments

Ready-to-Run (RTR) SSR DC Speaker Protection and Delay GB

Edit Mar 28, 2023: Schematics for Rev 2.3 that have the bonus low capacitance PSU PCB:
1680004640098.jpeg


Edit Dec 4, 2022: GB5 interest list here - please sign up and 30 units needed for production to commence.
https://www.diyaudio.com/community/threads/rtr-ssr-speaker-protection-gb5.392399/#post-7186273

Edit March 14, 2021: Easy Peasy instant off anti turn off thump mod here:
Ready-to-Run (RTR) SSR DC Speaker Protection and Delay GB

Edit Jan 25, 2021: the Gen 2 RTR SSR schematic and notes on use is here. Specifically,
Details on how to connect the power supply and how to use the instant off bonus controller board.

Edit Dec 16, 2020: the GB interest list for the Gen 2 of the RTR SSR has kicked off. They will handle up to 150v or 300w into 8ohms, the speaker negative is isolated from power supply ground to allow use with bridged amps, and there is an external open collector logic pin to instantly shutdown the SSR. $47ea, professionally assembled and fully tested. Free shipping in USA.
891926d1604979168-ready-run-rtr-ssr-dc-speaker-protection-delay-gb-58344f39-83d0-4306-b8a0-95dfbb8b2c42-jpeg


GB interest list here:
Ready-to-Run (RTR) SSR DC Speaker Protection and Delay GB

Edit Oct. 22, 2019: The full production run has been delivered. They look great!
Ready-to-Run (RTR) SSR DC Speaker Protection and Delay GB

Edit Oct. 15, 2019: Here is a photo of the sample unit we tested before we gave the OK for the full production run:
788077d1571199829-ready-run-rtr-ssr-dc-speaker-protection-delay-gb-rtr-ssr-protect-sample-01-jpg


Edit: Oct. 15, 2019: We just received news that all 120 units of the first production run have been completed. Should be shipping them out soon.

Jhofland has developed a superb, simple, compact solid state relay (SSR) DC speakere protection and turn-on delay circuit that is similar to the one used in the ABBB amp. JPS64 did the layout on this, and together, we now have a very nice SSR protection circuit that works "like a wire". It uses very compact SMT parts and the whole board is only 75mm x 35mm per channel. An assortment of connection options are availble ranging from usual spade Fastons to Molex Minifit 4-pin locking jacks, or even plain old soldered flying leads. The circuit uses a topology designed by Jhofland to sense a small DC offset via an opto-coupler isolator and a comparator. The comparator drives another optoisolator to activate back-to-back ultra-low RDson MOSFETs as the SSR. A second comparator provides the 3 second time delay when powering on to avoid turn-on speaker thump. The circuit is powered from the conveniently available +ve DC rail of the amplifier's PSU (range is circa +20v to +100Vdc). The supply voltage is reduced and regulated to a constant value on board via a regulator for consistent performance despite variations in the supply rail voltage.

Initial testing of the SSR DC Protect circuit revealed that when it is on, it truly acts and measures as if it were a piece of high current wire. No noticeable artifacts in the time domain were visible on an O-scope, and FFT's also revealed that it had no effect on the harmonic distortion profile either.

Specifications:
  • PCB size is 70mm x 35mm and the M3 screw mounting holes are 62mm x ~26.5mm
  • Requires > +19vdc power supply (can use +ve rail from your amp) and internally regulated to 15v
  • Fully tested for 100w rms continuous load into 8ohms (MOSFETs are rated for up to 154w into 8ohms)
  • Fully tested to handle 48vdc continuous DC fault
  • 3 second turn on delay
  • For a 48vdc fault, turn-off time is 25 milliseconds, 1.5v thrreshold

The best part of all is that we will be offering this as a proefessionally built and fully-tested, ready-to-run (RTR) unit. The user just has to solder on his/her own choice of spade terminals or Molex Minifit Jr connectors, or flying leads, the +ve supply via a JST connector or flying leads, and then go and use it.

Thanks to Jhofland for the design, and JPS64 for the layout.

3D render of intitial version for testing and verifcation:
770899d1564239251-ready-run-rtr-ssr-dc-speaker-protection-delay-gb-ssr-dc-protect-render-01-jpg


Photo of verification build with Faston connectors:
770900d1564239251-ready-run-rtr-ssr-dc-speaker-protection-delay-gb-ssr-dc-protect-verification-build-01-jpg


O-scope screenshot of signal at 100wrms into 8ohms with (yellow) and without (blue) - they are indentical and thus perfectly overlaid. Test with Hafler Class AB amp and resistive load:
770901d1564239251-ready-run-rtr-ssr-dc-speaker-protection-delay-gb-ssr-dc-protect-100w-8ohms-oscope-jpeg


Edit Aug 7, 2019: New data with VHEX+ amp for 40Vpp into 8ohm load (25wrms) showing harmonic distortion components from H2 through H5 vs Frequency and THD for case without SSR Protection in place:
773223d1565161745-ready-run-rtr-ssr-dc-speaker-protection-delay-gb-01b-vhex-14-12vrms-8ohms-protect-sweep-8avg-jpg


Same data with SSR Protection in place:
773216d1565161249-ready-run-rtr-ssr-dc-speaker-protection-delay-gb-02-vhex-14-12vrms-8ohms-yes-protect-sweep-8avg-jpg


Comparison with overlay of above THD data for both cases:
773217d1565161249-ready-run-rtr-ssr-dc-speaker-protection-delay-gb-03-vhex-14-12vrms-8ohms-thd-compare-8avg-jpg


Comparison of THD vs Power into 8ohm load with and without SSR Protection in place:
773220d1565161249-ready-run-rtr-ssr-dc-speaker-protection-delay-gb-thd-vs-power-1khz-jpg


Typical FFT without SSR Protection in place at 25wrms into 8ohms:
773218d1565161249-ready-run-rtr-ssr-dc-speaker-protection-delay-gb-04-vhex-14-12vrms-8ohms-protect-jpg


Typical FFT with the SSR Protection in place at 25wrms into 8ohms:
773219d1565161249-ready-run-rtr-ssr-dc-speaker-protection-delay-gb-05-vhex-14-12vrms-8ohms-yes-protect-jpg


No added distrotion as shown by test with 40w into 8ohm load with and without RTR SSR using Tomchr's ultra-low distortion Modulus86 amplifier:
Ready-to-Run (RTR) SSR DC Speaker Protection and Delay GB


For more technical details of this test, see this post:
Ready-to-Run (RTR) SSR DC Speaker Protection and Delay GB

Update August 7, 2019: Pre-orders are now being taken from my shop here. Price for fully built and tested unit is $40ea with Free Shipping in the US; $10 shipping to Canada; $15 shipping to everywhere else.

Update July 29, 2019:
Current interest list shows almost 100 units. Looks like this is a definite go! Latest render with voltage regulator IC and transzorb diode for protection:
771139d1564352088-ready-run-rtr-ssr-dc-speaker-protection-delay-gb-minifit_horizontal-sm-jpg


With vertical Molex Minifit Jrs:
771140d1564352088-ready-run-rtr-ssr-dc-speaker-protection-delay-gb-minifit_vertical-sm-jpg


With Faston spades:
771138d1564352088-ready-run-rtr-ssr-dc-speaker-protection-delay-gb-faston-sm-jpg


Schematic of pre-production unit:
771141d1564352088-ready-run-rtr-ssr-dc-speaker-protection-delay-gb-rtr-srr-prot-rev1-schematic-jpg

Attachments

  • SSR-DC-Protect-Render-01.jpg
    SSR-DC-Protect-Render-01.jpg
    367.1 KB · Views: 10,871
  • SSR-DC-Protect-Verification-Build-01.jpg
    SSR-DC-Protect-Verification-Build-01.jpg
    252.9 KB · Views: 10,895
  • SSR-DC-Protect-100w-8ohms-with-without-Oscope.jpeg
    SSR-DC-Protect-100w-8ohms-with-without-Oscope.jpeg
    111.1 KB · Views: 10,673
  • No-SSR-Protect-2.88vrms-8ohms-FFT.jpg
    No-SSR-Protect-2.88vrms-8ohms-FFT.jpg
    183.2 KB · Views: 1,184
  • SSR-Protect-2.88vrms-8ohms-FFT.jpg
    SSR-Protect-2.88vrms-8ohms-FFT.jpg
    181.9 KB · Views: 1,648

For Sale RAAL 70-20XR-AM Ribbon Tweeter pair, with boxes and Crowe Horns

I used these for 20-30 hours mounted in some homemade MDF standalone boxes which I will include with purchase. They’ve never been mounted in a full-size cabinet. In addition, I’m including a pair of 3D printed Joseph Crowe biradial horns that were specifically designed for 70-20XR. I never got around to mounting the horns, so some drilling/finishing may be required if you choose to use the them.

More info on the horns here: https://josephcrowe.com/blogs/news/horn-no-1155-for-raal-70-20xr-pure-ribbon-tweeter

THIS IS DONE

Attachments

  • IMG_0598.jpeg
    IMG_0598.jpeg
    988.3 KB · Views: 146
  • IMG_0602.jpeg
    IMG_0602.jpeg
    1 MB · Views: 147
  • IMG_0603.jpeg
    IMG_0603.jpeg
    816.2 KB · Views: 167
  • IMG_0606.jpeg
    IMG_0606.jpeg
    1.2 MB · Views: 154
  • IMG_0605.jpeg
    IMG_0605.jpeg
    802.5 KB · Views: 158
  • Like
Reactions: mordikai and dBel84

Kenwood KA-907 oscillating when preamp is hooked up

I’m repairing this amplifier for a friend, and this one has given me several headaches. When I received it, the input board had multiple blown out traces, as well as multiple dead transistors. I did a full electrolytic recap as well as replaced all of the black flag capacitors with silver mica of equal value. I also replaced several zener diodes. I am now at a place where I want to do a bit of testing before I go further with any work.

On power up (on DBT) I found the bulb went bright as the bulk capacitors charged up, and then went dim and then a second later went slightly bright again. Also ans I was monitoring the bias current it went up quite a bit ans well. After a bunch of trial and error as well as input from others, I found that the amplifier was oscillating. I am seeing a 2 MHz oscillation at the input of the protection relay.

IMG_6549.jpeg


Trying to figure out where it was originating from I found that when I removed the pre out/amp in jumpers on the back of the amp that the oscillating went away and no more brightening of the bulb and bias was stable.

So that told me the oscillating was originating in the preamp, right??? Measuring at the preamp output with it disconnected from the amp input I was seeing nothing. No oscillating whatsoever.

IMG_6573.jpeg


If I turned the volume pot all the way up, I would get oscillating, but only at the very end of turn. And the oscillating that I was seeing was not increasing as I turned the volume pot, it wasn’t there, and then all of a sudden appeared at the end of the turn, plus this oscillating was 24 MHz.

IMG_6574.jpeg


I’m hoping to get some suggestions on where to look, I am confused as to why the amplifier goes into oscillation when it’s input is connected to the preamplifier output.

Really appreciate it!

Dan

  • Locked
Threshold S550E Amplifier Issue

I purchased a nice S550E Amplifier about a month ago. It sounds great all around. However, I have noticed that it gets a lot of transformer vibration on startup that usually subsides after about 5-7 seconds. I believe this is the transformers charging the filter capacitors. Once the amp is warmed up, I can hear a very low sounding buzz that reminds me of a ground loop sound, but I am using the same outlets and power filtering. This amplifier has never been serviced and the cans and rectifiers may be overdue for a refresh. I am not a pro, but can solder and have adjusted bias on Thresholds before with success. I will likely take it to a good repair technician but ai need recommendation's on what type and specs for the filter capacitors(6) and the rectifiers, as I understand those should be replaced as well. Any recommendations are greatly appreciated. Thank you.

Cambridge Audio S30 Damage Repair

Hi there,

Ordered some used Cambridge Audio SL30 that were advertised as 'tested working'. First time I plugged them in I noticed one speaker sounds awful and then saw that the woofer is damaged. The whole rubbery part of the woofer is disconnected from the outside and it has a small cut at the bottom. Is this easily repairable or shall I return to seller?

Second photo is of the good condition speaker.

Thanks,

Tom

Attachments

  • image.jpg
    image.jpg
    695.1 KB · Views: 29
  • image.jpg
    image.jpg
    652 KB · Views: 25

Pioneer A-676 No Output and No Relay Clicking

So i'm currently attempting to revive a Pioneer A676 Amp. I'm getting no sound out of the speaker terminals or headphone jack and no relay clicking. The amp does appear to be powered up (got LED's on the driver boards although no power light - I think its just the bulb burned out tho!) The other lights come on when the buttons are pressed ok.

I've got 70mv DC on the output of both the driver boards AWZ3421 and AWZ3418 and if I feed in some sound to the input jack and connect my scope to each output from the amp boards (Left + Right) I can see the amplified sound on my scope and I can adjust the volume using the volume control. So it seems as if the amplifier circuitry is all working and its taking the signal and amplifying it. But something isn't happy and it isn't allowing the relays to turn on. I've pulled each of the relays out and manually checked them and they are working normally.

I've been looking carefully over the service manual and have found something - i've got no 13.2V or 13.3V on the VR Assembly board AWZ3441 and instead am seeing between 0.45 and 0.6V there - I cannot however seem to get my head around where this voltage is supposed to come from and was hoping someone with a bit more experience on this amplifier to point me in the right direction for what I can check next. I believe that without this voltage the relays are not going to activate.

Just as a quick update/edit - I decided since there was no noticeable DC on the amp output I wired a speaker up to the output before the relay (i've tried both channels) and the amp works perfectly sounds clear and all other functions work - volume control etc. Obviously this is not a solution but it confirms the amplifier is working correctly.

Threshold S550E Repair Help

I just purchased a Threshold S550e in great condition but have noticed a couple of issues. The transformers vibrate pretty loudly on startup and then settle down after about 5 seconds or so. I am also noticing a very low humming through the speakers with no source material playing, and this also occurs without the preamp attached. I feel pretty confident that this amplifier is due some new PS filter caps and bridge diodes, but I cannot find any info on what I can or should be using as replacements for the existing 6 caps and the bridge rectifiers. Any help would be appreciated.

Source for Alps Alpine rotary band switch cables

Does anyone know a source for replacement band cables for the Alps rotary selector switches used in squillions of integrated amplifiers? They are commonly a blue lattice with a stainless steel band inside, though in the picture below they are black.

The band / strap / cable connects a rotary control to a PCB mounted slide switch, commonly used for input selection, etc.

1pcs-lot-Japanese-ALPS-cable-band-6-switch-handle-length-25MMF.jpg


T2KUHdXm8XXXXXXXXX_!!116528884.jpg

Has anyone used this boost converter?

https://www.parts-express.com/Sure-...5uFoawCnQ1NRTKRMIm_tiAWm9OAR2TCxoC0-MQAvD_BwE

I have been curious lately if I could figure out how to use some tda7498e boards I have in my truck. I thought doing this would be more common but apparently not because I can't seem to find any threads on it. I have come across a couple way back that talked about it but I don't know how it worked out(or didn't). I would like to supply 2 boards with somewhere between 28-36vdc and I'm thinking they would need about 200w each. That boost converter from Sure is the only ready made product I can find that's advertised specifically for amplifier use in vehicles. Of course there is the boost converters on amazon and multiple other sources but I don't think its wise to try one of them unless I find someone that has used one without too much trouble.

BC546 for 2SC2634 in Yamaha M-60 amp?

I am working on a Yamaha M-60 amp and need to replace a 2SC2634, the closest I can find is BC546 (which I have and I know the pinout is different). I got the schematic from HiFiEngine and it is very fragmented. TR140 is the bad one. Anyone have a better idea?

transistor TR140.jpg

Attachments

Request for help in diagnosing a fault in a Sony TA-N55ES/N330ES amplifier

Request for help in diagnosing a fault in a Sony TA-N55ES/N330ES amplifier.

Right (R) channel not working.
Components found faulty during diagnosis:


  • Short-circuited ICs: Q301, Q302, Q303, Q304, Q305
  • Burnt resistors: R306 and R305
  • RT301: Open circuit
We replaced the STK module, but the same problem persists.

  • Issue: On pins 10 and 11 of the STK3102-3, we measure + and -59V DC (measured with respect to ground).
  • We isolated pins 10 and 11 of the STK3102-3 from the amplifier circuit, but we still measure 59V DC on them.
  • We removed ICs Q301, Q302, Q303, Q304, and Q305 to isolate the amplifier section.
Tests performed:

  • Correct measurement: On pins 5 and 6 of the STK3102-3 (Left channel), we measure + and -1.2V DC, which is correct.
  • Resistors and capacitors in the STK3102-3 bias circuit are within correct values:
    R301 & C301, R302 & C302, C329, C307, C304, C305, C306, C303, C308
  • Continuity test passed on the -B and +B power lines

Attachments

  • stk3102.JPG
    stk3102.JPG
    79.4 KB · Views: 13

Request for help in diagnosing a fault in a Sony TA-N55ES/N330ES amplifier.


Request for help in diagnosing a fault in a Sony TA-N55ES/N330ES amplifier.

Right (R) channel not working.
Components found faulty during diagnosis:

  • Short-circuited ICs: Q301, Q302, Q303, Q304, Q305
  • Burnt resistors: R306 and R305
  • RT301: Open circuit
We replaced the STK module, but the same problem persists.
  • Issue: On pins 10 and 11 of the STK3102-3, we measure + and -59V DC (measured with respect to ground).
  • We isolated pins 10 and 11 of the STK3102-3 from the amplifier circuit, but we still measure 59V DC on them.
  • We removed ICs Q301, Q302, Q303, Q304, and Q305 to isolate the amplifier section.
Tests performed:
  • Correct measurement: On pins 5 and 6 of the STK3102-3 (Left channel), we measure + and -1.2V DC, which is correct.
  • Resistors and capacitors in the STK3102-3 bias circuit are within correct values:
    R301 & C301, R302 & C302, C329, C307, C304, C305, C306, C303, C308
  • Continuity test passed on the -B and +B power lines.

Why SLAPS behaves so much differently from traditional Passive Radiators?

I was reading about SLAPS Passive Radiators. Please see attached SLAPS_manual_ENG.pdf. It just has two back to back attached surrounds sharing same PR disk mass.
Attached are front, side and rear images of SLAPS PR, the slots on one surround are just to avoid air compression during operation which will otherwise damp the movement, for our discussion, the slots can be ignored and we can assume that there are two back to back surrounds without these slots.

One effect I immediately see is that this SLAPS will increase effective stiffness of the PR as each surround is bringing its own stiffness. I assume that we can punch in the numbers in a PR simulation program like Unibox and generate the frequency response of the system.

However, I was surprised to read SLAPS_manual_ENG.pdf and found some things deviating from usual theory of PR working and I have listed down only those points below. Can we have a discussion on each point to either accept it as mentioned in SLAPS_manual_ENG.pdf or dismiss it as gimmick? I have also mentioned my understanding for each of the point below in italics.

1) Claim: The revolutionary efficiency and performance are the result of the pneumatic coupling between SLAPS and the active driver.
Wait, 'pneumatic coupling'? I thought this supposed pneumatic coupling was also valid with a normal PR, how does that suddenly improve with SLAPS?

2) Claim: The unique design allows the active driver compression-free movement resulting in deep, dynamic and hard-hitting bass response.
In case of normal PR, the PR size is one greater than active driver, for eg for 12" active driver, a 15" PR is recommended so that we dont get xmax related compression. Whats so different with SLAPS?

3) Claim: Conventional computer modeling software will not work correctly with SLAPS and will in most cases greatly overestimate the internal volume of the optimal cabinet.
Why does double surround PR break simulation?

4) Claim: SLAPS increases a subwoofer efficiency and capability for ultra low frequency reproduction (very deep Sub-bass) without the drawbacks of traditional designs.
So, I read the patent and attached the PR excursion vs frequency plot from the patent, as you can see they show more extension for SLAPS and a steep fall response for normal PR, why this difference in bass extension between both?

5) Claim: It gives you much better performance due to the increased surface area and the fact that the particles of air
inside the enclosure and outside the cabinet moves with the same speed and in a near phase relationship. Phase means that the active device and SLAP work almost concurrently and simultaneously creates respectively pressure and counter-pressure at the same time.
Now, what is being said? I am lost in the phase jargon. And both active and PR dont move in unison, there is air spring the sound wave has to travel that air-spring, of course due to the wavelengths being so large they may appear concurrent due to very small delay, but this is valid for normal PR also. What is so different with SLAPS?

6) Claim: A traditional bass reflex port design, the system is limited in performance due to the air in the reflex port not being in phase or at the same speed of movement as the air in front of the active driver.
As far as I understand the PR does exactly what the cylindrical air mass of air does in a bass reflex port. What limited performance is being described, is it port velocity limit of port?

7) Claim: Active woofer unit should preferably have a resonance frequency (FS) of 30Hz or less and not more than 35 HZ.
In the entire document, TS parameters are never considered or even mentioned and now this limit imposed on Fs, why cant I take Fs of 40Hz and tune PR to 25Hz? Haven't people done that already?

8) Claim: Typically 16 mm MDF or thicker. Particleboard or plywood are also excellent materials.
For long stroke active driver and long stroke SLAPS PR, isn't 16mm too thin, should it instead be saying to use more thickness and more bracing than used typically?

9) Claim: It is important that you do not exceed the maximum specified enclosure volume. The air inside the cabinet acts like a spring and the larger the enclosure the lower the linear output. This also introduces distortion.
10 "inch 20 - 45 liters internal volume sealed cabinet
12" inch 30-60 liters internal volume sealed cabinet
15 "inch 35-100 liters internal volume sealed cabinet
18" inch 50-140 liters internal volume sealed cabinet

As far as I understand the opposite is true, and this is what I read, I dont remember where. Lets assume the volume of air displaced at Xmax of active driver is Vxmax in each direction, then as the cone goes in at Xmax the active driver reduces the volume of the enclosure by Vxmax and the stiffness of the enclosued volume increases, same way, as the cone goes out at Xmax the active driver increases the volume of the enclosure by Vxmax and the stiffness of the enclosued volume decreases. This increase and decrease if substantial, causes distortion. If the enclosure volume is large then the Vmax and the corresponding change in stiffness is negligible and distortion is negligible. Now, if if we reduce the enclosure volume then this Vmax becomes a sufficient portion of enclosure volume causing large changes in stiffness at both the ends at Xmax, thus distortion increases. The Vmax of the driver should not be more than 5% of the enclosure essentially putting a lower limit on tghe enclosed volume. Thus, a large active driver needs larger enclosure and higher Xmax also needs a larger enclosure. Of course, the actual frequency response still has to be simulated. Isn't it the same reason that when Sunfire put their large excursion drivers into very small enclosures they had to improve distortion using servo based electronics/amplifier? How does a small volume benefit SLAPS?

10)Claim: By placing SLAPS right next to the active woofer so you run the risk that at the acoustic resonance frequency there may be a negative interference which and the can lower the overall sound pressure level of the deepest bass tones. The lower the resonance is set, the less likely it is that there will be an issue. Best results are obtained by placing it on the back or side of the cabinet.

Firstly at box resonance the active driver moves the least, it hardly produces sound, the entire output at this frequency is from SLAPS so where is the claimed cancellation coming from. And if we move the SLAPS to rear even then both the drivers output is within 1/4 wavelength, so if cancellation has to somehow occur, it will occur the same way with a rear mounted SLAPS, no?

Thanks in advance,
Warm Regards,
WonderfulAudio

Attachments

  • SLAPS_manual_ENG.pdf
    SLAPS_manual_ENG.pdf
    729.5 KB · Views: 46
  • SLAPS Front.jpg
    SLAPS Front.jpg
    34.7 KB · Views: 91
  • SLAPS rear.jpg
    SLAPS rear.jpg
    43.5 KB · Views: 76
  • SLAPS Side.jpg
    SLAPS Side.jpg
    50 KB · Views: 89
  • Frequency response.PNG
    Frequency response.PNG
    57.5 KB · Views: 91

Fully 21st Century Tube Preamplifier

All,

Here is the initial post (more will follow) for a project I wish to share that I have been working on for a while (hence my absence from this forum). It is a vacuum tube preamplifier that essentially marries 1950s technology with that of the 21st century. Here is a list of its primary features:

1. Bluetooth input and audio streaming capability.
2. Smartphone control with Bluetooth.
3. Dot matrix RGB display for digital volume control and menu screens.
4. Protection mode for output overload, open tube heaters, and power loss.
5. Software-defined programmable gain (default gain is 12dBV).
6. Tape input, tape monitor loop, and buffered tape output.
7. Four 20k ohm line level (-10dBV) inputs.
8. Switchable high-impedance buffer (used for high-impedance sources such as ceramic cartridges) makes any line input 1M ohm.
9. 45dBV 47k input impedance RIAA magnetic phono input.
10. Two switchable 6922 direct-coupled line-level outputs can drive 600 ohm loads with 0.01% or less THD. 6N1P tubes produce slightly more distortion.

Audio circuitry:
1. All tube circuitry in audio path for line and phono stages.
2. Bluetooth audio signal processing, tape output buffer, and high-z buffer circuits are solid-state.
3. Four 6C45P tubes are used for phono and four 6N1P or 6922 for line.

The software is not complete. I have at least a month of C coding ahead of me to get the Bluetooth streaming/pairing functionality (along with some bug fixes) to work correctly.

Before anyone panics, I must note that the digital circuitry, display, and Bluetooth radio cause no measureable or audably noticable interference (even with the phono input at full volume without the input shorted) in this design.

Attached are several pictures of the unit. What do you all think? Once I see some initial opinions, I will post some test results.

Thanks

Attachments

  • Back.jpg
    Back.jpg
    526.5 KB · Views: 186
  • Bluetooth (2).jpg
    Bluetooth (2).jpg
    292.5 KB · Views: 178
  • Inside 2.jpg
    Inside 2.jpg
    681.1 KB · Views: 191
  • Inside.jpg
    Inside.jpg
    733.4 KB · Views: 184
  • Line 1.jpg
    Line 1.jpg
    271.7 KB · Views: 178
  • Out 1.jpg
    Out 1.jpg
    275.1 KB · Views: 168
  • Phono.jpg
    Phono.jpg
    277.1 KB · Views: 171
  • Standby.jpg
    Standby.jpg
    517.5 KB · Views: 172
  • Test Setup.jpg
    Test Setup.jpg
    588.5 KB · Views: 166
  • Top.jpg
    Top.jpg
    568.3 KB · Views: 168
  • Volume.jpg
    Volume.jpg
    258.1 KB · Views: 172
  • Warmup.jpg
    Warmup.jpg
    327 KB · Views: 173
  • AUD-1 Bottom 2.jpg
    AUD-1 Bottom 2.jpg
    818.5 KB · Views: 150
  • AUD-1 Top 2.jpg
    AUD-1 Top 2.jpg
    724.8 KB · Views: 165
  • VREG 2.png
    VREG 2.png
    6.4 MB · Views: 138
  • VREG 3.jpg
    VREG 3.jpg
    597.6 KB · Views: 186

The "Elsinore Project" Thread

Thought it best to consolidate the inquiries re the Elsinore Project into a single thread, so issues can be dealt here.

We are currently as of June 7th, 2024, up to page 298, click on this link.

1677653542986.png

March 1st, 2023. Elsinore Mk6 "ULD" Version. These are very expensive Purifi Audio "ULD" drivers.

----------------------------------ooooo00000ooooo----------------------------------

There are three variations of the Elsinores:

The "MFC" uses arguably one of the best polycone drivers. Very high sensitivity.

The "NBAC" is the latest variation, uses the same driver but with black anodised aluminium cones. The "NBAC" requires a more powerful amplifier, roughly about double, but is still incredibly amplifier friendly, as all Elsinores are.

The "ULD" is the premium Elsinores, using extreme Purifi Audio drivers that are of the highest quality available. As high sensitivity as the "MFC" and around 20% more efficient. One manufacturer and friend has said that to manufacturer and sell the "ULD" would mean around $50.000 retail.

Nobody manufacturer make a speaker that measures anything like below:

1717722839556.png

This speaker looks like a resistor to the amplifier. As close as possible, above 25 Hertz, the amplifier will draw the same current at all frequencies. This makes the amplifier's output impedance largely cancelled out. These speaker can be driven by all amplifiers with an impedance from zero to infinity. They are also suitable for so-called current-drive which is becoming more common and has an increasing following. All Elsinore variations are suitable with amplifiers like Nelson Pass First Watt amplifier. This is the most amplifier friend speaker designer ever! Until somebody starts using this approach to speaker design.
  • Like
Reactions: Clausen

Tube audio interstage transformers from AM modulators

Hello-
I have been involved in Ham radio since mid 1960's and have built quite a few tube projects. Over the years I have parted tube military and commercial gear. Of interest here are the interstage transformers from AM transmitter modulators. I have interest in using some interstage transformers in guitar amplifiers as experiments. I wanted to mention some of these interstages here as possibly some of you'll have ran across or used them. Of particular interest is the interstage transformer from a mid 1950's CAA (FAA) VHF 50 watt AM transmitter model TV-3 by Kaar. I have the technical manual for it. The I/S is circuit component Kaar #T-104, Kaar part #1022, General Transformer #2A213, a nice hermetically sealed one weighing around 2.5 pounds. It is a single ended primary (10K, 20 mA DC) with two separate 18.75K secondaries. The transformer was used with secondary windings in series (75K) driving the grids of a pair of 6146 tubes in push pull class AB1 with a negative fixed bias of about -45 vdc on center tap of secondary. The primary of transformer had a 6C4 triode, class A cathode bias, with around 150 vdc on transformer primary, and a 1.8K cathode resistor bypassed with a 0.1 ufd capacitor. I measured DC resistances of pri as 735 ohms and each secondary in vicininty of 2.5K.
Just curious if anyone else has used I/S transformers from older AM modulators. I have some smaller, about 1 lb, Berkely Transformer, hermetically sealed interstages from the 1958 TV-15 modulator in nearly identical service, a 10K 20 ma primary (1/2 12AU7) and 75K CT secondary (driving grids of P-P 6146's).
My interest is to use a fairly decent I/S transformer driving grids of P-P 6L6GC/5881 or KT-88 in a clean guitar amp. I have studied some of the Gibson designs and the fairly small I/S (TF-1001D) they used. I believe Mercury builds a larger, better version of it. If anyone has a suggestion for me am all ears here.
Thanks,
Byron W5FH

Attachments

PN100A/PN200A replacements?

Are there any suitable replacements for the PN100A/PN200A complementary transistors? I know they look fairly generic, but I am just wondering what would be the closest equivalent pair?

Background is that I've bought a preamp PCB from eBay that uses these. I can find PN200As in stock, but the PN100As are unavailable for at least two more months from Mouser/Digikey which is a bit annoying 🙄.

Thanks,

Deezer Connect as Debian package for Raspberry Pi streamers - PLEASE HELP!

Hello,

I believe lots of members here use Raspberry Pi for music streaming. Some of you may also be Deezer members and therefore I'd like to ask you for your help.

I've created a thread on Deezer Community forum suggesting that it would be great to have Deezer Connect functionality on our Rpi streamers:
Deezer Connect as debian package for Raspberry Pi streamers. | Deezer Community, bringing music lovers together

If you are also interested in such functionality, could you register on Deezer Community forum and press "Upvote" button to make this idea more popular and visible for Deezer developers?

Thanks a lot in advance and have a great day ;-)

Cheers,
Przemek

Pioneer VSA-701S

Hi all.

Thank you for approving my request to join. My name is Aristo. I am from sunny South Africa.

I had my Pioneer amplifier, VSA-701S, now for 4 years. I need some help with a setting please. I want to change the display color from the yellow/orange to white/light blue. I saw on youtube most of them is the blueish color.

Can someone please help me to change it. I also do not have a user manual.

I will really appreciate it.

Best of regards.

Mods to "Little Bear" phono-preamp

A viewer sent me this made in China "Little bear" phono stage to look at, and out of the box it was nothing special. But with some simple mods, it really sounds quite good.

The main issues IMHO were the coupling caps were the wrong sizes: stage 1-2 was a 0.1uf which is fine, stage 2-3 was a .47uf which only needs to be a 0.1uf, and the output cap was a .47uf which needs to be a 1.0uf. The output cap change in particular resolves the low bass output this pre-amp had. I used Mundorf Alum/oil but if you are on a budget, other types could be used. I have a feeling the supplied "Wima" film caps are fakes and I would replace even the correct size 0.1uf first stage cap while I was in there.

The China 12AX7 tubes it came with were noisy and lifeless. Some new production Mullard 12AX7 gave it some life but were still noisy. Ended up with some EH7025 tubes, which massively reduced the noise yet kept the spunky sound of the Mullard 12AX7 tubes.

They also have 62K resistors for the cart loading/input caps which should be 47K for the vast majority of MM phono carts out there. And finally I swapped the ceramic caps in the feedback loop for high precision mica caps, which made a very audible difference! I also did a bit of lead dress while I had it open.

At the end, this is a nice sounding little pre-amp for a small amount of work. I still think my EAR834 clone sounds better, but if you already own one of these, it's worth doing these upgrades to it.

Here some videos on this phono pre:

Login to view embedded media
Little Bear Mods.pngLittle-bear-BOM.png

Yamaha RX V450 completely dead Help!

Hello friends.
Question, maybe someone has had a similar experience. I received a completely dead Yamaha RX V450, thinking the standby power supply was the problem, but I found that the 10V output was showing 40V!!! I removed the board and worked on it outside the unit, and it turned out Q404 was defective. Naively, I thought, "Okay, now I plug it back in and it works," but it didn't. I got to the board where the microprocessor is located. 10V enters it and drops to 5.5V, C501 was blown. I replaced it, but I'm experiencing some voltage instability on the IC501 regulator output. Just in case, I replaced it with a 78L05 plus a diode on the GND pin to get it down to 5.6V. Now everything is fine, but the unit still doesn't respond when I try to turn it on. I see that there is no +5S voltage, commanded by Q501, Q509 and pin 81 of the micro, I tried disconnecting pin 81 to see if there were any changes and nothing, nor by pin 69 PRY, a signal that enables the relay that feeds the main power supply. The micro oscillator, I could see that it works, but everything would seem to indicate that the 5.6V regulator was damaged and let more than that voltage pass and could have caused the micro to fail, but I understand that the electrolytic capacitors that are at the output of the regulator C502, C503 and C505 which are 6.3V should have exploded as well. Any suggestions or tests to do?.
Thank you very much.

Attachments

The Wolverine 4th Group buy

:cop: This project is a Group Buy. The public group here must agree - in this thread - on what parts will be sold, by whom, and where. Members must abide by those agreements. Any regular sales of the Group Buy PCB, kits or other specific related items outside of diyAudio or this thread will result in the removal of that person from diyAudio.com This is completely at the discretion of the Moderation Team.

No one shall send unsolicited or blind sales PMs to anyone else on the forum. This has long been against the rules and will also result in the immediate banning of any person who does so.
Keep this Group Buy clean and noncommercial or risk immediate removal from diyAudio.com.
:cop:


Hi Guy's

Please Register your details for the Wolverine 4th group buy - Pre Order

After the success of the 3rd group buy in Xmas 2023 and the increasing demand for boards we would like to announce another group buy for the DiyAudio community.​
Thank you all for your support and interest in the Wolverine project over the past 2 years.​
Once again we will do things a little differently then the 1st group buy to help save on the amount of processing time involved.​
Please read the detailed instructions below on how to register for the 4th group buy.​
Color will be determined based on numbers. If we don't have sufficient numbers only a single color will be ordered.​
Please specify your preference on your order sheet.​
To view further details about the EF3-3 vs the EF3-4 please read this post
The prices for 1 and 2 sets of boards are as follows.​

For the EF3-3
2 x Precision EF3-3 boards which includes 2 x wolverine IPS boards. (Color to be determined, Green, Black, Blue)​
$50.00 USD.​

4 x Precision EF3-3 boards which includes 4 x wolverine IPS boards. (Color to be determined, Green, Black, Blue)​
$90.00 USD.​

For the EF3-4
2 x Precision EF3-4 boards which includes 2 x wolverine IPS boards. (Color to be determined, Green, Black, Blue)​
$55.00 USD.​

4 x Precision EF3-4 boards which includes 4 x wolverine IPS boards. (Color to be determined Green, Black, Blue)​
$95.00 USD.​

If you would like more than 2 sets of either boards or you would like to change your indicated quantity,​
please let us know and we will get back to you with further pricing.​

Please note: These prices do not include shipping to your location.​
Shipping will be done at cost price plus an additional $3.00 for the box and packing material.​

No added or extra handling charges will be applied.
A copy of the shipping receipt will be emailed to your personal email address once your shipping has been paid for.​

Each order will contain:
  1. The PCB’s that you ordered.
  2. An A3 copy of the schematic. Both 57V and 64V rail voltage versions have been created. (Dropbox Link)
  3. The Build Guide, which is a 32 page illustrated A4 color document. (Dropbox Link)
  4. BOM in excel, listing all the components and mouser part numbers required to build the Wolverine. (Dropbox Link)
  5. Hole Pattern DXF file and 1:1 PDF file of the Hole locations for Heatsink drilling. (Dropbox Link)
  6. How to wire a Audio Amplifier. PDF document by Bonsai showing Audio Amplifier wiring best practices. (Dropbox Link)
  7. Any future updates to the Build Guide, BOM or Schematic will be updated in Dropbox Link for you to download. So please include the e-mail address you would like to use for this purpose.
We are taking payment through PayPal, and you will be sent a PayPal request to make your payment when the boards are ready to ship.​

To Register your details
Please open the attached file and enter your details into the excel order sheet.​
Please fill out all the fields and then e-mail it directly back to me so we can enter your details into our database:​
My e-mail address is stuartmp@internode.on.net. Please use your DiyAudio username in the subject for example​
Subject: Wolverine Project – Your DiyAudio User Name​
If you have any trouble opening the attached file, please just reply to this PM and provide the following details.​
Please be very specific to save any confusion.​
  1. The total number and type of each EF3-3 & EF3-4 boards you would like.
  2. Your full name, full postal address including country and post code,
  3. Please include your Phone number for tracking updates once your boards are shipped.
  4. Your PayPal e-mail address
  5. Your personal e-mail address for the Dropbox documentation link to be e-mail to you.
Once a reasonable number of boards have been pre-ordered we will order them from our P.C.B. supplier.
We will keep all forum members up to date on the progress of the group buy.

Once we receive the boards we will pack them up, calculate shipping and then send out the payment request to each forum member.
Then once payment has been made you will receive a tracking number so you can track your orders arrival.

Please don't use my e-mail address for any other purpose as I don't have time to respond.
Please post any questions regarding the build of the Wolverine to the main Wolverine Build thread on the forum.
Please post any questions related to ordering through to me using the DiyAudio PM system.

You personal information will not be used for any other purpose and won't be passed onto anyone else.

Kind Regards
Stuart & the Wolverine project team.

Wolverine development Thread

Wolverine Build Thread

Youtube build series
Please see the attached pdf for pricing details. Just let me know what options you'd like when you order your boards.​

Please note. The prices shown include the cost of the boards.​
------------------------------------------------------------------------------------------------------------------------------------​
Heatsinks

We're are also excited to share some great news, which we hope will enhance your amplifier building experience.
The Wolverine team is thrilled to announce that anodized heat sinks are now available for our project.

These heat sinks are specifically designed to fit perfectly with our current boards. Here's what we've got:
  • Heat sinks suitable for the IPS Boards V4.9.
  • Pre-driver heat sinks designed for V4.2 of the EF3-3 & EF3-4 Output Stage Boards (OPS Boards).
  • Driver heat sinks for V4.2 of the EF3-3 Output Stage Boards.
We are offering full sets of these heat sinks, which include installed Mill-Max pins:

  • EF3-3 IPS, Pre-Driver & Driver: $27.5 USD (6 Heatsinks Total)
  • EF3-4 IPS & Pre-Driver: $22.5 USD (4 Heatsinks Total)
Thank you for your continued support of the Wolverine projects. If you have any questions or would like to place an order, feel free to reach out via PM.

@jjs is in the USA, and I am in Australia, so please PM whoever is closer to you, and we'll arrange some for you.

Happy building!

Best regards,
Stuart & the Wolverine Team

Attachments

30W amp (triple emitter follower) with TIP3055/2955 outputs

Small, 30W amp, triple (pre-drivers, drivers, outputs), with TIP3055/2955 outputs.
25V - 30V rails, op-amp input (TL-071 and LT-1056 tested).
Darlington VAS, 2-pole compensation.
50mA idle current per output pair.
The sim (attached) matches the real world very well; no problems with building it 'as is'.
Just adjust idle current, and it works.
Negligible output DC offset (0.2 mV).
The output devices were matched for Vbe.
I really like the sound, slightly on the bass-heavy side for some reason, but very meaty and rich.
Sounds like a big amp.

b44.3055.triple.21Dec2022.png


b44_triple_pcb.jpg


b44triple_fft_1khz.png

b44triple_thd_1khz.png

DSCN0822.JPG

Attachments

Transparent & curved open baffle frames (10mm acrylic) - anyone interested?

( * * * Note to admins => feel free to move this thread to another forum section , if you think it would be more appropriate. * * *)

Introduction:
I know that this is a long shot, but I am checking if there is any interest with open baffle crew, to purchase fully transparent, curved open-baffle frames, made from single piece 10mm cast acrylic.
Making such frames requires expensive mould which is typically outside DIY budget, and couldn't be justified for one stereo pair, but as I already invested in mould, the cost will be considerably lower.

Short description of process:
1. Frame was designed in CAD, then it was cut from single sheet of acrylic glass on CNC machine.
2. After CNC cutting, two side panels were gently curved by thermoforming on the special mould.
3. Finally, all edges & curved surfaces were polished.

Looking form the side, the frame is slightly slanted backward, purely for aesthetical reasons, here are few pics of two sample pieces:
1745936965831.jpg

1745936965889.jpg

1745936965987.jpg


IMPORTANT NOTES:
1. Approx. dimensions:
  • Width: 500mm
  • Height: 1200mm
  • Depth: 360mm

2. Please note that front panels are intact (no holes pre drilled/cut) so you can install any driver combination.

3. Due size & weight, ideally I would prefer shipping inside EU.

Attachments

  • 1745936965867.jpg
    1745936965867.jpg
    373 KB · Views: 9
  • 1745936965792.jpg
    1745936965792.jpg
    277.8 KB · Views: 9

Single-stage active RIAA correction with second- or third-order Butterworth high-pass included

Hi all,

While thinking about ways to speed up the settling of a single-supply single-op-amp RIAA amplifier, see https://www.diyaudio.com/community/...upply-phono-preamp-design.413571/post-7702435 , I found a way to include a second- or third-order Butterworth high-pass filter. As it may be useful outside the context of single-supply circuits, I give it a separate thread.

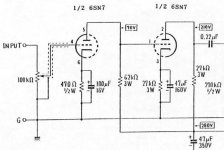
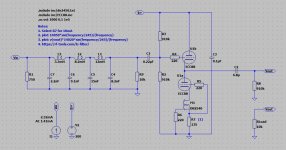
When you just look at the topology and ignore the component values, this is a rather conventional RIAA amplifier (you could make it even more conventional by connecting R7 in parallel with C5, that doesn't matter much for the principle):

RIAAEV3tussenstap.png


Normally, C8 is used to cause roll-off in the subsonic region and the network R7...R9, C5, C6 realizes the RIAA poles and zero. In this case, however, I use C8 to realize the lowest RIAA pole at -1/(3.18 ms) and R7 to get subsonic roll-off.

Note that C8/C5 = 1000, meaning that without the subsonic roll-off, the DC gain would be 1001, a very ordinary value for a moving-magnet amplifier (1 kHz gain roughly 40 dB).

With everything ideal, at the value of the Laplace variable s where the impedance of C8 cancels the impedance of R12, the feedback disappears and the gain goes to infinity. This means that there is a pole at exactly -1/(R12C8), so if this has to be the first RIAA pole, one needs R12C8 = 3.18 ms. It's actually 3.196 ms in the schematic, pretty close.

The disadvantage of using C8 for the first RIAA pole is that C8, which has a relatively large value, needs to be accurate to get an accurate first RIAA pole. (C8 has practically no effect on the gain at frequencies much greater than 50 Hz, so its tolerance affects deep bass, but not channel balance.) The advantage is that you can include better subsonic filtering in the loop by adding two more resistors and a capacitor.

As an intermediate step, suppose you could add an ideal inductor with a huge value between the output and the negative input of the op-amp, chosen such that it resonates with C5 at the desired subsonic roll-off frequency, and that you chose R7 such that it damps the LC circuit to a quality factor of 1/2 √2. The subsonic response would then be very close to second-order Butterworth. That's because the gain of the RIAA correction amplifier is one plus the ratio of the feedback impedance to the impedance from the negative op-amp input to ground, and that "one" is quite negligible at low frequencies. Mind you, R8 and R9 contribute to the damping of the LC circuit, but not by much. You could also choose a quality factor of 1 and design the AC coupling at the input for the same cut-off frequency. The combined response is then third-order Butterworth.

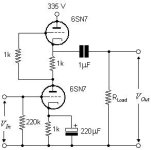
Such an ideal inductor is totally impractical, but it can be approximated with a T network consisting of two resistors with values much smaller than R7 and a capacitor to ground at the point where they are connected, see this figure:

RIAAEV3.png


The transfer from the voltage going into R11 to the current coming out of R10 rolls off at a first-order rate from some very low frequency onwards, like would be the case with an inductor.

I haven't found any simple exact equations for any of the values except R12C8 = 3.18 ms. In fact, I've been very lazy and just calculated approximate values for the other components, and then used a pole-zero extraction program to fine-tune the values.

Regarding those approximate calculations:
R12C8 = 3.18 ms to get the first RIAA pole at the right spot.

The DC gain would be 1 + C8/C5 without subsonic roll-off, so C8/C5 = 1000 gives you a midband gain of roughly 40 dB.

At s = -1/((R8 + R9)(C5 + C6)), the impedance of the network R8, R9, C5, C6 goes to zero and the gain of the circuit becomes 1. As a gain of 1 is pretty close to 0, this must be close to the location of the RIAA zero. That is,

(R8 + R9)(C5 + C6) ≈ 318 μs

At s = -1/((R8 + R9)C6), the impedance of the parallel connection of C6 and R8 & R9 goes to infinity. The impedance of the whole feedback network remains finite due to the other branches R7 and R11, C7, R10, but it does get pretty large. That means the second RIAA pole must be close, so we get the extra criterion

(R8 + R9)C6 ≈ 75 μs

The (theoretical) inductance L is chosen to resonate with C5 at the required subsonic roll-off frequency and R7 is chosen to get the desired quality factor. R10 and R11 get convenient values much smaller than R7 with R10 also much greater than R12. We then have

C7 = L/(R10R11)

Best regards,
Marcel

Edits:
Input RC coupling
The RCR T-network that approximates an inductor actually approximates an inductor with inductance L = R10 R11 C7 and a series resistance of R10 + R11. At low frequencies, it stops behaving inductively, it just turns into the series connection of the two resistors.

As a result, one of the zeros of the high-pass filter that are supposed to lie at s = 0 actually lies somewhere around s = -(R10 + R11)/(R10 R11 C7). For the second-order cases, I have used the first-order high-pass at the input to cover this zero by making the input RC time constant approximately equal to R10 R11 C7/(R10 + R11), or actually to a more accurate value for the displaced zero found by the LINDA pole-zero extraction program.

For the third-order case, I have used the input RC coupling to make the real pole of the third-order Butterworth response, so I couldn't use it to cover the displaced zero. I used the output RC circuit in that case, or simply did not cover the zero. The effect of the zero not being in the origin is typically only seen below 1.something Hz anyway.

There is another zero not exactly in the origin, this is related to the + 1 term in the gain expression of a non-inverting op-amp amplifier. It is so close to 0 that I decided not to bother correcting for it.

16 Hz split-supply versions
This is a version for split supply and 16 Hz cut-off frequency, see post #58, https://www.diyaudio.com/community/...rworth-high-pass-included.413649/post-7927611

sRIAA2_3.png


For the second-order version (values in parenthesis), the input coupling capacitor C2 can be replaced with a short circuit if you don't mind when the roll-off reduces to first order below 1.3 Hz.

This is a variant with 46 dB rather than 40 dB midband gain:
sRIAA56_46dBgain.png


Thanks to having R6 split into R6 and R0, the time constant of the input RC coupling network can be set more accurately without needing awkward values for C2. This was implicitly suggested by hbtaudio on another thread. Because of the high midband gain, the op-amp needs to have a fairly high gain-bandwidth product to get accurate RIAA correction (16 MHz gain-bandwidth product will give about -2 % error of the location of the second RIAA pole).

Finite gain-bandwidth product
See post #100, https://www.diyaudio.com/community/...rworth-high-pass-included.413649/post-7964481 , for some rough calculations on the effect of finite gain-bandwidth product of the op-amp.

From post #101 onward, Nick Sukhov points out that an amplifier with a high open-loop output impedance would result in a loop gain that depends much less on the RIAA correction circuit impedance. That's something to keep in mind when designing a discrete amplifier, you don't have the ability to choose a high open-loop output impedance when using op-amps.

Applying the subsonic filter to a discrete preamplifier based on the Hoeffelman and Meys configuration
The discussion with Nick and Chris about open-loop output impedances made me realize that the subsonic filter of this thread could be combined with a low-noise ("electrically cold") input termination resistance realized with a special feedback configuration that Dual already used in the late 1960's (CV40 phono section, see https://www.diyaudio.com/community/...o-input-load-modification.424717/post-7947176 ) and that was advocated by Hoeffelman and Meys in a 1978 AES article (Jean M. Hoeffelman and René P. Meys, "Improvements of the noise characteristics of amplifiers for magnetic transducers", Journal of the Audio Engineering Society, vol. 26, no. 12, December 1978, pages 935...939, see also Ernst H. Nordholt, "Comments on "Improvement of the noise characteristics of amplifiers for magnetic transducers"", Journal of the Audio Engineering Society, vol. 27, no. 9, September 1979, pages 680...681). The very first electrically cold resistance was made by William Spencer Percival and W. L. Horwood in 1939 as far as I know, but they used a different configuration and did not apply it to phono preamplifiers. See W. S. Percival, "An electrically "cold" resistance", The wireless engineer, vol. 16, May 1939, pages 237...240.

The schematics below show the resulting configurations. They are identical, but the left schematic is for people familiar with nullators and norators, the right schematic for people who feel more comfortable with high-gain twoports and op-amps. At frequencies well above 50 Hz, the input impedance approaches (R13 + R14)/(1 + R13/R12 + R13/R10). You can make this equal to 47 kΩ while using an R14 that is much greater than 47 kΩ, thereby reducing the thermal noise current √(4kTf/R) that gets injected into the input.

RIAAmetsubsoonfilterin1C.png


You can't do this with op-amps (not without floating supplies anyway) because op-amps lack the negative output that conducts a (signal) current equal but opposite to the current through the positive output. That is, you can make electrically "cold" resistances with op-amps, but not as shown here.

Document about dimensioning the circuit
The attached zip file contains a pdf document that explains step-by-step how the component values were found (section 2) and that presents a more accurate method than I have used (one that doesn't need fine-tuning with a pole-zero extraction program, section 3). It also contains a spreadsheet for the more accurate way to calculate the component values.

Deriving the expressions was a nice exercise, but I'm not at all convinced that my more accurate calculation is of any practical use. It can very easily lead to negative or complex resistances.

Attachments

Sonance Sonamp 260

First off let’s make sure everyone understands I know very little about the subject I’m bringing up and my total amp repair experience is the changing of a faulty protection circuit in a h/k avr500....so please dumb it down as much as possible!

I want to figure out if it’s possible to easily upgrade any components of the sonamp 260.....I own one of these (bought new around 2000’ish) and it’s hardly ‘audiophile’ but seems to me a well built and simple platform that might benefit from some ‘upgrades’.

I understand it’s not as simple as it may look and hope to find someone local to maybe mentor me through it.

Anyhow am I safe in assuming this amp is worthy to upgrade?
It’s currently seeing duty as a sub amp driving dual 10’s
The 260 is supposedly stable to 2ohm and I’ve never been able to make it break a sweat.
As a full range amp the top end is a bit too grainy and harsh (since new) for me anyway.
Is there simple change outs to make it smoother on top?

I think this amps simplicity and low worth (can be had on eBay -$100)
lends itself as a good ‘training’ piece if nothing else?

Anyone have experience with this amp?

Thanks bob

Simple +/- Rail Voltage reduction

If you have a nice transformer with a good VA rating, and your chosen filter capacitors but your +/- rail-voltages are a bit too high >
there is a simple low cost way to 'trim down' your voltage using series power diodes. You simply connect series diodes between your
bridge rectifier Plus & Minus outputs and your filter capacitors. Each diode reduces your voltage by .6V [ or very close to ] .
This means that 10x diodes in series with your + , and 10x diodes in series with your - , will reduce your rail voltages by 5.8 volts.
There is no limit on how far you want to go. The 'voltage regulation' is quite acceptible for most applications and as I said > it is low cost.
https://www.ebay.com.au/itm/4054292...-aedf-969fdf8decb6|iid:1|vlpname:vlp_homepage

I am likely to use this method in the design of an amplifier I am thinking of building. [ I got a great price for a high VA transformer, but its voltage is a bit too high ]

DIY EMI filter for power supply

Emi Filter Plus Elite & DC blocker schematics and motherboard

I had built my own version of a very advanced EMI filter which is still available from here https://775mv.com/product/power-emi-filter-for-audio-12a/ for being purchased at a good price, but I like building things, and modify them according to my needs. First I did not need to filter my entire house using a single high amps filter, because it may be more efficient to use several low current filters instead of one. Therefore I could choose higher inductances with higher attenuation of the noises which circulate on the 220Vac power supplies. I am using a DIY audio Dolby Atmos 16 channel amplifier power, having 8 distinct stereo modules, each with its own power supply, torroidal transformers and rectifiers.

Situation before adding EMI filters:
a) trafo noises and hum because of the DC offset which exists on the network, and obviously I didn't used any DC blocker circuit before.
b) regular EMI filters are just not good enough and they don't filter below 100 kHz, and I needed something to filter below 10 kHz
c) all power transistors from each module where just unusual overheating, without pushing too much the volume ... because all these noises were just passing through into the DC components, almost unfiltered by the electrolitic capacitors.
d) audio distorsions were very intense after pushing some power into the loudspeakers and transistors continued overheating very much
e) ground noises even after changing all audio cables with high expensive professional ones.
f) big noise in the loudspeakers after switching to power on, a big sharp and short boom.

Situation after adding individual EMI filters to each module:
a) no more trafo noises and hum, DC blockers have been added too.
b) filtering all noises and foreign signals above 10 kHz, present in the 220Vac wires from the surge protection unit of my home.
c) transistors are no longer overheating, sound quality improved because of using them in normal range, and the entire sound quality improved.
d) very soft noise in the loudspeakers after switching to power on, low intensity short boom.

The schematics contains: a) DC blocker, b) Advanced ground loop breaking, c) Deep suppression of differential noise stage I (F1,F2,C1,C2,C3,C4,C10), d) Zero noise overvoltage protect (RV1,RV2,RV3) and also Gas Discharge Tube technology GDT, e) Deep suppression of common mode stage using Tr1 and Tr 2, followed by suppression of differential noise stage II and III, (L1,L2,L3) and f) Careful dempening of complex filtering (C8 and C9)

Attachments

  • 07 Filtre.jpg
    07 Filtre.jpg
    100.4 KB · Views: 1,735
  • 08 Filtre.jpg
    08 Filtre.jpg
    102.1 KB · Views: 1,478
  • 09 Filtre.jpg
    09 Filtre.jpg
    84.6 KB · Views: 1,594
  • 21.jpg
    21.jpg
    269.9 KB · Views: 1,454
  • 22.jpg
    22.jpg
    348.2 KB · Views: 1,391
  • filtru1.jpg
    filtru1.jpg
    61.7 KB · Views: 1,331
  • filtru3.jpg
    filtru3.jpg
    78.5 KB · Views: 1,341
  • filtru7.jpg
    filtru7.jpg
    67.6 KB · Views: 2,066
  • Emi Filter Plus Elite & DC blocker.jpg
    Emi Filter Plus Elite & DC blocker.jpg
    426.7 KB · Views: 2,789
  • PF_Cablaj lucru final 120 mm x 100 mm.jpg
    PF_Cablaj lucru final 120 mm x 100 mm.jpg
    259.3 KB · Views: 2,123

New Stuff From Tectonic

Shoutout to Tectonic and Seltech. Great customer service. Just got these guys for a build I'm working on.

https://cdn.prod.website-files.com/673cf5977476dddd8360dc22/67d2079b633f206066240ef8_BMR85R12-4A Datasheet Rev. A.pdf

Have something else in mind for the LF drivers though. Saving those.

https://cdn.prod.website-files.com/673cf5977476dddd8360dc22/67d896ff7f855ecb8ec229c5_SDW70C30-4A Datasheet Rev. D.pdf

Attachments

  • 2025-04-2614.00.378657035760050658299.jpg
    2025-04-2614.00.378657035760050658299.jpg
    210.7 KB · Views: 40
  • 1000003968.jpg
    1000003968.jpg
    270.9 KB · Views: 35
  • 1000003969.jpg
    1000003969.jpg
    227.1 KB · Views: 34
  • 1000003970.jpg
    1000003970.jpg
    287.8 KB · Views: 34
  • 1000003971.jpg
    1000003971.jpg
    269.7 KB · Views: 36
  • 1000003972.jpg
    1000003972.jpg
    246.6 KB · Views: 38
  • 1000003973.jpg
    1000003973.jpg
    229.4 KB · Views: 38

Help identifying this OpAmp

I hope this is the correct forum for asking for help with an Op Amp ? I recently bought a genuine Lehmann Audio Black Cube Linear Headphone Amplifier with some modifications. Mods include a larger transformer, Mundorf capacitors and some circuit changes, but most intriguing is the op amp has been replaced with what appears to be two Burr Brown op amps on a carrier. The text reads BB (Burr Brown logo) and SL232 but I can't find any info on this on-line. It's possibly an older amp ? It comes as stock with an OPA2134 which isn't bad at all, so I'm surprised it's been replaced.

Any info much appreciated.

Attachments

  • IMG_2515.jpg
    IMG_2515.jpg
    499.4 KB · Views: 143

calculating Pensil speaker dimensions for arbitrary drivers

looking at building some pensil type speakers, and at the moment don't have the drivers called for in any of the designs. Is there some rule of thumb that I can use to modify the box dimensions to get close enough to re-size the box to drivers I do have?

Drivers I want to try currently are Mark Audio CHN-70. There will be others soon enough, I'm sure.

I have modeled a few of the various published boxes in CAD (I use fusion 360), so that I could figure out the net volume (not including the driver), and have not really figured out what speaker parameters are the cause for a bigger or smaller box. I'm guessing the Fo, and the Qts are the more important numbers, but also the Vas?

pensil R70.3 has a volume of 2124 in3, pensil p70.2 has 2098 in3 - Not a huge difference. The original pensil R70 had 1792 in3 and the p70 had 2303 in3 volumes. I have not found the specs on those drivers yet to compare. of the currently available drivers with parameters listed online, the CHN-70 look closest in t/s parameters to the CHP-70 gen 2, though they have slightly lower Qts, larger Vas, smaller magnet, and lighter cone. I could try a box built to the same size as called for in the P70.2, but if I knew how to adjust these properly, it might save a bunch of trouble.


I'm also curious about bracing on these boxes. They don't seem really big enough to need it, but the plans say to refer to how the super pensil is braced, which is easy enough to follow. What I'm not sure about it whether I should keep the overall volume inside the same with the bracing, or increase it based on how much space the bracing takes up.


I have hornresp on my computer, but haven't quite figured out the ins and outs of getting useful information from it yet. I'll mess around with it some more and see if I can figure out how to input models of this kind of speaker (this is a mass loaded transmission line?).

SpeakerSim speaker simulation software

SpeakerSim - speaker simulation software

Hi.

I have made this speaker simulation software.
It works on Windows, Linux, and Mac OS X (requires Java 8 or newer).
Goal was/is to make simple all in one speaker simulator.

It currently has Bass Reflex, Closed box, Aperiodic, and Open Baffle simulator, baffle diffraction, passive filters, active filters, room simulation, power response, listening window response ...

I hope it is useful. Any suggestions, wishes, or ideas are welcome.

Download

Attachments

  • SpeakerSim.png
    SpeakerSim.png
    61.4 KB · Views: 5,818

B&C DCM50 Yuichi horn?

Hi,

I stumbled across the B&C DCM50 in the search for a midrange compression driver. It seems like it has only been used by very few people, but the ones that have used it recommends it highly. It seems to fit well into a 200 Hz tractrix or similar round horn, but any inputs on using it in a Yuichi 290 Hz horn? I have not been able to find the exit angle of the driver to evaluate if it matches the rather narrow throat of the Yuichis.

Recommendations for other horns to fit the DCM50?


Thanks!

New member from NY

After months of lurking and binge-reading build threads I’ve finally signed up. I’m based in NY, have a background in software, and relax by melting a little solder in the evenings. Recent projects: a Pass ACA, an MM phono pre, and far too many power-supply experiments.

My current rabbit hole is Static Induction Transistors—trying to wrap my head around the Tokin THF-51S and other SIT/VFET parts. I love minimalist, no-feedback class-A designs and the way they let you “voice” the amp with the device itself.

Looking forward to learning from the collective wisdom here and, once I’ve got something that doesn’t smoke, sharing the scope pics and distortion plots. Thanks for having me!

_ forever25
  • Like
Reactions: metaphile

Push-push ported subwoofer

A buddy of mine gave me 4 dayton rss390hf 15" drivers. I would like to use them for HT and while I normally like sealed subs, I feel like trying out a ported design. My question is, is push-push loading viable/okay to use with a ported design? If so, are there any caveats or things I should know going in? My idea is a dual port ( 4" diameter x 17" long ) on a 2'x2'x3' enclosure in a push-push setting. This design was done on winisd. Thanks in advance!

Best kit starting out? (UK)

Hi, my goal is to build a tube amp that accepts RCA and ideally DC power and obviously outputs to jack. I am a complete novice but very eager to learn. I have scoured eBay (Uk), for a starter kit as well as the internet but finding it hard to find by step by step instructions anywhere.
Has anyone had any experience with any UK kits? Or know where the best place to start is

Best
Reg

Thoughts on new simulator - QSpice

It is being developed by Mike Engelhardt (LTSpice creator). It seems to still be in very early development but already looks quite promising. I have tried it out for a few hours and have been quite impressed so far. I will definitely be keeping an eye on this to see how it develops, it would be nice to see some competition in this space as there hasn't really been any major developments made to free simulators in quite some time.

Things that I like are:
Modern interface
Fast
Can write Verilog code blocks that runs natively
You can type the location of where you want a cursor to appear in the waveform viewer

Has Anyone Tried to Use a TDA1541 DAC to Feed a Phono Preamp?

Please bear with me. I do not have a strong grasp of the complex interactions of my audio equipment. I have never designed or built a new circuit from scratch.

I have been considering adding a tube output to my Philips CD880 for about 10 years now. I have spent a many, many hours trying to learn the technical requirements of I/V conversion and how to build a working tube output. Today, I ran across Regal's thread from 2011 https://www.diyaudio.com/community/threads/new-look-at-tube-analog-for-tda1541.194134/ and a light went on.

Why has everyone focused on building line level outputs instead of MC phono level outputs? I have never seen any discussion of a MC cartridge level output. My Ortofon Cadenza Black cartridge only has an output of 0.3mv and my CAT preamp and ARC D70 MkII have no problem driving my Martin Logan Sequel speakers to good volumes.

It seems to me that there would be more options to build a low level I/V conversion output that outputs 0.3V than 2.0V. What are the technical barriers to converting the TDA1541A's 0.4ma PP to 0.3mv and outputting that to the phono in of my preamp? Is there an insurmountable impedance mismatch problem between the chip and a preamps phono in? Even if I cannot eliminate the tube output, wouldn't I have more options for which tubes I use and which amplification cuirt I use if I am trying to build a phono level output?

I hope someone who has the knowledge will help me with this.

Hello from Cincinnati, Ohio

Hi all! I came here looking for some advice and pointers repairing an amp for a good friend of mine.

I have my own company designing electronics, primarily stuff aimed at the performance aftermarket. Flasher/programmers, fuel pump controllers, secondary injection controllers, sensor manglers, data translators, etc. I have a pretty wide range of gear - pick and place, reflow ovens, stereoscopes, hot air, rework stations, scopes, signal generators. Lucky in this respect.

I've done some SMPS design, mostly buck converters. Seems like Class D amplifiers take a lot of somewhat familiar building blocks and put them together slightly differently. I'm used to seeing boost converters coupled with PWM control for overdriving brushless pumps, for instance.

Look forward to interacting here.
-Dave

Sony DVP-S7700 Analog audio board upgrade with Burson V7 Opamps

I have been using a Sony DVP-S7700 as a transport connected to my Music Hall 25.2 Dac which has some slight mods, including Burson V7 Vivid opamps and a Gold Lion 12AU7 tube. Burson has been kind enough to provide me with samples for a new project to mod my DVP-S7700 and install DIP 8 sockets and replace the OPA2134 factory opamps.

Phase one has been completed, removing the soldered OPA2134 and replacing them with DIP 8 sockets.

IMG_1104.jpegIMG_1108.jpegIMG_1112.jpegIMG_1113.jpeg

Phase two is waiting on some DIP extensions from Burson, it's too tight to install the V7 opamps due to the location of some capacitors. This will hopefully make it easier to swap without having to remove the analog audio board every time.

Please follow along for future comparisons between the analog audio board with the Burson opamps compared to the external Music Hall 25.2 Dac using the Sony as a transport connected through CoAx. I will also be comparing the older V6 Classic, to the V7 and OEM OPA2134.

Passive Radiator vs Active Chassis as PR

Hello Folks!

I am currently in the process of building an PR tuned enclosure.
After searching for available PRs it looks like the market is quite thin. But maybe there is another option?

How about using a active driver with nothing connected to the voice coil or maybe even with the Magnet and voice coil assembly removed as a PR?
It looks like many of the available PRs are already just normal available woofers with just the magnet and VC removed.

Let us take a look at this for example: PURIFI PTT6.5PR-NF1-01 vs PURIFI PTT6.5X08-NFA-01
PURIFI PTT6.5PR-NF1-01PURIFI PTT6.5X08-NFA-01
Vapr / Vas26,2L26,4L
Qmpr / Qms10,96,6
Cmpr /Cms1,05mm/N1,06mm/N
Xmax15mm10mm

The PR very much looks like it uses the exact same parts as the actual woofer. However it somehow doesnt add up.
Qms and Qmpr should be exactly the same as these values are just related to the mechanics, same for Vas / Vapr.
Vas is almost the same on these, but Qmpr is much higher than Qms?
Xmax is different but this makes sense as the active chassis is likely limited by the voice coil leaving the magnet field vs the PR is only limited by the suspension.

If we take a different manufacturer it gets even worse:

Dayton DSA175-PRDayton DSA175-8
Vapr / Vas26,9L18.7L
Qmpr / Qms4.301.66
Cmpr /Cms1.15 mm/N0.71 mm/N
Xmax8 mm5.3 mm

Dayton Audio Epique E180HE-PRDayton Audio Epique E180HE-44
Vapr / Vas12,5216,15L
Qmpr / Qms3.52,93
Cmpr /Cms0.48 mm/N0.61 mm/N
Xmax19 mm14,7 mm

So whats going on here? Are they using different materials for the suspension to get different characteristics? Is the voicecoil influencing anything?

Lets say we need a PR, can we just use a Dayton DSA175-8 instead of a PR and get the same performance if we remove the magnet?
Or the other way around: can we use a cheap woofer, remove the magnet and voicecoil and it will act with the same Qms / Vas when used as a PR?

Is my logic incorrect that removing the VC shouldnt influence Qms and Vas at all? I can only imagine that Qms would increase slightly because some eddy currents could be removed when the VC + former dont have a magnet fields around them.
Could this also increase Vas as it results in less "breaking" while moving?

Sansui AU9500 bias issue

I recently acquired an AU-9500. So I look in the service manual to adjust the offset and bias. I set the offset ok everything responds as it should. I then follow the instructions and remove the speaker fuse and hook my multimeter in series where the fuse was as it says to do. I fire it up and it says to adjust to 30-40ma. Well its at 10-11ma and turning the pot to adjust it does nothing. It does not change the current whatsoever. Both channels respond exactly the same way. What the F? I cleaned the trimmer and checked it with a meter and it does indeed change resistance when you turn it. So why doesn't the bias change? I have attached the instructions and a pic of my meter clipped in. What else could be wrong that would stop the bias from changing? It even says I do not need any load connected but I tried it with a load and didn't matter.

Attachments

  • image_2024-11-23_205052065.png
    image_2024-11-23_205052065.png
    478.4 KB · Views: 27
  • 20241123_204617.jpg
    20241123_204617.jpg
    280.3 KB · Views: 26

Help needed to determine if a 2 prong polarized or 3 prong IEC should be a replacement

Ok here goes, I have to replace the plug (and possibly the power transformer) as the old cord frayed right by the plug and shorted on me. It was a very brief spark as I had my finger on a switch for the power receptacle and my ups also broke the connection so the transformer may have survived.
But now I need to decide if a polarized 2 prong or a iec 3 prong should be the replacement, I asked this question years ago on another forum and got dozens of conflicting answers, though at the time I didn't have a schematic for this amp now I do. So I will attach it.
Would some kind soul take a look and tell me if an iec is suitable for this amp?
I know how to install either but I was told that grounding some vintage amp chassis could cause problems with ground loops. So that's why I'm asking, and one last thing I did add a y2 safety cap to this amp from the aux socket to chassis because it was suggested as a modification years ago.
Thanks for any and all help with this.

Attachments

For Sale LynxTWO-A model PCI Sound card

LynxTWO-A model, with four analog inputs and outputs with all of the breakout cables
This is a used full-size PCI sound card .
Lynx Two 24-bit/192kHz Multi-channel Audio Interface
A model also provide comprehensive digital I/O facilities: a single digital in and out in either AES-EBU or S/PDIF format.
All the analogue I/O emerges from an L2Audio 25-way D-type connector, which interfaces with a 1.8-metre-long multiway cable a full 14mm thick, terminating in eight XLR plugs and sockets

The Price for the used LynxTWO A Model with the breakout cables $450.00 Plus Shipping
Lowered Price $250.00 Plus Shipping

6SN7 driving EL34PSE

Recently I got Tektron EL34PSE intergrated amp with 6SN7 as input/driver tube.
My version is older version with 6SN7 connected as two gain stages (picture 1).
New updated version is using 6SN7 in SRPP configuartion (picture 2).
Is there any benefit to convert old version to new one?
Also is there enough gain in 6SN7 in SRPP configuration to drive two EL34 in PSE?

Attachments

  • 6SN7.jpg
    6SN7.jpg
    33 KB · Views: 95
  • image002.jpg
    image002.jpg
    11 KB · Views: 94

Hello from Belgium

Hi everyone,

Hello everyone! Here, I go by the moniker "Gunn." I became interested in speaker building decades ago, but never pursued it. I have an engineering background, though that was 37 years ago. Now, I'm picking up where I left off. I'm particularly interested in full-range speakers (which was mostly Jordan Watts and Lowther that long ago ...).

Cheers,

Gunn
  • Like
Reactions: decramer

Hello All

I'm new to this site / forum and just wanted to say hello. I'm George and based in the UK. I started in electronics when I was at school, building radios, amplifiers etc. All the usual suspects. I went on to study electrical engineering to degree level from 1977 - 1981 and then worked in broadcast tv as a sound installation and maintenance engineer. My home projects continued with adventures into music keyboards and synths (none of them worked particularly well!) as well as other music / audio related circuits. I have been away from engineering for some time, having left the engineering sector to become a film sound recordist in 1987 and retired from that field about ten years ago. To be honest, the new digital arena is a mystery to me. I am an 'analogue man', that is where my passion is and I'm glad my career in sound was largely analogue in nature. It's nice to find a place where like-minded people can come together and help out.

Hej from Denmark

Hi everyone!

I'm Jeppe; composer from Denmark with an interest in electronics. Some might know me as Dynatron. I work as web developer but I was educated in electronics back when CRT's was a common thing.
I don't have a lot of experience with designing electronic circuits, but I've built a couple of 500 series units among other things. I've joined this forum to learn more and actually finish my projects. 😉

Cheers!

Poor bass response from a Dynaco EL84 PP amp. Wrong OTs?

Greetings Friends. I did a little amp swapping the other day and was surprised at the lack of bass coming from a Dynaco P-P amp I built a few years ago as compared to my daily amp, a 6B4G SET and was wondering why. Here's the schematic as built:

EL84PPAMP.png


The amp in question was built using 2x PCBs with a circuit called "Dynaco 6V6 P-P" that features a 12AX7 in Floating Paraphase driving a pair of EL84 to about 10 watts. I used Edcor CXPP10-8k outputs with 4 and 8 ohm taps and wired the feedback to the 8 ohm tap. It was mentioned in a thread I started upon completion of the amp that the original Dynaco product used a different, higher-quality OT and adjustments to the Fb loop might be required. Using a simple scope and a 10kHz sq wave I minimized ringing by increasing the value of the cap in the Fb loop.

First listing to the amp gave a disappointing lack of bass when my Polk Monitor 60 speakers were connected to the 8 ohm taps, and better bass when wired to the 4 ohm taps - the Speakers show about 5 ohms of DC resistance from a DMM. But I get much more bass from my 6B4G SET amp hooked to those speakers - and that amp makes "only" 3 watts. So I'm wondering what I can do to improve the bass from this P-P amp. The original amp had the Fb loop connected to the 16 ohm tap, I only have 4 & 8 ohm - is this a problem? would changing the value of the Fb resistor compensate? Or do I just need new iron?

thanks for taking a look!
Projects by fanatics, for fanatics
Get answers and advice for everyone wanting to learn the art of audio.
Join the Community
507,699
Members
7,884,763
Messages

Filter

Forum Statistics

Threads
406,064
Messages
7,884,763
Members
507,699
Latest member
zelinograd