Thanks Gordon, I'll be sure to post plenty of pics and be back here to annoy you guys with simplistic cnc related questions as I start to try and produce the first parts with the machine.
No problem. BTW I haven't PM'd you about a visit to Oxford yet 'cause we're a bit busy (due to be getting hitched in early March, so low on time). If there are weekends in Feb that you're free let me know, and I'll have a chat to the boss to see if I'm allowed
 .
.However I'm not sure just how much I'll be using it now with the cnc machine. I can imagine there are still uses like bevel or roundover details on fully constructed cabinets that are impossible to fit under the gantry of the cnc but its a bit overkill for that task and a smaller machine would be fine.
Gotta decide whether to downgrade before using so I can still sell it 'as new'.
Basically, everything that John said, plus: mine is critical (in a table) for using with a trimming bit to clean up tabs/onion skinning from CNC cut parts. So, yes, I'd say having a router is still crucial. I don't tend to make any parts with it now (as John notes - use the CNC) but cleaning up, and adding roundovers is very useful.
Because I find it fiddly to cut double sided jobs on the CNC, I sometimes cut the rear of a speaker baffle (rebates and slots for construction, as well as driver and port holes). I'd then cut the driver rebates with a rebate cutter (by hand, or on the table, for a smaller baffle) as well as roundovers for port holes, and then roundovers on the edges of the glued box.
That a good tip on trimming tabs. I'll have to remember that one.
Due to the deflection of the cutting bit, I've found that I get a slight change to the cut edge when the machine lifts up to leave tabs. So, instead of leaving, say 3mm thick tabs, I've recently moved over to leaving 1-2mm depth of material around the whole of a cut part.
For large parts, this is fine, as you can roughly cut the piece out with a knife, jigsaw, or bandsaw. Then I clean it up with a trimming bit, just as I would do with tabs. It seems to leave a better edge. For smaller parts, it's a bit more of a faff, so I might use tabs.
A quick update on Apollo baffles.
The construction of the baffles has evolved into a Corian outer shell with an MDF core and the two are coupled with a visco-elastic adhesive layer.
That's obviously a lot of very complicated machining and pretty much requires a 5-axis machine to do sensibly so the parts I've designed have been outsourced to a Corian fabricator near me. Maybe once I'm really confident with my own cnc I'll give similar things a go but for now Corian is far far too expensive to make a mistake with
The Corian place have done a couple of prototype baffles now just to verify with me that I'm happy. The first attempt had some issues but this evening I got to check out the second iteration and I gotta say the results are fantastic. Extremely dead resonance wise and the Corian looks and feels great.
The complete set are now in the works and once done you can bet I'll be posting images back here.
Since you've already done it, it doesn't really matter but I don't remember seeing anything on your baffle design that required more than 3 axes to machine. I also know people who do machine corian on their routers. So for the future, it would definitely be worth a try. If it's expensive I'd definitely get your process down using some mdf first and then adjust feedrates for corian as required. I have not cut corian myself, but iirc it requires lower spindle speeds or higher feed rates to prevent melting it. I'd assume you have to polish the faces you machine to get the finish back.
Since you've already done it, it doesn't really matter but I don't remember seeing anything on your baffle design that required more than 3 axes to machine. I also know people who do machine corian on their routers. So for the future, it would definitely be worth a try. If it's expensive I'd definitely get your process down using some mdf first and then adjust feedrates for corian as required. I have not cut corian myself, but iirc it requires lower spindle speeds or higher feed rates to prevent melting it. I'd assume you have to polish the faces you machine to get the finish back.
Its certainly not impossible with a 3-axis machine but the Corian shell and MDF core approach would be incredibly time consuming. You'd have to machine the MDF on both sides first. Then you'd take your corian, machine the front side, flip it over and create a female version of the MDF part. After this because you used a step over approach all the faces and edges would need sanding and cleaning up before assembling.
Then consider your doing that for six parts, four of them very large, and its a huge amount of labour and time.
The 5 axis cuts down the machine time by a huge amount and negates the need for sanding all edges and surfaces because the end mill would be perpendicular throughout the process rather than using a step over approach which leaves thousands of tiny ridges on the work piece.
Some jobs only make sense with a 5 axis machine even though you could do them on a 3 axis.
If I were doing this on the 3-axis, I'd skip the MDF core and visco layer. A block of corian would be far simpler and quicker at that point.
Last edited:
Arthur has asked for the option to allow for some experimentation with tweeters.
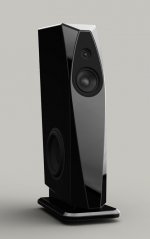
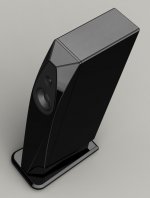
The original intent is for the RAAL 70-20 but flexibility never hurts and so I've fashioned up a tweeter baffle that allows most standard 104mm diameter tweeters to be installed. The target here is the Scanspeak D30 series and most likely the beryllium variant.
Swapping between these two is a matter of a few bolts, slide out one baffle, replace with the other and fix back up.
For the sake of completeness here's another render of the with dome tweeter variation.
Attachments

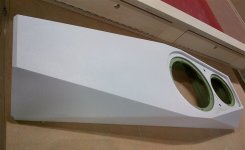
Shot of the prototype baffle. The final one's will be shinier!
Looks awesome in the flesh. Once I have the finished articles I'll get some better shots.

Superb!Re 5 axis - yep would kill for one of those, plus an autochanger. There's a bespoke furniture manufacturing place not that far from me, and they use a 5 axis CNC set up to do some amazing 'quilted' sheets of wood, which are then veneered. I got chatting with the guy about their techniques, and he lead me to their 'barn'. In it was a machine. A big machine. As in, you could comfortably fit two medium sized cars on the bed. The cutting head weighed more than my whole machine. Yep. I'd kill for 5 axis plus an autochanger
*LOL* 62kW (~83hp!) spindle. 30m/min working speed
Factoring in the cost of buying a new house, with large outbuildings of course...
*LOL* 62kW (~83hp!) spindle. 30m/min working speed
Factoring in the cost of buying a new house, with large outbuildings of course...
That's got approx 10 more hp than my Berlingo van. And at that 30m/min it probably moves faster too
I'm in love with a machine:
Fidia GT - YouTube
Fidia GT 2 - YouTube


I wanted to share a few images of the new workshop. There's still the odd bit of painting left to do but the last job was finished this weekend. My electrician friend came around to fit all new electrics including a 230v 20amp circuit for the table saw and outlets mounted up in the air to help keep cables out of the way. Whilst he was at it I had an alarm system fitted too as it seems you can't be too careful these days.
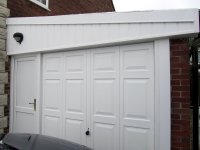
Exterior:

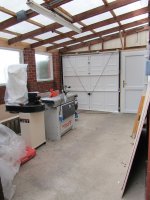
Interior:

Part of the electrics install - master power switch for the table saw located high up to prevent the little person from reaching it and a dust proof switch.

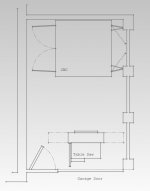
I've done a basic floor plan to help visualise the layout and yes its cramped in there! The workshop is small at 5m x 3.1m but I only really intend for the cnc and tablesaw to be in there. Maybe a workbench but that's about it. For the rest I have another similar sized garage at the rear of house that acts as a work area.

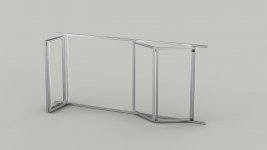
You might have noticed a distinct lack of space around the cnc machine. That's a problem because I need to access the front and rear for work piece clamping. I also need enough room to get a 4x4ft sheet onto the bed too. Sadly I lacked the foresight to fully investigate the space(slaps self) and I'm going to have to modify the rear doors on the cnc to a split door type affair otherwise getting in the back will be a traumatic affair. If that goes well I'll likely modify the front doors as well whilst I'm at it.
Here's the general idea for the door mod:

The cnc *should* be arriving tomorrow providing we don't get any more snow. Its going to be a busy time after that. Gotta get the fixed ducting up for dust extraction, do the door mod, build a workbench/racking and learn how to use the cnc. Should be fun!
Exterior:
Interior:
Part of the electrics install - master power switch for the table saw located high up to prevent the little person from reaching it and a dust proof switch.
I've done a basic floor plan to help visualise the layout and yes its cramped in there! The workshop is small at 5m x 3.1m but I only really intend for the cnc and tablesaw to be in there. Maybe a workbench but that's about it. For the rest I have another similar sized garage at the rear of house that acts as a work area.
You might have noticed a distinct lack of space around the cnc machine. That's a problem because I need to access the front and rear for work piece clamping. I also need enough room to get a 4x4ft sheet onto the bed too. Sadly I lacked the foresight to fully investigate the space(slaps self) and I'm going to have to modify the rear doors on the cnc to a split door type affair otherwise getting in the back will be a traumatic affair. If that goes well I'll likely modify the front doors as well whilst I'm at it.
Here's the general idea for the door mod:
The cnc *should* be arriving tomorrow providing we don't get any more snow. Its going to be a busy time after that. Gotta get the fixed ducting up for dust extraction, do the door mod, build a workbench/racking and learn how to use the cnc. Should be fun!
Attachments

Nice workspace - quite a bit bigger (and a taller ceiling) than what I have to cope with.
My only concern is the thin metal door and the roof: if you have neighbours close by then noise may be an issue.
Hey Gordon, thanks.
Noise is always a worry, especially if its after evening.
As a test I've had the table saw running and then gone outside to take a listen. It seems pretty good. Far better than the corrugated steel garage on the back garden that seems to amplify noise rather than drop it
Now the real test will come with the router because that's another level above the table saw but I do have a couple of plans that could be put in place to further reduce noise.
First plan is to throw some money at a watercooled spindle and VFD then drop the rpm's to reduce noise. Second involves building a suspended ceiling out of kingspan but I wanted the natural light from the ceiling. The roof panels are the same as the stuff they use in conservatories which do an ok job of reducing noise. And the last resort is to build a uPVC box (essentially a mini conservatory) around the router but this will involve taking up even more floorspace and completely negates the reason for the dust enclosure. I'd have to be to be desperate to do this.
Finished the Aurora and its now a matter of turning it all into something the cnc can use.


That's the aesthetic I was thinking of before.. a'la Rockport (yet not).
As a test I've had the table saw running and then gone outside to take a listen. It seems pretty good. Far better than the corrugated steel garage on the back garden that seems to amplify noise rather than drop it
I'd expect it was causing the panels to vibrate/resonate, and basically acting like speakers!
You may well find that the dust enclosure will trap a lot of the sound pressure, such that it won't be too bad outside.
I do wonder if adding some soft damping to walls would help - even bitumen backed carpet tiles. I lined the enclosure in my router table where the router lives with tiles and a bit of foam, and it did seem to make a decent difference.
- Status
- This old topic is closed. If you want to reopen this topic, contact a moderator using the "Report Post" button.
- Home
- Loudspeakers
- Multi-Way
- Apollo Construction Diary