Ok Sir
Meanwhile..the sound is fantastic as it opens up.
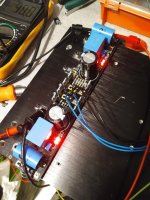
We had a group review last night by a few people who is a good listener and they are highly impressed.
The focus. Naturalness density . Detail and dynamic had improved significantly from the reference. Another low noise power supply
Meanwhile..the sound is fantastic as it opens up.
We had a group review last night by a few people who is a good listener and they are highly impressed.
The focus. Naturalness density . Detail and dynamic had improved significantly from the reference. Another low noise power supply
Salas ,please help me with some advice.
My preamp plate has a 200mA consumption and a voltage of - + 40V.
If I have a large radiator, can I set SSLV for 400mA / 40V?
I should use in this case Fairchild FQP3P20?
Also, on the preamp PCB, next to the power plug, we have 2 capacitors 5600 mkF / 50V. Should I remove them?
Thank you.
My preamp plate has a 200mA consumption and a voltage of - + 40V.
If I have a large radiator, can I set SSLV for 400mA / 40V?
I should use in this case Fairchild FQP3P20?
Also, on the preamp PCB, next to the power plug, we have 2 capacitors 5600 mkF / 50V. Should I remove them?
Thank you.
Yes the SSLV can reach that high output. Better allow just 100mA extra to save on heat. The standard listed IRF9610 can easily take that current as the CCS MOSFET and its even little faster than the FQP so no need replacing it. As for those large capacitors make sure that they are just decouplers across the rails to ground not serving some other function like bypassing some signal resistors. If just decouplers listen to them VS high quality 100uF in their place and decide.
Happy!
Inlägg
I did change the PSU in my Playstation 1 CD player and I can only say, wow!
SSLV1.1 for the drive and Reflector D for the digital part set to 7.6 volts 1 A respectively 3.6 volts and 500 mA.


Better 3D stage overall but what I am most surprised about is the bass. It is.... not fuzzy any longer! I had good clean bass before also but with the change of power supply it is even more well defined, cleaner and airy.... can't describe it better than this, you hear the wood for example in a cello, not only the tone but also how the wood itself is sounding. I can now differentiate two cellos from eachother by the instrument itself, lovely.
Over all one of the best changes I have made to anything. Thank you Salas for lovely devices

Inlägg
I did change the PSU in my Playstation 1 CD player and I can only say, wow!
SSLV1.1 for the drive and Reflector D for the digital part set to 7.6 volts 1 A respectively 3.6 volts and 500 mA.
Better 3D stage overall but what I am most surprised about is the bass. It is.... not fuzzy any longer! I had good clean bass before also but with the change of power supply it is even more well defined, cleaner and airy.... can't describe it better than this, you hear the wood for example in a cello, not only the tone but also how the wood itself is sounding. I can now differentiate two cellos from eachother by the instrument itself, lovely.
Over all one of the best changes I have made to anything. Thank you Salas for lovely devices
Last edited:

No. The Q101's VGS can change during warm up and make that voltage to slide until hot but not going up and down. Maybe there is oscillation or interference and there is AC riding on it. See with oscilloscope across R101 or at least with a DMM on ACV mode. Really a 30W resistor? Maybe a typo and you meant 3W?
Resistor are Caddock 4R / 30W.
The problem has been solved, I forgot to keep in mind your advice to mount two 100UF capacitors on the preamp power jacks.
Now everything is stable and works perfectly.
Thank you so much for your support, Salas.
Best regards.
The problem has been solved, I forgot to keep in mind your advice to mount two 100UF capacitors on the preamp power jacks.
Now everything is stable and works perfectly.
Thank you so much for your support, Salas.
Best regards.
Attachments
Last edited:
Also remember that the Fairchild fast type Mosfet you expect is for CCS use (the one near the setting resistor). For the output keep the 9530.
OK followed exactly. The chips arrived fqp3p20. Tried whichever look more real. 2 ohm down to 0.5 ohm to get around 1A
Fantastic.. Went up another level of dynamism. Detail. Energy 3d.
Thank you Salas. Great help there.
Will work fine but at a rather high 12V DC difference between rectified DC and output DC. That potential appears across the CCS MOSFETS and creates 12V*0.45A=5.4W dissipation in each one. Why not order a 15V-0-15V AC transformer and create 30% less heat on them at about 3.5W. The potential across those Q101 & Q202 TO-220s will be a good enough 7.75V for the CCS section to keep functioning within its healthy voltage spec range.
Those numbers are predicted when the mains and the transformer nominal voltages are taken literally. Mains are usually reported as 5V to 10V higher than nominal by DIYA members in North America, EU, and Australia. At least that's my general impression.
Those numbers are predicted when the mains and the transformer nominal voltages are taken literally. Mains are usually reported as 5V to 10V higher than nominal by DIYA members in North America, EU, and Australia. At least that's my general impression.
Hi Salas
I’ve built your DCB1 Hypnotize version into a preamp with success...although I have to revisit the grounding and signal wiring as I got too creative I think. It does work well as I have it setup.
I have also managed to put together a gainclone based on Peter Daniels kit, one of the simple Boozehound phono MM kits, a miniDSP from boards and just finished a lengthy resto-mod of my turntable which included building a new motor control system designed and supported by Bill from Phoenix Engineering here on the forums. I hope this means I’m not a complete idiot, but I do struggle with the projects sometimes.
I have everything I would need to build your Simplistic RIAA project, but wanted to put it on the back burner for a little while.
My hope was to finish building a bass solution for my DIY Oris horns next while I continued to finally enjoy analog playback again after 9 months of having my turntable in pieces.
Unfortunately, I can’t find a power supply that doesn’t seem to create humming or noise with the Boozehound Phono Amp. It will run on 12-24VDC supposedly.
I’ve tried several laptop and wall wart supplies and they all cause it to hum or buzz. I resorted to ordering some rechargeable 24V robotics battery packs, but should have ordered 18V I think because they appear to be over driving the circuit causing it to create noise. I think this is because they are taking on a charge that exceeds the specified output. I measured them at 25-26.5 VDC at the output connectors.
So I ordered some SSLV kits and have them on hand. I read over the PDF manual...but it wasn’t entirely clear to me how to proceed as it has been with other projects I’ve built. Perhaps I’m just distracted by all the variables being discussed.
I was looking for a post or build thread that would help me fill in the blanks, so to speak, on building an SSLV with an output of 18VDC for the the Boozehound phono amp.
The manual info tells me:
c. 10V-25V Mosfet reg. 2 1.9V LED, 1.8 kOhm R303. 5K trimmer. Other parts jumper.
Other posts I’ve read over so far seem to point toward using a 15V transformer. I have a 50VA 15-0-15 SumR transformer on hand.
What else do I need to understand or have on hand before I dive into this project?
Thanks for any guidance you can offer.
Kevin
Kevin hi
For a phono like that with zero PSRR use 470uF 25-35V C101 in the regulator to filter its reference voltage components noise well.
For 18V DC output you need at least 18VAC input with the SSLV for proper CCS work and safety from mains tolerances. You could think creatively though by putting voltage dropping resistors after a 30 VAC configured SumR. Its easy to predict because there will be constant current draw in the regulator that you will decide. See with the Duncan PSUD2 free simulator. That way you can go to 24V output too. Just allow 10V drop or more from rectified input DC to regulated output DC.
PSRR is Power Supply...??. Sorry I am trying to learn here. Most of what I have built has been “connect the dots” so to speak.
I also have some Antek 12-0-12 trannies that I bought for another turntable controller project that will not happen any time soon. There are probably more than I will use, and I can always order a replacement. I think they are 100VA...could be 200VA. Overkill I think, but would they make things easier for me?
Your talking about AC input of at least 18VAC...and then mention DC rectified input to regulated DC output... this is confusing me. Doesn’t the SSLV have a recitifier section on board that accepts VAC directly from my transformer?...or am I not using that section for some reason because I only need a single positive rail and ground to power the phono amp?
PSRR = Power Supply Rejection Ratio. In other words not all circuits have the same susceptibility to rail ripple and its other possible noises.
Yep, overkill. But 12-0-12 can make 24 with its secondaries in series and its a good figure for your purposes.
The board provides AC input that gets rectified and smoothed by local diodes and a filter capacitor. So it turns to DC that includes ripple thus named raw DC. You can measure that DC level across the big filter capacitor. Nonetheless the pure regulator section is DC to DC as any. So raw DC is its input DC. Term like when talking about an LM317 or 78XX reg chip etc.
- Home
- Amplifiers
- Power Supplies
- SSLV1.1 builds & fairy tales