I don't know anything about horn theory. Would it be difficult to calculate the size/shape/contour of a small pseudo front-horn like this bowl for a 4" driver like those recommended for the FH3? I've heard about the various flare contours... conical, exponential, hyperbolic, tractrix, etc., but that's as far as my knowledge goes.
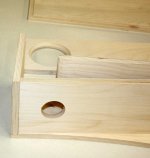
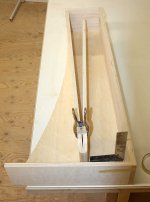
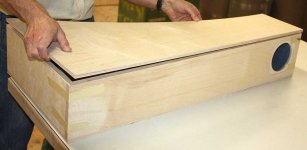
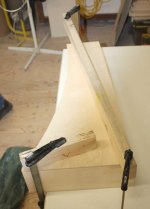
Top, baffle & bottom put into place (in that order). The baffle is the longest piece in the kit, and some of them may have a bit of a bow. Masking tape should be sufficient to pull everything into place and hold it till the glue drys. You don't need much pressure. (do not use packing tape, the glue on it sticks to the ply after the tape is removed, and is a bitch to get off)
If the baffle bows out at the middle a clamp may be helpful.
Don't forget to check with the square. Leave to dry.
If the baffle bows out at the middle a clamp may be helpful.
Don't forget to check with the square. Leave to dry.
Attachments
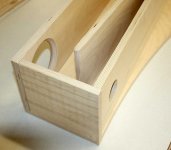
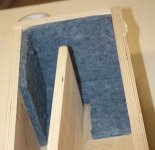
All the panels now in place, time for the damping.
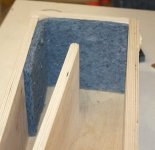
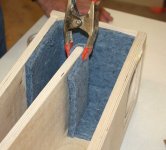
All the felt pieces have been rough cut. Width will need checking, and you'll need to cut out the sides. I posted a full size template earlier in this thread, but you probably want to double chack against your install. Make sure that the sides are mirror images (if you forget it is easy enuff to peel off the black backing) The felt can be fixed in place with glue or hot melt. The black backing on the cotton felt makes this a cinch.
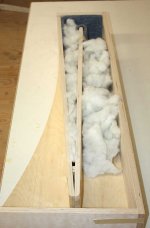
Back 1st, then the divider panel (if you haven't done it earlier). then one side. Now the fluff -- tease it very well. The sandwich bag of fluff should get to be a BIG pile once teased. Consult the damping plan.
(Note: the fluff we used to illustrate placement is not well teased and ot of a quality that makes it actually useable)
The pointy part of the line gets one of the 30g packages. You are trying to distribute equal amounts along the length. Since it is pointy at the bottom this means a decreasing density as you approach the fold.
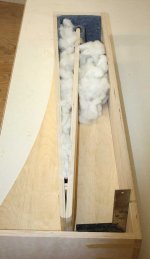
For FE126 you should be good (there is an extra 40g of fluff if you need to fine tune)
For the Mark Audio drivers there is a 40g bag of fluff for the wider part of the line below the driver. This part tunes the amount of bass. If you want big fat rounded bass you can start with none. Using all of it will give a full halfd-pound per cubic foot. You may want to do something to keep the fluff here from drifting to the bottom of the cab. Door screen mesh, a couple long screws sticking out, a piece of low thread count cotton or other acoustically transparent material like double knit.
It is easier to start light and insert more thru the driver cutout than reach in and pull it out.
Now it is time to nstall the other felt side. Just float it ontop of the fluff, making sure it is clear of any of the gluing surfaces. After the other side is solid you can reach in and mke sure it is solid against the side. A couple spots of glue should do to hold it in place.
Tweaking of damping fluff can be done thru the driver hole, add or subtract from the back top or under the driver. Low density amounts can be placed right behind the driver.
All the felt pieces have been rough cut. Width will need checking, and you'll need to cut out the sides. I posted a full size template earlier in this thread, but you probably want to double chack against your install. Make sure that the sides are mirror images (if you forget it is easy enuff to peel off the black backing) The felt can be fixed in place with glue or hot melt. The black backing on the cotton felt makes this a cinch.
Back 1st, then the divider panel (if you haven't done it earlier). then one side. Now the fluff -- tease it very well. The sandwich bag of fluff should get to be a BIG pile once teased. Consult the damping plan.
(Note: the fluff we used to illustrate placement is not well teased and ot of a quality that makes it actually useable)
The pointy part of the line gets one of the 30g packages. You are trying to distribute equal amounts along the length. Since it is pointy at the bottom this means a decreasing density as you approach the fold.
For FE126 you should be good (there is an extra 40g of fluff if you need to fine tune)
For the Mark Audio drivers there is a 40g bag of fluff for the wider part of the line below the driver. This part tunes the amount of bass. If you want big fat rounded bass you can start with none. Using all of it will give a full halfd-pound per cubic foot. You may want to do something to keep the fluff here from drifting to the bottom of the cab. Door screen mesh, a couple long screws sticking out, a piece of low thread count cotton or other acoustically transparent material like double knit.
It is easier to start light and insert more thru the driver cutout than reach in and pull it out.
Now it is time to nstall the other felt side. Just float it ontop of the fluff, making sure it is clear of any of the gluing surfaces. After the other side is solid you can reach in and mke sure it is solid against the side. A couple spots of glue should do to hold it in place.
Tweaking of damping fluff can be done thru the driver hole, add or subtract from the back top or under the driver. Low density amounts can be placed right behind the driver.
Attachments

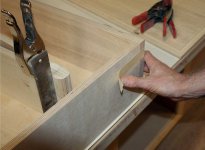
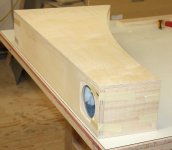
The other side.
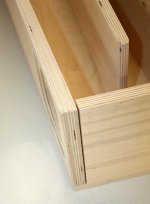
It should drop right into place with the internal bits tight up against the dadoes on the side.
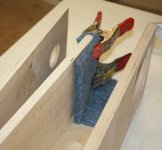
Some clams are useful here (use some sort of clamping aid to distribute the force and protect the sides -- we used 2x4s in the picture) Alternately, masking tape and the big pile of weights, books, 4 litre plastic milk bottles full of water.
Chris: comments, corrections, suggestions?
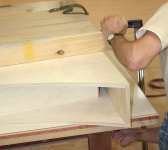
Did i mention you want to use yellow carpenter's glue?
next turorial post >
It should drop right into place with the internal bits tight up against the dadoes on the side.
Some clams are useful here (use some sort of clamping aid to distribute the force and protect the sides -- we used 2x4s in the picture) Alternately, masking tape and the big pile of weights, books, 4 litre plastic milk bottles full of water.
Chris: comments, corrections, suggestions?
Did i mention you want to use yellow carpenter's glue?
next turorial post >
Attachments
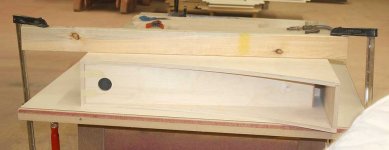
Chris's comments would include
Some clamps or weights during the first assembly stage - i.e. before damping padding - ( or even braid nails), wouldn't hurt
White glue ( Weldbond, etc) is great for attaching the Ultra touch insulation, but I'd recommend yellow carpenter's or polyurethane (Gorilla, etc) for the panels
Note that moisture cured polyurethane glues requires substantially longer curing time, and can definitely swell exterior panels out of alignment- so clamping is required - and it will stain, so if your finishing plans are for clear coat, I'd suggest yellow glue and masking/pre-finishing of interior faces of side panels before glue up
/end tutorial
Can someone comment on, or point me to the thread/post where people talk about how the FH3 sounds?... say compared to the Ed Horn or the FH1/FH2? I've had both of these, as well as the Austin A126, so I know how they sound.
Relevant threads are posted in Post #1.
We haven't yet done a head-to-head of the FH1 vrs FH3 (FH2 was still-born). My feeing is the FH3 is smoother particularily in the upper bass and the lower midrange.
You no doubt already have opinions on EdHorn vrs FH1.
dave
PS: i am working a reply to your OB inquiry)
Whoohoo! My flatpack was waiting for me when I got home last night! I think I'm going to need a tutorial on unpacking it! Wasn't able to get to it last night, and today, I had a router applied to my jaw (or whatever it is that dentists use to drill holes in bone) preparatory to installing an implant. But the nice drugs are keeping the pain at bay. However, not a good combination to use things with sharp edges. Hopefully by Saturday night I'll have a set of working speakers!!!!
Thanks!
Tom.
Thanks!
Tom.
Whoohoo! My flatpack was waiting for me when I got home last night! I think I'm going to need a tutorial on unpacking it! Wasn't able to get to it last night, and today, I had a router applied to my jaw (or whatever it is that dentists use to drill holes in bone) preparatory to installing an implant. But the nice drugs are keeping the pain at bay. However, not a good combination to use things with sharp edges. Hopefully by Saturday night I'll have a set of working speakers!!!!
Thanks!
Tom.
and a $hit eating grin on yer face

which drivers will you be using?
Probably somewhere along 4 to 6 hours spread across 3 evenings, I took it real slow, test fit, remove, glue, clamp, etc ...
After it settle a little I will remove the drivers and have work on the finishing, which from working on my fonken previously, I'd say maybe another 2 - 3 evenings of 1-2 hours each.
So far so good, these Alpair 7 are such an improvement over my last pair that my face was like this as soon as I hear the first vocal note.
After it settle a little I will remove the drivers and have work on the finishing, which from working on my fonken previously, I'd say maybe another 2 - 3 evenings of 1-2 hours each.
So far so good, these Alpair 7 are such an improvement over my last pair that my face was like this
as soon as I hear the first vocal note.Attachments
![IMG_1086[1].JPG](/community/data/attachments/210/210429-e34064234311cf9b4b1d1e35458d7b70.jpg)
Last edited:
Flat Paks
Dave where did you find the blue damping material. I need a bit more, but I can make do with something else.
Just an update 1 speaker is almost complete, so far so good. I found the
2 pieces of wood inside the cabinet to fit VERY tight in routed out grooves. I had to use sandpaper to get them to fit. The ends fitted very well but the centre required a bit of sanding on the edges of the grooves.
Another question:what is the small block of wood used for the one that is about 3" x 3"?
Dan
Dave where did you find the blue damping material. I need a bit more, but I can make do with something else.Just an update 1 speaker is almost complete, so far so good. I found the
2 pieces of wood inside the cabinet to fit VERY tight in routed out grooves. I had to use sandpaper to get them to fit. The ends fitted very well but the centre required a bit of sanding on the edges of the grooves.
Another question:what is the small block of wood used for the one that is about 3" x 3"?
Dan
Dan,
Do you need more for the FH or for something else? For the FH you should -- damn, i just realized i shorted everyone 2 side pieces.
I'll get those out in the mail.
Thanx for catching that.
Go ahead and build without one of the side damping pieces, and you can fit the additional piece thru the driver opening.
The 3x3" piece is a packing spacer that makes room in the stack to tuck the drivers into the stack.
dave
... that's what i was wondering when I was building mine, I end up using some left over from my previous build ...
For the FH you should -- damn, i just realized i shorted everyone 2 side pieces.
dave
- Home
- More Vendors...
- Planet 10 hifi
- Frugel-Horn Mk3 flat-paks