@ jer
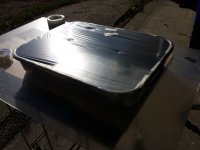
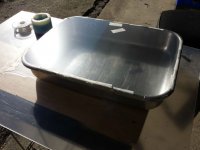
Hey! Thanks for the info once again, I did another test with a heat gun today.
Firstly, I was incorrect with the wattage I thought it was, instead of 2400W, it was actually 750W/1500W. The 1500W setting burned through a (non-pictured) test piece straight away, but the 750W setting worked a charm! see attached pics:
@ waldtraut
Thanks for the info, that will help me while re-building my flat panels, and thanks for wishing me good luck! Same to you, brutha...
Hi Calvin,
I understand that this method of heat-shrinking is not meant for further tensioning a curved panel, but just for removing minor ripples, as is noted in this builder's blog: https://sites.google.com/site/eslarray/home/project-history
Why did you state what you did about heat-shrinking "C" mylar? Do you know of an unsuccessful attempt, or one that turned out in disaster?
Like I said, I would be using only mechanical tensioning on my curved panel, and working towards flawless results *unless* there was some mild ripple of
some sort, then... and only then, would I try heat to remove them. Any further thought? Or experience?
As always, I appreciate your opinion and help.
cheers
-wreck
Attachments
One of the papers I have is from Frank Verwaal, and it can be found here,
http://www.diyaudio.com/forums/planars-exotics/48120-experiences-esl-directivity-2.html#post2203316
jer 🙂
I just got around to reading through this thread, and all I can say is wow. Just WOW!
This opens up a whole new dimension.
Saran Wrap! hahaha!
(plus a whole lot more)
Thanks jer!
Last edited:
One of the papers I have is from Frank Verwaal, and it can be found here,
http://www.diyaudio.com/forums/planars-exotics/48120-experiences-esl-directivity-2.html#post2203316
I just got around to reading through this thread, and all I can say is wow. Just WOW! This opens up a whole new dimension.
Hello wreckingball,
If reading that thread piqued your interest in flat segmented ESLs you might also check out this thread which includes more discussion and links to a segmented stator simulator.
http://www.diyaudio.com/forums/plan...ted-wire-stator-esl-simulator-esl_seg_ui.html
Bazukaz was kind enough to provide an English translated version of the simulator in post#39
http://www.diyaudio.com/forums/plan...r-esl-simulator-esl_seg_ui-4.html#post3192348
Oh, also the author of the AES paper gearldfyjr mentioned is a fellow DIYaudio member who posted his ESL creation based on his paper here:
http://www.diyaudio.com/forums/planars-exotics/234975-another-segmented-esl.html
Hi,
Heat treatment of one of the standard films in a curved panel will ineviteably lead to the unwanted hour glass shape, with the membrane closer to the back stator than the front. This happened the guy from the link. Also his panels are less curved than intended.
If You want to try heat treatment, apply heat only locally to small areas.
Still this introduces inhomogenities in tension and possibly in the membrane's shape. But it may be less bad than strong wrinkles.
The long vertical rims and the four edges are most prone to wrinkling.
For the wrinkling edges there are two counter measurements.
First is to use a streching jig/film length quite a bit longer than obviously required. The second is to place the first spacer close to the rim, so that the first top and bottom segments are quite slim with a clearly lower d/s ratio.
Wrinkes along the vertical rim are more difficult to treat as they will likely pull the membrane towards the back stator.
As a mechanically stretched membrane will settle over the coming months, there's a great chance that the wrinkles will occur again.
So it is best to stretch the membrane wrinkle free in firs place.
Rather replace the wrinkled stuff at once, than correcting wrinkles
In R.Ss Cookbook they present a method of heat treating the membrane whilst glueing it to the stator. But I doubt that one would be successful first time. Also it looks as if it were a messy procedure and not a very consistant too.
For flat panels matters change and heat treatment is wholly recommended.
jauu
Calvin
Last edited:
Thank you Bolserst for reminding me were I got that paper !!!
Those are most excellent threads and are what inspired me to take the direction I am now taking.
There are many benefits to using electrically segmented ESL's!
On the note of Dispersion and panel size I suggest that you could build some smaller narrower panels to experience the difference of the effect.
You need not have to use any large expensive perforated metal to make them.
But, do use a good and thick enough coating to prevent any arcing failures.
Besides you may even find use for them elsewhere.
Besides my window screen method (although it is by far the cheapest), You could use some Lincane material commonly found at Home Depot at a fair price (for today's times).
And use plastic light grating for the support and strength of the very thin Lincain sheet.
You could probably build two sets of different sizes for under About $70 or so including the paint for the stators.
Although it seems that prices just keep going up.
If you think that Lincain is not cheap it is about double what it cost just 10 years ago when I thought about using it when I built my First panels.
I wish I had stocked up on the stuff back then!
The reason I mention this is that when I built my First set of working panels (not the experimental ones I did), I built two different sizes.
One was roughly 4 times larger than the other.
The reason for this was to test, The more surface area the more efficiency theory.
It took only one 2' X 4' sheet of plastic grating material ($10) to build both sets.
I never got as far as being able to test with measurements as life's crisis interfered with a few things at that time and slowed me down a bit (all of 2006 and 2007).
Also, I didn't have the proper measuring equipment back then that I have now.
But, I had a good ear and a SPL meter, scope and signal generator.
So, That was better than nothing at all!!
One of the main things that I had difficulty with at the time was having suitable transformers to drive them with.
At the time I was using some small 6V6 pp OPT's and by about 2004 or so, they finally gave out and shorted.
So, My whole project was put on hold and I started searching for transformer core material to build a pair of suitable transformers.
When I got back on DIYAudio in 2008 to see what advances in ESL technology may have progressed, It was finding Jazzman's ESL's that really got me going again, even though my passion was still stronger then ever.
That is when I started using the Power Toroidal Transformers in reverse Technique in 2010, as they weren't readily available when I had started just a few years earlier.
Anyhow, During the A&B testing of my two sized panels I had found the typical things like the wider panel had slightly more bass as expected and such.
And a slightly more output maybe, as I had no woofer system at the time and was running them full range as the extra bass made them seem louder.
But, The one thing that I did notice was that with the larger panels I had to hold my head in a vise more so in order to enjoy the stereo image, or, without some kind of phase distraction from only very slightly moving my head.
With the little panels it was not so bad and was much much better as I was able to move about freely (slightly) without the stereo image being altered at all (or very much)!!!
The deficiency in the bass part was one thing and I knew that would be solved by adding a woofer.
But everything above about 300Hz sounded exactly the same between the two as they have no coloration whatsoever!!
Except, For the stereo imaging issue and that is why I favored the little panels more.
Then, I built my third set of ESL's duplicating the little ones using a better stator coating that only consisted of two layers of Powder Coating material that a local shop help me with.
This allowed me to raise the bias voltage quite a bit.
I had used many multiplier stages fed from the 345v volt winding that was found on the stereo 6V6pp chassis that I was using.
I used an alligator clip to select what bias voltage range I wanted to use.
I had something like 16 stages or so to chose from.
Once I had got them running at a very high bias voltage I could not believe what I was hearing out of such a small panel (sorry to repeat myself here).
At a very realistic volume of up to about 90db at 12 feet away, and there was bass too!!
All it needed was a sub to help it out a bit.
That was when the OPT's started to fail and were arcing on the inside due to the very high bias voltages.
Eventually they got to the point where one shorted and the other one just profusely arced and it too became unusable.
Since then, I started to do some heavy researching as to what I had discovered, and it all boiled down to the actual width of the diaphragm and not just the width of the panel itself !!!
The widths of my original panels were chosen as a fluke, due to wanting to utilize as much of the Plastic grate material I could without wasting any of it!!
There was no thought of the Horizontal Dispersion issue until after I had built them and started listening to them.
It took a lot of digging and reading to finally understand this and the answer was so simple that I could not believe it!!!
But yet it seems that it has been a well hidden secret used in advertising of speaker manufacture's to boast about how ones system is better than the another companies system.
It all stems from the statement I have read so many times,
"There is a reason why Tweeter's are 1" and smaller, Midrange's are 3" to 6" and woofer's are 8" or bigger !!!"
But nobody actually explained why, or maybe I am just slow and missed it somewhere as it is all related to the laws of physic's.
But, I explain this more in this post here,
A Segmented Stator Desktop ESL
"When the section width equals one wavelength the dispersion pattern is of the familiar doublet figure 8 pattern, and, any frequency below this point becomes more and more omni directional with a circular wave front.
Above this frequency the wave front begins to form into a beam and sometimes with some extra lobes shooting out from the sides."
I hope this helps some.
Cheers !!!
jer 🙂
Attachments
Last edited:
Thanks bolderst! Threads that you have posted led to other threads with additional information, some great, some not so. So confused!hahhaha
These segmented panels you guys keep mentioning seem very complicated, at the same time, awesome.
Time will tell, but for the time-being, I'm sticking to my original design of a curved panel, albeit narrower than the one I had envisioned.
When I learn enough, I intend on building a/some large segmented panel(s)
cheers guys
-wreck
Hi,
Any wrinkles in the diaphragm(initially, or after time) are completely unacceptable. It makes buzzing noises and introduce somewhat harsh character to the sound.
So be sure to use glue & spacers that don't creep(that's tells the word NO for almost all double sided tapes, with few exceptions perhaps).
In regarding to segmented wire panels, while at first glance looks more difficult to build, has some very important advantages:
a) Very difficult to arc due to rounded shape of wires as well as thick and more or less uniform insulation, so build and forget.
b) dispersion pattern can be controlled from narrow to wide; IMO here it excels curved designs considerably.
Regards,
Lukas.
Thanks Lucas.
For the time being, a wire stat is simply out of the question, as I have not learned enough to attempt something like that.
However, I have learned enough to attempt a perforated steel build.
Your comments about the double sided tape are noted, but I'll be using 3M VHB (very high bond) double sided tape, which is used in place of otherwise welded bonds. I should be OK..😉
I thought long and hard about encountering wrinkles, and I've decided that to eliminate them, a slight horizontal stretching will be needed to avoid these.
This will lead to 'hourglass' effects, or as I call it: 'cupping'...
My solution to that is to use more spacing on the back stator to compensate.
The front stator spacing will have a .063" thickness, however, this will not be the effective spacing in practice. I anticipate more like .070-.074 spacing (allowing for said cupping that will inevitably occur)
This will be met by spacing of the back stator, that in specification will be .093" ...but in practice will be more like .086" to .082" due to the front-side 'cupping'
If the whole thing goes down in flames, then I'll just tear it apart and start from scratch, but I have a sneaking suspicion it'll work...😉
Intermission time:
Part 1: Crafting MartinLogan Electrostatic Panels - YouTube
Notice anything?
OK, I'm out...😀
Part 1: Crafting MartinLogan Electrostatic Panels - YouTube
Notice anything?
OK, I'm out...😀
Here is a thread worth mentioning when it comes to curved stators and/or Asymmetrical D/S spacing's.
jer 🙂
jer 🙂
Wreck: come on, you're in this like the rest of us. Don't let the Martin Logan stuff scare you. Give it a shot.
What? Mine? 😛 (thanks jer, with your continued help, it could just be!)Here is a thread worth mentioning when it comes to curved stators and/or Asymmetrical D/S spacing's.
jer 🙂
Wreck: come on, you're in this like the rest of us. Don't let the Martin Logan stuff scare you. Give it a shot.
Thanks for the enthusiastic push waldtraut, but it's gonna be a long trough through the woods before I can see the clearing...
I have several things to do, but starting this weekend, I'll be documenting my progress...
Wish me luck, and the helping hands of the ESL gods...hahah
Ohhhmm...🙂
Reguarding stator panels? Is it better to have the outside perimeter free of hole's?
Not on a flat panel... but given the vertical tension a curved panel requires, I believe a solid, non-perforated band at the top and bottom would be very beneficial, if not necessary.
Having a non-perforated band at the top and bottom would certainly allow the double sided tape quite a bit more bonding surface, and also avoid ( I would think) the tape from recessing into the holes, which would provide less bonding pressure onto the diaphragm.
See post # 30 by Calvin for consensus on this, and FWIW, ML uses it on all sides, not just the top.
cheers
-wreck
Just watched that you tube video at friends place, I have slow dialup 🙂 , I wonder how even the tension is across the length as it seems she only gave about 4 or 5 pulls on it's length, placed right on the tape, almost looks like exact tension isn't that important.
Al
Al
Watch it again Delta, she's pulling in the horizontal, and not the vertical.
The vertical tension seems to be mechanized as far as I can tell,(unless you're watching a different video, haha)
Anyways, for anyone following the thread, I ordered my metal today after a battle with a few different companies.
Four pieces measuring 15" by 60" plus two remainder 6"x 60" (for a future center channel) perforated 20 gauge metal, cut out of their stock 36"x120" sheets... final price was $113 and some change, straight to my door, not bad.
(I'm happy 🙂)
Stay tuned...
Wreck: where do you get 3M very high bond tape? I've been having trouble with the "regular" 3M tape I bought through McMaster. The tape is now creeping. Might have something to do with the room where my system is got down to 55 degrees last night...getting frustrated.
Bazukaz: what kind of glue do you use? Spacers? Please fill me in on this method.
Thanks.
Bazukaz: what kind of glue do you use? Spacers? Please fill me in on this method.
Thanks.
Ah..Um... I think since the thread is named...oh, nevermind..wreck, you going curved or flat? if curved did you get it pre rolled?
Al
 🙂D)
🙂D)I'll let you off the hook this time, only because you may have been consuming large quantities of Saskatoonian brewskies last night, eh?

(I'm just kidding, Delta...haha)
McNichols offers a host of options including rolling/bending. But I decided against because they deal in such large quuantities, I'm afraid they wouldn't be personal enough to care what they are doing. Besides, I have a friend who does machining locally, and will cut me a good deal also.
Hey waldtraut, I get this stuff anywhere I can find it, with the right specs, and with the best price.Wreck: where do you get 3M very high bond tape? I've been having trouble with the "regular" 3M tape I bought through McMaster. The tape is now creeping. Might have something to do with the room where my system is got down to 55 degrees last night...getting frustrated.
McMaster-Carr has VHB, but I found the thickness I was looking for at a much cheaper price at ULINE, so I ordered there. Things can also work the other way, for instance, I found a much cheaper price at McMaster's for another tape I was looking for, as opposed to ULINE, and yet another 'best deal' at Amazon.
Just to rattle off a few names, there's Uline, Amazon, McMaster's, shop3M..etc. Prepare to spend a few hours comparing prices/specs/quantities...
Hope this helps
-wreck
There was a previous member here by the handle Starz00700, and he built a stretching table for curved ESLs that looked pretty functional, look:
I'd like to build something similar, as this particular table would have the back stator attached first, which is the sequence I'd like to follow, reason being is the front stator would be much easier to mount than the back one once (halfway) fabricated.
Does anyone know how he built the curved 'table' ? What is it made of? etc.
Thanks in advance...
-wreck
An externally hosted image should be here but it was not working when we last tested it.
I'd like to build something similar, as this particular table would have the back stator attached first, which is the sequence I'd like to follow, reason being is the front stator would be much easier to mount than the back one once (halfway) fabricated.
Does anyone know how he built the curved 'table' ? What is it made of? etc.
Thanks in advance...
-wreck
- Status
- Not open for further replies.
- Home
- Loudspeakers
- Planars & Exotics
- Building a large curved ESL