Keep some distance from the heatsink to the wood plinth, see pic below of final assembly,
I have a 1/16” (1.5mm) all around the PCB. The heatsink doesn’t touch the wood so it’s all good.
My bias is set to 0.45A with each heatsink between 53-55C in a 22C ambient.
What an awesome little kit.
Eric
Congratulations Eric fantastic DIY work
this amp with wood plinth are beautyful.
How you protect them againts dust and electric possible problems from the "outside world "
, accidental shorts with the fingers, insects etc. ?
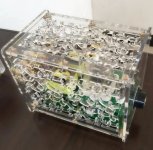
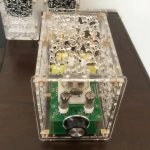
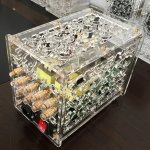
Maybe make from transparent plexiglass physical barrier ( or hat ) will be useful
but keep a lots of open space all around for the free air circulation..
") Have a nice day
Have a nice dayMake something similar plexiglass " bird cage " to this on the pictures
but with wood frame ( or not ? ) for ACA mini Concept idea for DIYAudio Store ?
but with wood frame ( or not ? ) for ACA mini
Concept idea for DIYAudio Store ?Attachments
If at all, I‘d use mesh metal.
Something like this
Edelstahl Drahtgewebe Fliegengitter Gaze - MW: 1,40 mm - DS: 0,25 mm - 1 m x 1 m Rolle : Amazon.de: Baumarkt
Something like this
Edelstahl Drahtgewebe Fliegengitter Gaze - MW: 1,40 mm - DS: 0,25 mm - 1 m x 1 m Rolle : Amazon.de: Baumarkt
@ Nicoch58
My post are about concept ( similar one but not the same design again )
of use cheap transparent plexiglass and with wood frame if you like for amplifier protection.
It's one idea what is your solution ?
Show some example....criticize is easy
....please send constructive message
My post are about concept ( similar one but not the same design again )
of use cheap transparent plexiglass and with wood frame if you like for amplifier protection.
It's one idea what is your solution ?
Show some example....criticize is easy
....please send constructive message

@ Nicoch58 and Diyers
OK why not metal can be used for protection
but you don't see amplifier inside very well
Plexiglass concept is about:
+ cheap price
+ with material transparency you have great components circuit show all the time
+ nice LED light can be diffused from wood frame position to the inside plexi front panel of the chassis
With your tool write " Pass DIY ACA Mini " instead " You are Awsome "
example Elegant Acrylic LED Decoration - How to Make a Edge Light Sign Emblem - YouTube
OK why not metal can be used for protection
but you don't see amplifier inside very well
Plexiglass concept is about:
+ cheap price
+ with material transparency you have great components circuit show all the time
+ nice LED light can be diffused from wood frame position to the inside plexi front panel of the chassis
With your tool write " Pass DIY ACA Mini " instead " You are Awsome "
example
Elegant Acrylic LED Decoration - How to Make a Edge Light Sign Emblem - YouTubeThat would be nice but as a DIYer how would you cut the plexiglass as a + sign since there are 1 heatsink on every corner.
I like the added protection of the plexiglass for the electronic but don’t believe it’s a must.
My only concern over the years are the trim pot which have their adjustment on top.
Eric
I like the added protection of the plexiglass for the electronic but don’t believe it’s a must.
My only concern over the years are the trim pot which have their adjustment on top.
Eric

@ E_fortier
Plexiglass position is better if distance from heatsinks, can be in the middle of your wood frame.
The wood piece of front panel need to be not single but two wood pieces so inside the wood sandwich
you put Led light circuit and longer piece of plexiglass for mechanical fixation together with wood frame.
The other plexiglass sheets are connected to plexi front panel with glue or screws etc.
Laser cut nice shape holes design in the plexiglass is very important for good free air circulation inside the ACA mini

So when I first saw the mini, the thinking process started. And that's not a bad looking little amp -- it has its it's own character. First get it from the store. Now the chassis...
Maybe I'll case it in a black box with air holes -- I have some spare cases from burnt out less than compact consumer grade stereos. A full chassis would mean minor modification to layout of the components requiring a mount in the case and running power to it. I could make my own clean filtered lots of caps power source too and put I there right beside the mini...
The holes in the back would have to be cut or drilled (I don't have a CNC machine handy and exact measurements never work out exactly). To avoid that, I could mount the components to the case, make runs, and just wire the RCAs and whatever off board. Might as well get a whole new metal plate because all of that distracting corporate writing and extra unused holes on the back.
Then the switch up front would have to be accessible, so that would definitely need to be wired off board and or find a compatible 90 degree switch and drill through the front because boxing or caging it all up would mean unlidding or uncaging to access said switch. Nope wire it and mount off board.
Since the switch up front needs a place, I might as well get a good piece of metal and tear off the old face plate of whatever labeled stereo unit the case is from. This way I can put the name onto the front and drill a hole for the LED. Gee, that is a lot of work.
Well, the Peasante chassis in the store is only $99 and $6 for an airy top plate.
Hmmmmm... maybe I will just mount it on metal and slab side some wood like on one of the tube amps. After all, it's not a bad looking little amp to begin with.
I wonder how long before someone makes a Turbo version of this amp...
Last edited:
I know it would complcate the design and raise costs but... could the single ended supply be changed to a bipolar supply? And in so doing connect C4 to ground and omit C2? Would that work?
It seems that it should. Does anyone more knowledgabla than me have any thoughts on this?
It seems that it should. Does anyone more knowledgabla than me have any thoughts on this?
Try it and see! Cobble together a little single-channel prototype on vectorboard, hook it up to your bipolar power supply, and evaluate its performance. There are only a few parts, it ought not take very long.
Or if you prefer not to do this yourself: find a way to motivate someone else to do it. Perhaps using cash, or homebaked cookies, or pizza & beer, or detailing their car.
Or if you prefer not to do this yourself: find a way to motivate someone else to do it. Perhaps using cash, or homebaked cookies, or pizza & beer, or detailing their car.
You winF As protection I'll make a sticker that says: "please insert fingers inside"
- Home
- Amplifiers
- Pass Labs
- DIY ACA mini