It’s the one with the opening I’m wondering, no glue or joint. Beautiful.
I’ll just pretend it’s the top plate of a tube amp and simply build a frame around it like i usually do, wonder why i didn’t think about this before...at the same time I’ll put some speakers binding posts.
Eric
I’ll just pretend it’s the top plate of a tube amp and simply build a frame around it like i usually do, wonder why i didn’t think about this before...at the same time I’ll put some speakers binding posts.
Eric
Last edited:
Enthusiastically recommended! 🙂
We don't need no stinking chip amps.
Nice! Do you come out directly from the PCB to go to speakers or you transition to binding posts?

Last edited:
Could also be put on top of a 230x170 1U Galaxy with a square hole in the top if you think it must match your other components. Get the version with the aluminum top to make cutting tolerable
Still, I would prefer a nice home made wood base
Galaxy 1U w/Aluminum Covers – diyAudio Store
Still, I would prefer a nice home made wood base
Galaxy 1U w/Aluminum Covers – diyAudio Store
Last edited:
Wow, Mark! That's great!Yes this
https://www.diyaudio.com/forums/att...d1637530019-diy-aca-mini-1121211419_hdr_2-jpg
I’m already advocating that the ground plane have holes to support the ACA mini.
Then maybe we have 2 new standards for future “tower” projects, plus Raspi Pi holes….
Although drilling holes in a PCB isn’t difficult.
Mark
Enthusiastically recommended! 🙂
We don't need no stinking chip amps.
Beautiful, beautiful, BEAUTIFUL plank, Michael!

me again, proudly, Papa is having ugliest Plank in Universe and around
Mr. MR is having cutest one, on top of cutest amp ever made
call me Biased, trice, all the time

Mr. MR is having cutest one, on top of cutest amp ever made
call me Biased, trice, all the time
I've been running it for a few days now with no problems, but will check the temps of the ACP+ and report back.
After an hour of BTO at more than reasonable volume the ACP+ heatsinks are at about 40 C while the mini's are at about 50-55 C. Ambient is about 25 C.

Hi
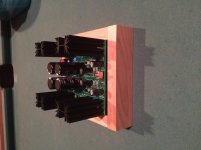
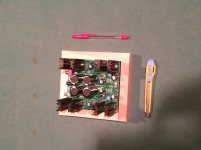
I have started my wooden frame. It’s 1.5” high and the sides are 3/4” thick.
Wood wise I’m not well equipped to do nice 45 degrees corners so I kept it simple.
Nothing is glued yet and in the final step the pcb will be 1/8” below all sides.
I’m attaching some pics of my progress and also a pic showing how small the amp really is.
Can’t wait to finish and hook it up again.
I hope you enjoy side view pics...gotta love iPhone...
BR
Eric
Attachments
Last edited:
The corners look like they were a choice, not a necessity, because they are so perfectly cut!
Excellent!
Excellent!
Hi
I have started my wooden frame. It’s 1.5” high and the sides are 3/4” thick.
Wood wise I’m not well equipped to do nice 45 degrees corners so I kept it simple.
Nothing is glued yet and in the final step the pcb will be 1/8” below all sides.
I’m attaching some pics of my progress and also a pic showing how small the amp really is.
Can’t wait to finish and hook it up again.
I hope you enjoy side view pics...gotta love iPhone...
BR
Eric
Nice!
how is the pcb attached?
- Home
- Amplifiers
- Pass Labs
- DIY ACA mini