Try disconnecting one leg of the 2.7uF capacitor and measure before and after.
You nailed it.
So what's wrong here?
Attachments
What microphone did you use?Any idea which components I should look at?
And is your mic calibrated? And how did you measure exactly?
You also have a lot of reflections in the measurement.
The tolerances in the components are relatively high, but still ok. This can lead to a slightly different frequency response. Without the 2.7µF cap, the treble is a little little.
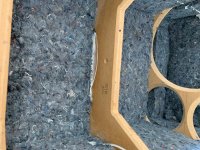
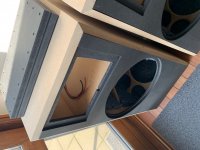
Jesper, the comments on the braces are correct, but your cabinet is good even like that. I know many speakers who have far fewer braces.
It's not like there is less pressure in BR speakers, by the way. A BR loudspeaker is only increasingly open below the tuning frequency.
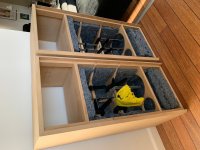
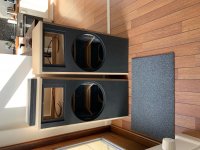
By the way, you shouldn't tear the inner pillows. The filling material is very loose. You can just put it completely in the case - that's how I did it. Your damping material is already very thick (which is good), so I would only put one or two pillows in the box. These should not press against the woofer.
You also have a lot of reflections in the measurement.
The tolerances in the components are relatively high, but still ok. This can lead to a slightly different frequency response. Without the 2.7µF cap, the treble is a little little.
Jesper, the comments on the braces are correct, but your cabinet is good even like that. I know many speakers who have far fewer braces.
It's not like there is less pressure in BR speakers, by the way. A BR loudspeaker is only increasingly open below the tuning frequency.
By the way, you shouldn't tear the inner pillows. The filling material is very loose. You can just put it completely in the case - that's how I did it. Your damping material is already very thick (which is good), so I would only put one or two pillows in the box. These should not press against the woofer.
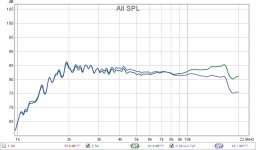
Two traces like these can sometimes be explained as one being measured with a mic that has a calibration curve loaded ( usually the one having less UHF ) and the other ( green trace ) being a measurement from a test mic lacking a calibration file ( being loaded ).
Unfortunately, I've also seen differences like this from ancient ( first generation ) UMIK-1 mics versus their more recent offerings ( recent being at least the last 5 years or so, or since CSL started calibrating UMIK-1s ) .
")
And is your mic calibrated? And how did you measure exactly?
You also have a lot of reflections in the measurement.
The tolerances in the components are relatively high, but still ok. This can lead to a slightly different frequency response. Without the 2.7µF cap, the treble is a little little.
It is a UMIK-1 purchased last summer and the calibration file was loaded. REW dialog popped identified the UMIK and prompted for the file. Measurement was just a quick-and-dirty setup in the basement.
I have an ECM8000 with calibration file and recently tried to compare measurements with the UMIK but was having an issue with my sound card and couldn't get REW or Holm working with it.
I'll give it another try and report back.
Thanks.
Tubeglow49, Rese66
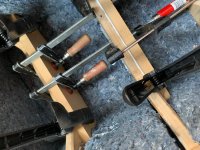
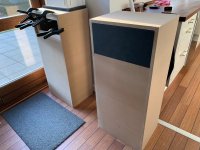
Lessen learned for this session now guy's...
As you demanded i did this, and actually i can hear difference with the knocking method you explained me, thank's man!
Eventhrough i am very careful when i assamble this kindoff stuff, and maybee Rese66 is totally correct when telling me it's good as is, i'am the type which cannot ignore such thing's very well, so Jesper comeOn FixMe please...
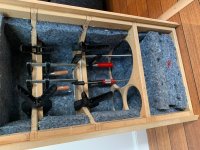
Rese66, i found a bag with some acustilux or like from an old project, i will show how much there is later another day, might be that it's enough.... let's see.
Jesper.
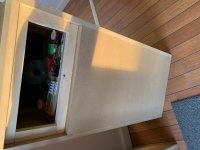
Btw. :: Still enough space for the woofer!
Lessen learned for this session now guy's...
Tubeglow49 :: but I would glue those circle pieces back in and to give it strength add a little strips of wood to connect the circle slices and the bracing and wall you have, either vertically or horizontally or both.
As you demanded i did this, and actually i can hear difference with the knocking method you explained me, thank's man!
Eventhrough i am very careful when i assamble this kindoff stuff, and maybee Rese66 is totally correct when telling me it's good as is, i'am the type which cannot ignore such thing's very well, so Jesper comeOn FixMe please...
Rese66, i found a bag with some acustilux or like from an old project, i will show how much there is later another day, might be that it's enough.... let's see.
Jesper.
Btw. :: Still enough space for the woofer!
Attachments
Last edited:
I was able to get the ECM8000 working. Later I will do some comparisons between the two mics with and without calibration files.
So I'm looking at the internal cabinet treatment now. So the recommendation is to line the cabinet walls with an absorbent material and then separately stuff the void?
What characteristics does each material require or can they be the same material?
Any idea what the North American equivalent of Fibsorb is? My local home improvement stores stock fiberglass (favorite of Pi Speakers), rockwool, and denim batt insulation.
I have an old of Monacor MDM-3 which purports to be 75% wool / 25% polyfill. I think I have enough for as much as two 35mm layers for the internal walls.
Two traces like these can sometimes be explained as one being measured with a mic that has a calibration curve loaded ( usually the one having less UHF ) and the other ( green trace ) being a measurement from a test mic lacking a calibration file ( being loaded ).
Unfortunately, I've also seen differences like this from ancient ( first generation ) UMIK-1 mics versus their more recent offerings ( recent being at least the last 5 years or so, or since CSL started calibrating UMIK-1s ) .
I didn't bother to match levels but here are the measurements of the cd using the UMIK-1 and ECM8000 with and without calibration files.
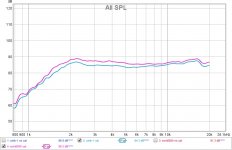
The second image is the same calibrated responses shifted a little closer together for easier comparison.
Attachments
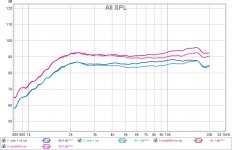
The Umik-1 measurement looks best without calibration.
Did you measure the horn in the finished box?
I suspect that the differences in the x-over parts mean that there is a little more sound pressure at 2kHz than with my Asathor.
This is mainly due to the 7.35µF instead of the 6.8µF. Unfortunately, this cap is very sensitive to deviations - and here we have a cap with 8% too much. Maybe you can swap this for a better fitting cap. It is better to have too little capacity than too much. 6µF would also work fine - maybe I should adjust the x-over here accordingly.
"So I'm looking at the internal cabinet treatment now. So the recommendation is to line the cabinet walls with an absorbent material and then separately stuff the void?"
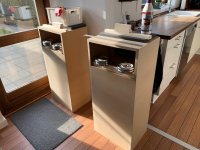
Correct. However, the housing should not be completely filled. At Jesper you can see it well. Line the walls inside with heavy damping material. Unfortunately, this material is often very expensive as a hi-fi accessory. I like to use pond protection fleece, which is very cheap and comes in different qualities. Then several layers of this until a thickness of about 1-2 inches is reached.
You can then use the MDM-3 to fill the cabinets.
@Jesper: Nice job.
It is sufficient if the cabinet is filled to the middle brace.

Did you measure the horn in the finished box?
I suspect that the differences in the x-over parts mean that there is a little more sound pressure at 2kHz than with my Asathor.
This is mainly due to the 7.35µF instead of the 6.8µF. Unfortunately, this cap is very sensitive to deviations - and here we have a cap with 8% too much. Maybe you can swap this for a better fitting cap. It is better to have too little capacity than too much. 6µF would also work fine - maybe I should adjust the x-over here accordingly.
"So I'm looking at the internal cabinet treatment now. So the recommendation is to line the cabinet walls with an absorbent material and then separately stuff the void?"
Correct. However, the housing should not be completely filled. At Jesper you can see it well. Line the walls inside with heavy damping material. Unfortunately, this material is often very expensive as a hi-fi accessory. I like to use pond protection fleece, which is very cheap and comes in different qualities. Then several layers of this until a thickness of about 1-2 inches is reached.
You can then use the MDM-3 to fill the cabinets.
@Jesper: Nice job.
It is sufficient if the cabinet is filled to the middle brace.
The horn is not in baffle at this point. I'm still a week or two from having a enough time to start the cabinet.
I have a small collection of caps I can combine to get a lower value.
Pond fleece is another one of those materials that appears uncommon in the US. How about denim insulation? It's available locally for relatively low cost and seems to resemble what Jesper's using.
Thanks.
I have a small collection of caps I can combine to get a lower value.
Pond fleece is another one of those materials that appears uncommon in the US. How about denim insulation? It's available locally for relatively low cost and seems to resemble what Jesper's using.
Thanks.
@Jesper nicely done
I'm also in the boat of better do than always regret not having done and then always wondering how it would be different if you had when looking at the speaker vs. just listening.
Be careful not overstuffing the enclosure, else you will get a kind of dead "overstuffed" sound. This is especially sad because it can cancel the nice "spinginess" of the closed enclosure sound. Your walls are well treated and will need little "acoustilux" or equivalent. It looks like you ordered the extra thick felt already. To get a feeling of the damping look at some Troels pictures, e.g. Faital-3WC-15
But important to stick to what the designer (Rese) has intended and then adjust to your liking. Also make sure stuffing does not touch the membrane or is too close. Ideal is lambs wool, if you have old pullovers or grandmas knitting supplies, but ikea pillows or similar work well. Put some glue into the holes drilled for holding the drivers if it is MDF that way you can mount and dismount them more often. Really impressive progress.
@Rese regarding the higher damping requirements/suggestions for sealed boxes I will politely disagree and I will go along with the opinions of Alon Wolf Chief designer of the Magico Speakers, IMO among the best sealed enclosure speakers out there. You probably know they go with aluminium cabinets working on a push pull tension principle aluminum cabinet with tension rods to allow them to get the best out of sealed enclosures.
There was an extemely interesting presentation and discussion regarding this at the High End in 2017 I believe. It's a bit more complicated than what you described He recently spoke about/mentioned this again regarding the M2 speaker, e.g. a quick quote from Stereophile M2 interview and review Magico M2 loudspeaker | Stereophile.com
"especially since with sealed designs, there's a tremendous amount of pressure inside of the box". Also having to do with how the box is mounted to the floor, noise dissipation and other factors. But it usually is a good idea to brace sealed boxes more IMO and experience.
Cheers
I'm also in the boat of better do than always regret not having done
and then always wondering how it would be different if you had when looking at the speaker vs. just listening.Be careful not overstuffing the enclosure, else you will get a kind of dead "overstuffed" sound. This is especially sad because it can cancel the nice "spinginess" of the closed enclosure sound. Your walls are well treated and will need little "acoustilux" or equivalent. It looks like you ordered the extra thick felt already. To get a feeling of the damping look at some Troels pictures, e.g. Faital-3WC-15
But important to stick to what the designer (Rese) has intended and then adjust to your liking. Also make sure stuffing does not touch the membrane or is too close. Ideal is lambs wool, if you have old pullovers or grandmas knitting supplies, but ikea pillows or similar work well. Put some glue into the holes drilled for holding the drivers if it is MDF that way you can mount and dismount them more often. Really impressive progress.
@Rese regarding the higher damping requirements/suggestions for sealed boxes I will politely disagree and I will go along with the opinions of Alon Wolf Chief designer of the Magico Speakers, IMO among the best sealed enclosure speakers out there. You probably know they go with aluminium cabinets working on a push pull tension principle aluminum cabinet with tension rods to allow them to get the best out of sealed enclosures.
There was an extemely interesting presentation and discussion regarding this at the High End in 2017 I believe. It's a bit more complicated than what you described
He recently spoke about/mentioned this again regarding the M2 speaker, e.g. a quick quote from Stereophile M2 interview and review Magico M2 loudspeaker | Stereophile.com"especially since with sealed designs, there's a tremendous amount of pressure inside of the box". Also having to do with how the box is mounted to the floor, noise dissipation and other factors. But it usually is a good idea to brace sealed boxes more IMO and experience.
Cheers
Denim insulation looks good to me. I would give it a try.
Of course there is enormous pressure in closed boxes. But that doesn't mean that less pressure is built up in bass reflex boxes. The cabinet is acoustically open only below the tuning frequency, otherwise there would be a drop in sound pressure above it.
With the high-end manufacturers, there is always a little bit of marketing involved.
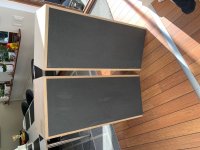
Vitorio; thank's... 
Weather was perfect today, cutting this nasty black hdf sheet's.
- I had to clean up everything outside afterward's (Neigbour's is by luck not at home!)
--- Jesper.
Weather was perfect today, cutting this nasty black hdf sheet's.
- I had to clean up everything outside afterward's
(Neigbour's is by luck not at home!) --- Jesper.Attachments
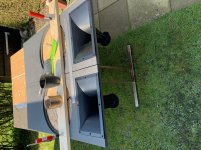
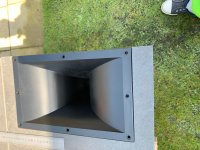
@jesper Those look really nice and excellent workmanship, very clean and neat. Where did you get your routing skills and what do you use as a routing compass.
Something important before gluing:
How much material thickness do you have left behind the counter sunk holes for the 15" woofers screws to go into? That is the most critical place to have strength. If you think it is not very strong you can glue a MDF ring or plate with hole behind the baffle around the driver hole. You can do this with very little material using only 4 x1/4 rings per side minus the side bracing in your case. You just glue it to the back and it gives the screws more material to hold onto, prevents unnecessary woofer movement, reduces vibrations going back into the driver and into the baffle/speaker, braces the front panel at the same time, etc. Best use of a few cm³ of material in a speaker. Do this before gluing the baffle into place.
A friend of mine likes using multiplex/birch high quality plywood and the hdf board in combination, also with a little bit of bitumen/alubytil glued on back (it will likely be worthwhile to get some for the horn anyway), and then little triangles that connect the sides to the front baffles, but this might be overkill here Use whatever you have in scaps.
Just wanted to give you a heads up before you glue.
Hard to see from your pick but the from baffle should as a rule of thumb have a minimum of the same to about 2.5 times the thickness of the side walls. You can also predrill the holes for the woofer and just glue some blocks where needed but this will not be as strong as a real ring.
Keep up the good work. Really like the bevel. Is that 30 or 45 degrees?
Cheers
and what do you use as a routing compass. Something important before gluing:
How much material thickness do you have left behind the counter sunk holes for the 15" woofers screws to go into? That is the most critical place to have strength. If you think it is not very strong you can glue a MDF ring or plate with hole behind the baffle around the driver hole. You can do this with very little material using only 4 x1/4 rings per side minus the side bracing in your case. You just glue it to the back and it gives the screws more material to hold onto, prevents unnecessary woofer movement, reduces vibrations going back into the driver and into the baffle/speaker, braces the front panel at the same time, etc. Best use of a few cm³ of material in a speaker. Do this before gluing the baffle into place.
A friend of mine likes using multiplex/birch high quality plywood and the hdf board in combination, also with a little bit of bitumen/alubytil glued on back (it will likely be worthwhile to get some for the horn anyway), and then little triangles that connect the sides to the front baffles, but this might be overkill here
Use whatever you have in scaps.Just wanted to give you a heads up before you glue.
Hard to see from your pick but the from baffle should as a rule of thumb have a minimum of the same to about 2.5 times the thickness of the side walls. You can also predrill the holes for the woofer and just glue some blocks where needed but this will not be as strong as a real ring.
Keep up the good work. Really like the bevel. Is that 30 or 45 degrees?
Cheers
- Home
- Loudspeakers
- Multi-Way
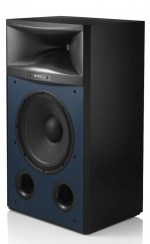
- Asathor - a JBL 4367 Clone