Yes, it's all done in JRiver, but it takes me 5 separate plugins to do what I want. So no one size fits all script I'm afraid.
I use 2x PEQ banks in JRiver (first one to split the ambient from mains, second to do post EQ), the build in convolution engine from JRiver, 1x Fabfilter EQ plugin (as the pré EQ), another linear EQ plugin (for mid/side EQ), the MSED Voxengo plugin (to split the mains in mid and side), a plugin to host a few others (Metaplugin) and a reverb plugin (for the ambient channels).
It was a growing process") . I didn't get there in one day.
. I didn't get there in one day.
I use 2x PEQ banks in JRiver (first one to split the ambient from mains, second to do post EQ), the build in convolution engine from JRiver, 1x Fabfilter EQ plugin (as the pré EQ), another linear EQ plugin (for mid/side EQ), the MSED Voxengo plugin (to split the mains in mid and side), a plugin to host a few others (Metaplugin) and a reverb plugin (for the ambient channels).
It was a growing process
. I didn't get there in one day.I'm still at day one re' Jriver, afraid to get my feet wet or perhaps drown in the complexity of what your processing has grown to.
Instead I've been using Toslink out of my TV into MiniDSP OpenDRC DIR for FIR then into MiniDSP 4x8HD, still via TOSLINK, which does IIR XO between ways and for subs. This is an easy way to get started but limited as to number of taps supported and surround/ambient channel synthesis but does well within its limits.
Still have good intentions re' moving all the filtering into a PC and JR but its a huge step to take away from a working system. I'll start out that way with my next set of speakers so the risk won't be so high.
I can imagine a transition like that being a bit much if you currently have what it takes to keep you happy.
Due to being able to verify each step, I love working with JRiver. The reason to have so many different EQ's in use is to be able to easily isolate each step along the way.
The only thing that really needs to be separate from all other steps is the mid/side processing. The rest of them (EQ and convolution) could be bundled or changed in sequence without influencing the end results.
By splitting it up into separate parts I can turn it on/off in one step for more control.
The plugins sound like a good way to organize your work and keep separate functions separate so that they can be managed and maintained. Individual plugins are reasonably well documented. The trouble is I can't find any high level docs that tell me how to hook inputs up to plugins and route between them. Can you help with that?
Separate topic: I've seen/heard guidance to pull arrays well away from front wall and to not put absorption on the front wall to increase depth of soundstage. Will ambience channels allow me to create the same depth of soundstage for shallow speakers flat to the front wall?
Separate topic: I've seen/heard guidance to pull arrays well away from front wall and to not put absorption on the front wall to increase depth of soundstage. Will ambience channels allow me to create the same depth of soundstage for shallow speakers flat to the front wall?
In JRiver you can change the content of each channel within the Parametric Equalizer. However plugins usually only pick up the left/right main channels to work on.
That's why I ended up using Metaplugin which allows you to insert plugins there and route all the channels at will.
There are free plugins available that should be able to do the same. I had a bundle that included Metaplugin and used it for that purpose ever since.

(an older picture from when I was still experimenting with cross talk cancelation, but it serves it's purpose here)
Your second question relates to how much delay there is between the main wave front and it's reflections. My arrays are about 50 cm (baffle from front wall) into the room without any absorption on that wall (not allowed to do so).
Ideally I'd have absorption behind them though, without being able to pull them further out. But I can't win that battle. I did experiment with placement prior to running FIR filters and ended up with the 50 cm distance and an amount of toe-in (about 12.5 degree) to cross behind the listener position.
That's where the ambience channels can change the perception, yes. However the eyes are often stronger than the ears, so one might have to close the eyes to truly be convinced. Ideally I'd go for Beveridge placement but that's a no go in my living room.
I must say I never found the front wall (as a specific reflection peak) in the raw measurements, on the contrary the side wall reflections were quite easy to find. I've had temporary damping sheets behind the speakers to see if that resulted in an obvious change in the IR. It didn't.
You might have seen a picture with Fiberglass isolation sheets on top of my arrays. That's not the only spot they were used for testing purposes.

I've had them just about everywhere while keeping an eye on the immediate changes it caused in (very early, 0 to 4 ms) IR measurements. I used that info to determine where to place panels, and how large panels I needed.
The room ra7 has, with a sort of portal to a second room could likely be an easier way to fool both eyes and ears together. The eyes can be pretty strong to steer our mind. Out in my room it definitely helps to close the eyes, while it sounds just as wonderful with eyes open, they can influence placement in imaging.
That's why I ended up using Metaplugin which allows you to insert plugins there and route all the channels at will.
There are free plugins available that should be able to do the same. I had a bundle that included Metaplugin and used it for that purpose ever since.
(an older picture from when I was still experimenting with cross talk cancelation, but it serves it's purpose here)
Your second question relates to how much delay there is between the main wave front and it's reflections. My arrays are about 50 cm (baffle from front wall) into the room without any absorption on that wall (not allowed to do so
).Ideally I'd have absorption behind them though, without being able to pull them further out. But I can't win that battle. I did experiment with placement prior to running FIR filters and ended up with the 50 cm distance and an amount of toe-in (about 12.5 degree) to cross behind the listener position.
That's where the ambience channels can change the perception, yes. However the eyes are often stronger than the ears, so one might have to close the eyes to truly be convinced. Ideally I'd go for Beveridge placement but that's a no go in my living room.
I must say I never found the front wall (as a specific reflection peak) in the raw measurements, on the contrary the side wall reflections were quite easy to find. I've had temporary damping sheets behind the speakers to see if that resulted in an obvious change in the IR. It didn't.
You might have seen a picture with Fiberglass isolation sheets on top of my arrays. That's not the only spot they were used for testing purposes
.
I've had them just about everywhere while keeping an eye on the immediate changes it caused in (very early, 0 to 4 ms) IR measurements. I used that info to determine where to place panels, and how large panels I needed.
The room ra7 has, with a sort of portal to a second room could likely be an easier way to fool both eyes and ears together. The eyes can be pretty strong to steer our mind. Out in my room it definitely helps to close the eyes, while it sounds just as wonderful with eyes open, they can influence placement in imaging.
Last edited:
I don't recall ra's layout now, but my previous room had open archways on both long walls. By placing the towers along the long wall with lots of toe-in, any low-order reflections were more than 90* off-axis. With damping behind the MLP, this worked very well.The room ra7 has, with a sort of portal to a second room could likely be an easier way to fool both eyes and ears together.
Too easy?
Working your *** off making all the needed parts gives you a lot of time to think and rethink parts of the design. That isn't always positive though.
As is reading a lot on this forum. One always gets new ideas and insights but I tried to lock into my plans and try to avoid side tracking.
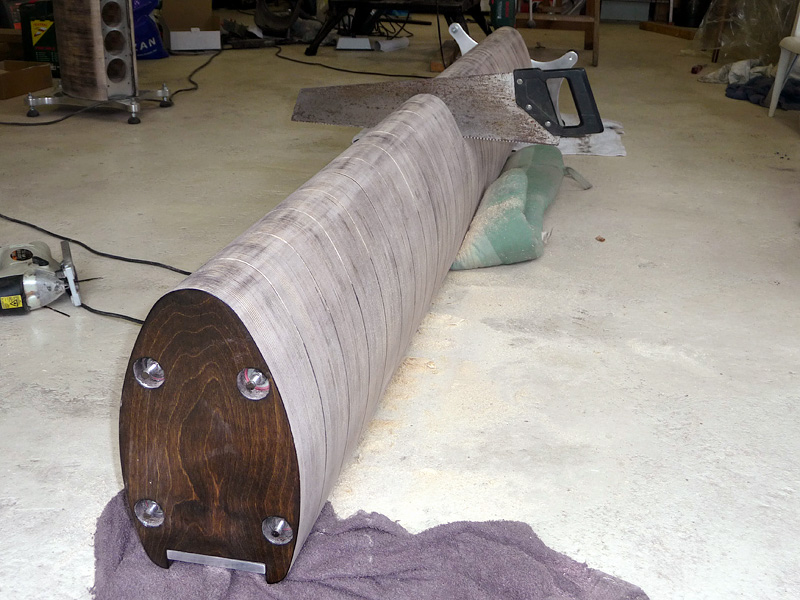
One of the things that had me wonder is if I should use threaded rods in the glue stage or just use wooden dowels for guidance of the separate layers.
I decided upon the first idea, and have the threaded rod fastened with rubber rings on the bottom and top of the stack to be able to let the wood expand/contract somewhat. In between the layers I have open spaces where I countersunk the wood to attach the template for routing. That space is filled with a rubbery glue that stays elastic.
Here's the setup for the glue stage:


The aluminum foot is glued to the floor while keeping everything level and the baffle is fixed to the roof of my garage.
A couple of straps would hold the braces firmly to the baffle. I used some spacers to have the baffle a couple of mm outside the line to be able to strap it down.
Another time consuming job, the glue stage. Here's what I did,
Glue 2 layers together and make them fit the baffle:

(here you see the countersunk hole, the layers are glued together at the non-countersunk side)

(the thread cutting tool is used from time to time to rid the bolts from residue glue)

After preparing 2 of these I glue them to the stack:

Glue the bottom one first, slide down the middle one, again glue and clamp:

(check level while fastening)
Some really great construction ideas here for my upcoming sub. I particularly like the way you have used the metal pieces to sandwich the ply while drying.
How do you keep the rod centered when the hole is bigger?
Thanks for the link!
Some really great construction ideas here for my upcoming sub. I particularly like the way you have used the metal pieces to sandwich the ply while drying.
How do you keep the rod centered when the hole is bigger?
Thanks for reading!
The holes are all 8 mm and drilled with the help of the template. The bigger hole you see on the picture is actually the countersunk hole.
The 2 pieces of ply are glued together with the 8mm holes towards each other, leaving the countersink bore on the outer sides. That countersink is filled with a flexible glue as seen on the pictures.
I used countersink holes on one side of each slice of ply to have the bolts, that keep the template fixed, flush on the bottom side (the side that slides over the table).
So it really is a snug fit.
Last edited:
I'm trying to make some sense of the flexible glue. What is your thinking around that? Were you trying to stop the rod from vibrating?
Like you I have had this idea of build a speaker in layers like this for years, also like you debated whether to use a wooden dowel to locate or threaded rod. The threaded rod does make for a convenient place to bolt down every stage instead of countless long clamps I don't have.
Like you I have had this idea of build a speaker in layers like this for years, also like you debated whether to use a wooden dowel to locate or threaded rod. The threaded rod does make for a convenient place to bolt down every stage instead of countless long clamps I don't have.
The idea behind the flexible glue was two-fold
One - To prevent ringing and vibrations in the threaded rods
Two - To damp the expansion/contraction of the wood
If you have read this thread, you know that second part did not work out. Parking the enclosures indoors after finishing them lead to (several) cracks upon sudden humidity changes throughout the season. The enclosures were covered in PU-lacquer on both in- and outside to prevent soaking up moisture.
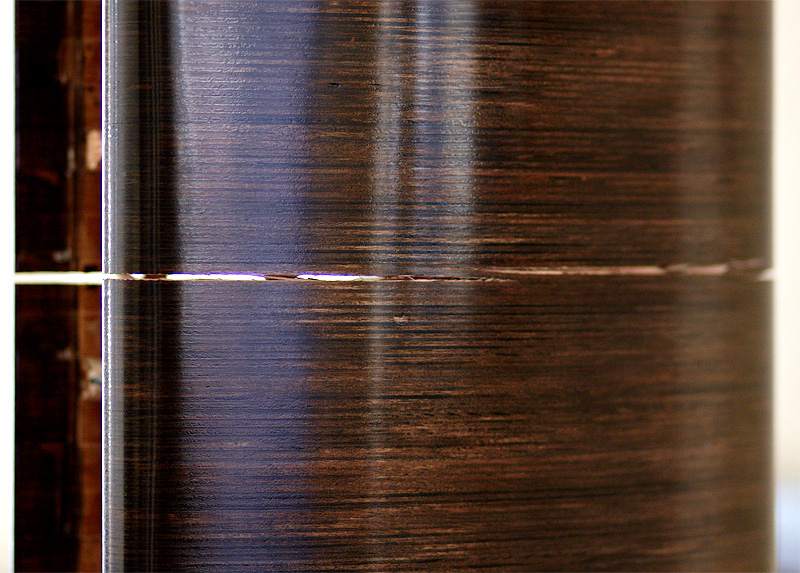
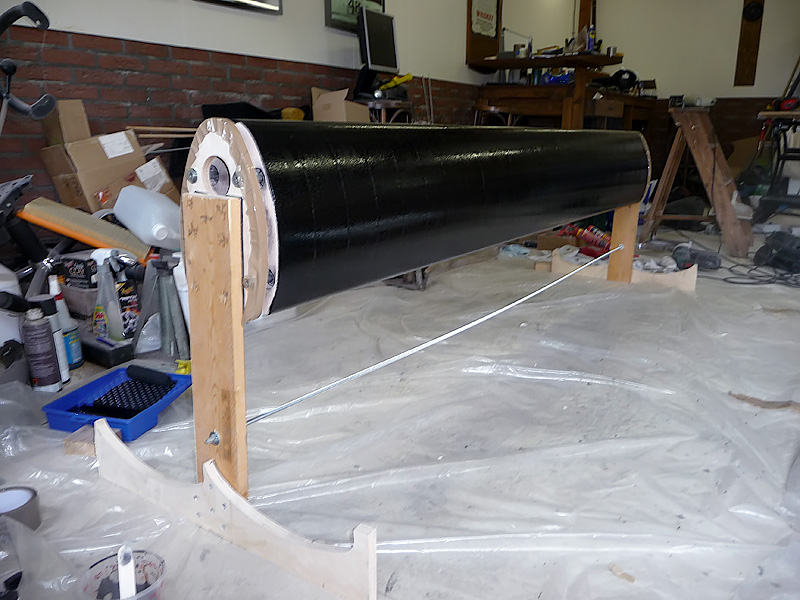
Final solution from me was to hack up the enclosure into smaller parts with flexible layers in between layers and cover it with fiberglass matt + epoxy on the outside.
The general consensus was to remove the rods as they were partly responsible for the cracks. My reasoning to let them stay was that they were the only thing holding the enclosure in shape. Removing them would mean a pile of partial enclosures.
Before the cracks:
After fixing it:
One - To prevent ringing and vibrations in the threaded rods
Two - To damp the expansion/contraction of the wood
If you have read this thread, you know that second part did not work out. Parking the enclosures indoors after finishing them lead to (several) cracks upon sudden humidity changes throughout the season. The enclosures were covered in PU-lacquer on both in- and outside to prevent soaking up moisture.
Final solution from me was to hack up the enclosure into smaller parts with flexible layers in between layers and cover it with fiberglass matt + epoxy on the outside.
The general consensus was to remove the rods as they were partly responsible for the cracks. My reasoning to let them stay was that they were the only thing holding the enclosure in shape. Removing them would mean a pile of partial enclosures.
Before the cracks:
After fixing it:
Last edited:
Hmmm I was originally looking to use ply but the good stuff is double the price of MDF. I plan to make the walls 50mm thick so hopefully there is enough surface area that I don't run into problem. Also MDF might bond a bit better. Although I am now a bit concerned about putting mega bass through a cabinet made this way.
I guess I could always use the threaded rods for construction and remove them before putting tops and bottoms on.
I guess I could always use the threaded rods for construction and remove them before putting tops and bottoms on.
I think the expanding/contracting of MDF might even be worse than with Birch ply.
Not along the length/width but along it's thickness.
The cracks I had were not on glued parts of the enclosure, it was in the middle of a ply layer. Slightly uneven expanding of the MDF could still lead to cracks.
Why are you looking for this construction method for a subwoofer? What advantage do you hope to gain? For me it was the outer shape I could realise this way to aid in diffraction control. For my subs I use conventional ways of using ply. Diffraction isn't a worry there.
Last edited:
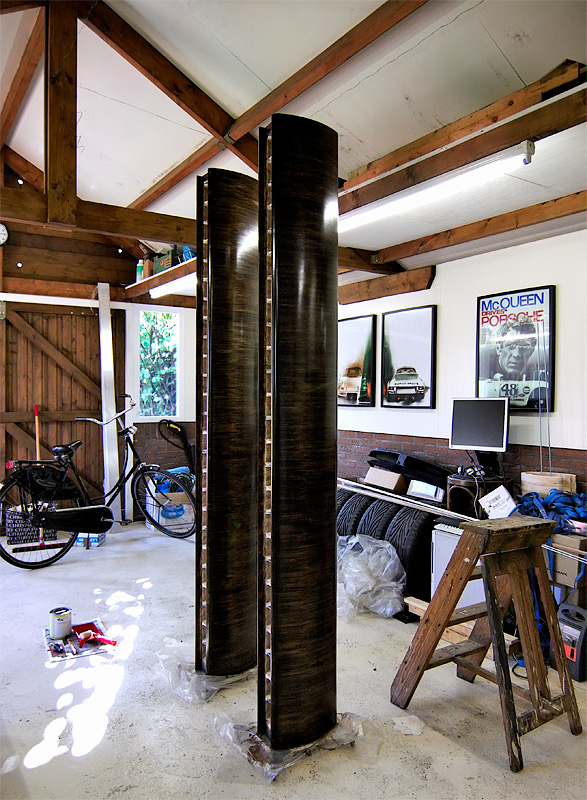
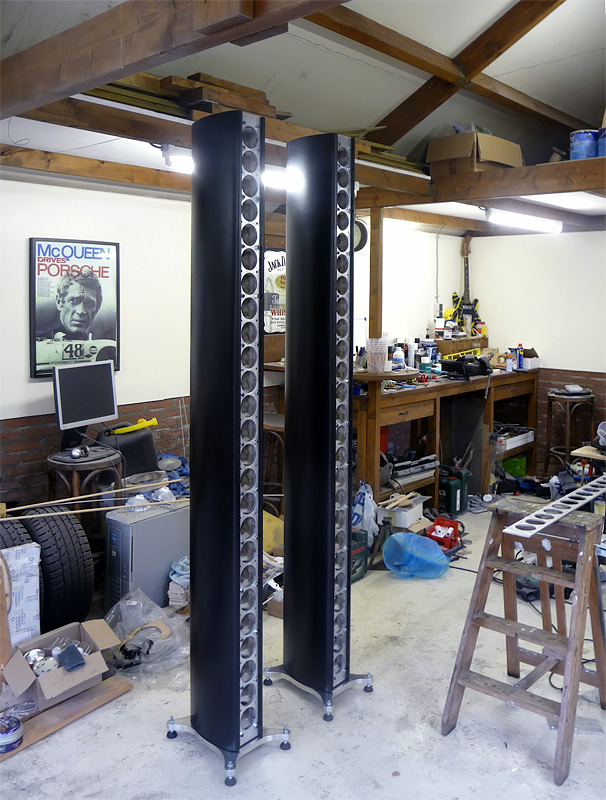
Everytime I see those towers, I wonder how you move/handled them during construction. Did you have to get help? Building them in sections and only joining them together at final assembly might have helped but then you likely get visible joint lines.
Am I correct in thinking that the glue wasn't flexible enough so that the wood was forced to split during a drying out phase? You no doubt want the rods taking the shear load when carrying the towers horizontally or tilting them up so something was called for. If not so tall likely would have been OK. Others have done glue/lam w/o the splitting problem and the aesthetics unwrapped are, I think, good.
Am I correct in thinking that the glue wasn't flexible enough so that the wood was forced to split during a drying out phase? You no doubt want the rods taking the shear load when carrying the towers horizontally or tilting them up so something was called for. If not so tall likely would have been OK. Others have done glue/lam w/o the splitting problem and the aesthetics unwrapped are, I think, good.
rods taking shear load
that's probably not the best way to put it. There is largest shear load on layer to layer connections when array is in horizontal position. You can't get rod to take it if glue is flexible; the glue will just flex and the rod will be relieved of the load. You said why you used the glue but not specifically why the rods. The rods hold the layers in compression and the compression keeps the assembly from sagging and then cracking?
Interesting problem for a mechanical engineer...
Everytime I see those towers, I wonder how you move/handled them during construction. Did you have to get help? Building them in sections and only joining them together at final assembly might have helped but then you likely get visible joint lines.
Am I correct in thinking that the glue wasn't flexible enough so that the wood was forced to split during a drying out phase? You no doubt want the rods taking the shear load when carrying the towers horizontally or tilting them up so something was called for. If not so tall likely would have been OK. Others have done glue/lam w/o the splitting problem and the aesthetics unwrapped are, I think, good.
rods taking shear load
that's probably not the best way to put it. There is largest shear load on layer to layer connections when array is in horizontal position. You can't get rod to take it if glue is flexible; the glue will just flex and the rod will be relieved of the load. You said why you used the glue but not specifically why the rods. The rods hold the layers in compression and the compression keeps the assembly from sagging and then cracking?
Interesting problem for a mechanical engineer...
The Rods were pré-tensioned (with rubber washers on both ends) to help keep the stack of wood under control. In the end it just wasn't enough to stop the wood from moving. I thought it was worth the gamble to have the wood layers visible, my original plan was what I ended up doing anyway (epoxy + matt outer shell). However due to this experience at least I got to make the room needed for the wood to be able to expand/contract.
The current situation is a bit different, the fiberglass/epoxy is quite a stable/strong 'hull' around the wood parts, with similar expansion/contraction to both the rods and the double aluminium baffle. The wood can move more freely inside, these 3 parts are what holds the shape.
I've handled them by myself most every time except when carrying them inside. There my spouse helped me to transport them both times. Completely finished they weigh about 70 Kg and I could move them around on my own. They have been stable in horizontal position and getting them back up again, but with a stack this high I wouldn't want to have tried that without the rods and aluminium baffle.
The force that broke them (contracting wood) was quite the experience. It was a loud crack one evening and I didn't even realise what had happened until the following morning when the crack showed up visibly. It happened during a large sudden swing in humidity which usually happens in the fall and early spring in our climate.
I can see the same thing happening to my oak wood floor each fall and spring. It doesn't crack the wood but it does have it's seasonal swings in expanding/contracting behaviour as it has just enough room to be able to move freely.
We've had several of those swings in humidity since then and the current construction has proven to be stable over time.
Last edited:
Did you apply similar finish to the inside as to the outside of the enclosure (at least, in terms of porosity)? That would be needed to stablize the moisture content of the plywood and minimize the variations in thickness caused by the variations in ambient humidity.
If this has been addressed sorry for the reiteration; I don't have the time to scan this big a thread.
If this has been addressed sorry for the reiteration; I don't have the time to scan this big a thread.
- Home
- Loudspeakers
- Full Range
- The making of: The Two Towers (a 25 driver Full Range line array)