Tested few IRF610 (12) according to the matching circuit, the SEC ones are in the 4.49-4.59 range, the Vishay ones are between 4.90 and 5.01.
Can make several matching pairs for Q2 🙂
[Still waiting for the heatsink.]
Can make several matching pairs for Q2 🙂
[Still waiting for the heatsink.]
Powered up... and realized that I cannot adjust the bias: the voltage across R12 is around 1.1V and does not change while adjusting the 100k trimmer (R16).
Used 2sc1815 instead of the ztx450 for Q3. It sounds like the 1815 can have two pinouts with E and B inverted 😱
2SC1815 datasheet(1/2 Pages) SPTECH | SPTECH Silicon NPN Transistor
https://cdn-reichelt.de/documents/datenblatt/A100/2SC1815_CDIL.pdf
Could such B/E inversion explain the abnormal behavior?
Looks like even in the pdf of the second link (CDIL), both ECB and BCE (front view) are given in pages 1 and 2 respectively. Inverted the transistors on the pcb and can now adjust the bias (0.33V across R12 for 150mA).
One more working mini-zen build started yeeeears ago 🙂
Here are few pics:


Big thanks to tortello and knauf1919 for the project and final layout. Also thanks to ptsoundlab for his info page and to digi01 for his all-in-one layout and simplified psu.
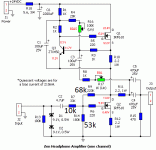
As written before, Q3 are 2sc1815 (take care for the pinout), the input caps are 4.7µF. The front 12V light gets about 3V to make it less bright. C4, C5 are a couple of 470µF capacitors, zeners are back on the pcb.
Here are few pics:
Big thanks to tortello and knauf1919 for the project and final layout. Also thanks to ptsoundlab for his info page and to digi01 for his all-in-one layout and simplified psu.
As written before, Q3 are 2sc1815 (take care for the pinout), the input caps are 4.7µF. The front 12V light gets about 3V to make it less bright. C4, C5 are a couple of 470µF capacitors, zeners are back on the pcb.

Thanks twitchie 🙂
Not much time to really listen to it yet 😱
Also still have to check/adjust the balance trimmer; maybe a two channels oscilloscope is more convenient than AC voltmeter(s) (?!?!).
Not much time to really listen to it yet 😱
Also still have to check/adjust the balance trimmer; maybe a two channels oscilloscope is more convenient than AC voltmeter(s) (?!?!).


One more working mini-zen build started yeeeears ago 🙂
Here are few pics:
View attachment 843051
View attachment 843052
View attachment 843053
Big thanks to tortello and knauf1919 for the project and final layout. Also thanks to ptsoundlab for his info page and to digi01 for his all-in-one layout and simplified psu.
As written before, Q3 are 2sc1815 (take care for the pinout), the input caps are 4.7µF. The front 12V light gets about 3V to make it less bright. C4, C5 are a couple of 470µF capacitors, zeners are back on the pcb.
Nice build!
But you haven't implemented the delay relay board which shorts the output for a sec or two after turn on. Don't you get a terrible thump in your headphones on turning on? I have the delay relay but sometimes when I switch off and on quickly the delay is not long enough (the delay circuit cap is not fully discharged so it engages the headphones quickly) and I am getting a terrible noise in the headphones, but not as terrible as without the delay thingy. I cannot imagine it is good for them without any delay circuit.
Knauf1919,
Thanks for the suggestion. Might try when I find the time to do it.
Is it what you are using?
Gregje,
My fist version did come with the delay relay. I plan to implement it in the future now that I know that all is working fine.
As far as I remember, the delay was rather short (a couple of sec as you mentioned) but long enough to avoid noise when turning on. Maybe changing the components for a longer delay would be worth.
Knauf1919,
Is it what you are using?
Yes.
What headphones do you use?
Good headphones.
I use the old 600 ohm AKG240. Put a capacitor of at least 1000uF on the output. Nichicon Muse ...
I use the old 600 ohm AKG240. Put a capacitor of at least 1000uF on the output. Nichicon Muse ...
Heard good things about AKG, never tried though.
The output uses two 470uF capacitors (Panasonic) as in the original schematics.
Looking forward to adding the delay relay (to avoid the noise and maybe protect the headphone) and see for the other changes.
The output uses two 470uF capacitors (Panasonic) as in the original schematics.
Looking forward to adding the delay relay (to avoid the noise and maybe protect the headphone) and see for the other changes.
Looking forward to adding the delay relay (to avoid the noise and maybe protect the headphone) and see for the other changes.
I have also the equalizers as described in the original article.
But I never could decide whether I need any of them (I am using HD600 and HD595).
What I find intriguing is that you seem to get away with a simple power supply.
Do you have any R between C and C on your PSU board?
The original power supply did not work for me. But it is probably due to my sloppy build. Yours is so much better!
I ended up using Nazar's PSU with an extra CRC. I still have some hum with HD595 which is very sensitive. HD600 is less sensitive and the present PSU is adequate.
I would recommend trying a cross feed. I started using it recently and I can listen long sessions without fatigue.
Did I say that I installed a stepped attenuator recently?
This was a huge improvement.
All in all it is a damn good head amp if you ask me.
But I need to build more to compare! Two more in the pipeline!
Gregje,
The power supply is indeed a very simple one, done according to digi01 schematics (New MINI ZEN Headphone Amp PCB group order...). [1N4001 (4), 4700uF (2) and 5.6R (1)] x2. It then feeds the amplifier with a pcb (very) inspired by the one that knauf1919 posted.
The step attenuator is reserved for Salas' DCG3. For now it's a 'simple' stereo 20k potentiometer.
No change but had some more time to use it. Not an A/B test, might be placebo, even if I doubt about it, sound seems more open, more detailed compared to what I used before (onboard pc sound card).
Prepared a layout for the delay relay part, but no built yet. In point of fact the 'noise' in the headphone is rather small when switching ON.
Prepared a layout for the delay relay part, but no built yet. In point of fact the 'noise' in the headphone is rather small when switching ON.

- Home
- Amplifiers
- Pass Labs
- ZEN-like headphones amp