Solhaga..i have an idea.
If you in bottom of each fold, stretch a wool thread (garn tråd). Then you get a damping and control of the membrane movement.
This thread should be stretched during the foldig process i guess...
What do you think?
my guess is it would pull all folds together. if you want to retain shape do it like in curved esl's. stretch it in the direction the curve is not!. so in this case pull at the bottom and top of the fold. it will retain shape and you got a way of tuning it. but still the lowest resonance is desired since it is the lower limit it is able to play (if it can move enough air that is.)
i am as well thinking of using some XPS and a hot wire to create a comb that fits in the pleats. to be able to mount it more easy without screwing up the folds that easy. for me at least this is the hard part and prone to screwups.
one question for Sol, what the reason for the 1.6 mm pleat width ? you had any problems with smaller width ? as in shorting it or something ? and why dont you ahve a rising high frequency? is this because ur membrane is much more heavy then mine ?
i made one now with exact same dimension is my previous one, but only with deeper pleats (5mm)1mm wide and wider alu (4mm). and still got a huge peak in the 10khz + department. it does lowered the resonance from 1.6khz to 550 or something.i do got some shitty resonances around 1khz, i think due the flimsy frame i made, should have made one like i did previous
i wonder how deep pleats you can go before something awfull in the high frequency department happens
I actually did that in one of my first membranes.Solhaga..i have an idea.
If you in bottom of each fold, stretch a wool thread (garn tråd). Then you get a damping and control of the membrane movement.
This thread should be stretched during the foldig process i guess...
What do you think?
It didn't help the vibrations I had at the time.
Perhaps it is time to revisit old ideas...
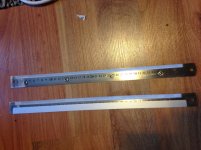
My folding jig is certainly not SOTA. I have no CNC parts, so I rely on intrinsic widths and thicknesses on OTS materials.What changes did you made to folding jig?
Like 40 cm steel rulers. There is a hole at one end of the ruler and I tried to drill a hole at the other end so that I can use a folding jig design like båndsei's.
I used VHB tape to tape 0,5 mm PTFE to make the width 1,5 mm.
It turned out to be more like 1,6 mm. But that was easily adjusted in the membrane layout.
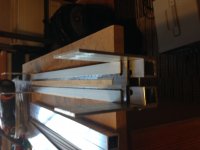
To be able to stack the rulers, I had to make the rulers 3 mm thick at the long side that didn't were involved in the actual folding. I used two 1 mm spacers for that.
I later discovered that the hole weren't at the same place on every ruler, not even the pre-punched ones.
Also that the stack of rulers wasn't horizontal. It was really bad at the top of the folding jig.
So I had 2 mm aluminium rods, from the scrapped 2 mm folding jig, instead of the spacers and abandoned the hole as guides.
I now entirely rely on the parallel supporting rods to get the 6,5 mm deep pockets. It is just easy to change the depth as in båndsei's jig.
Old ruler and new:
Current jig:
Attachments
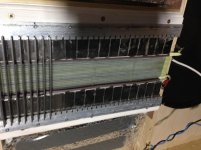
its the same as my jigg as well except i have the vertical rods with holes in the sapcers, so the spacers cant move in both directions, both work like a charm as we all see in your results 🙂
there is one thing i noticed and i did read your thread complete and as well bandsei's, but i got s problem with deep pleats with a narrow width, the side where you release one half of the stacks there curves look different then the once on the other side, witch results in the curve to the next pleat almost closing the pleat width on one side of the membrane. i guess there is a golden rule there with dept vs width before all goes to **** 🙂
maybe answered the question i asked you few pages back why you chose 1.6 mm 🙂 haha
its the same as my jigg as well except i have the vertical rods with holes in the sapcers, so the spacers cant move in both directions, both work like a charm as we all see in your results 🙂
there is one thing i noticed and i did read your thread complete and as well bandsei's, but i got s problem with deep pleats with a narrow width, the side where you release one half of the stacks there curves look different then the once on the other side, witch results in the curve to the next pleat almost closing the pleat width on one side of the membrane. i guess there is a golden rule there with dept vs width before all goes to **** 🙂
maybe answered the question i asked you few pages back why you chose 1.6 mm 🙂 haha
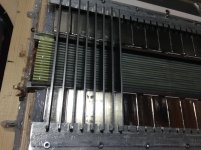
I haven't seen that problem. But I apply a manual tension to the membrane while folding.
An externally hosted image should be here but it was not working when we last tested it.
Since it is a wool tread it´s also some sort of damping..
I can't see the picture. You'll probably need to upload it to the diyaudio server by using Manage Attachments.An externally hosted image should be here but it was not working when we last tested it.
Since it is a wool tread it´s also some sort of damping..
An externally hosted image should be here but it was not working when we last tested it.
Since it is a wool tread it´s also some sort of damping..
Can not see pic 🙁
One need to sign in to google account to see it.
--
@Solhaga Thank you for explanation 🙂
I haven't seen that problem. But I apply a manual tension to the membrane while folding.
i so as well. but when your done folding i slide the those stacks apart. my guess it fails there. maybe because you bake them they are already set >? might try that . first lookup the max temperature this stuff can handle before i totally demolish my jigg
I bake the membrane in the jig without parting it.i so as well. but when your done folding i slide the those stacks apart. my guess it fails there. maybe because you bake them they are already set >? might try that . first lookup the max temperature this stuff can handle before i totally demolish my jigg
All material used must withstand the baking temperature (170 °C) for 20 - 25 minutes. If you are using the 3M 74 film that is.
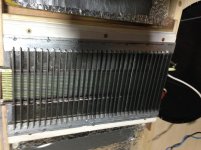
Made a small re-arrangement on how to mount the back pole pieces:


And then I measured at the same distance and level as above:

To my big suprise I gained only about 3 dB overall but distortion went up, especially 3rd HD and higher.
So I decided to remove the back pole pieces, I will also have an easier access to the membrane so in can experiment with.
But I :ed the membrane while doing it
  .
.
Anyway, will make two new membranes and then actually listen to music for a while.
I think...
And then I measured at the same distance and level as above:
To my big suprise I gained only about 3 dB overall but distortion went up, especially 3rd HD and higher.
So I decided to remove the back pole pieces, I will also have an easier access to the membrane so in can experiment with.
But I
:ed the membrane while doing it .Anyway, will make two new membranes and then actually listen to music for a while.
I think...
Attachments

well if i bake it at a moderate temperature, around 140-150 degree the folds do look better be it slightly but just a bit more straight and keeping there shape better, so ur baking method is a nice add on. i did melt one of my clamps handles 🙂 hehe plastic ... dumb me. the pertinax did not give much about the heat, so i might dare to go a tiny bit higher say 150-160. that is approaching the melting temp of mylar. pertinax likes working temp of 120.. but this is not working temp this is more a temporary temperature for few minutes. so i think all be fine. might test it with a separate leftover piece first 🙂
OOh Solhaga did you buy the kapton ? i kind of did last night a roll of 200mm 1mill thick, lets see what it can do. might not be 1mill thick i am afraid but we will see soon 🙂
i bet it will hold shape better then my thin foil. if it sounds good remains to be seen. although all AMT's ive seen use it.
oooh i like your idea with the sloted alu to space the metal!! good one!
so bandsei is right about the the fact of not using back poles 🙂, if your front does then try turning it around, i noticed that when i had only one pole fitted, that there is a difference in front and back in the frequency response. (ofc they are not exactly the same so there should be) its a bit like magnepan did, turning membrane to face you in the newer models compared to there older ones
Last edited:
hmm when i think of it its weird this works so well, and more and more start to think that instead of having big magnets at the sides small thin ones in place of your steel poles pieces suddenly dont sound that stupid. i had a connected membrane without any magnet structure and i took one magnet, and its sick that from a distance of like 15 cm the thing already starts playing. when magnet pole north or south is held in front of the membrane that gave the highest output compared to from the sides. this was done by ear but it would be fun to do this whith the RTA running to see what happens.
although your distrotion probable comes from difraction and reflection and such between rear and front. you already tried spacing them un even ? front one then no back one then back one and no front one etc. ?
although your distrotion probable comes from difraction and reflection and such between rear and front. you already tried spacing them un even ? front one then no back one then back one and no front one etc. ?
I can not change the front pole pieces. I must build a new motor in that case.
If I turn the AMT around, I will have a severe problem with reflection.
Yes, I bought the Kapton.
If I turn the AMT around, I will have a severe problem with reflection.
Yes, I bought the Kapton.
I can not change the front pole pieces. I must build a new motor in that case.
If I turn the AMT around, I will have a severe problem with reflection.
Yes, I bought the Kapton.
oooh, aha ok thats to bad, well you could measure the backside see whats happening ? unless you dont want to know 🙂
this would be of-course without ur horn, so maybe hard to compare
oooh, aha ok thats to bad, well you could measure the backside see whats happening ? unless you dont want to know 🙂
I have, I got severe problems with reflections.

asks to sign in... I think best solution is to upload photo to diyAudio server.
i got my roll of kapton, it feels and sounds far less krinlkle then the mylar, it is also much more heavy. the adhesive is prety strong and pretty hard to get some of the roll 🙂 . i now have to make a sort of jig like you got for the 3M tape, so i stretch both the kapton and the aluminium and drop one on the other and work my way from the middle to the sides to not have any bubbles. to bad this is another step in making them. the adhesive you can remove with white spirit. witch should make it lighter but i dont think this is the real issue , it also makes it NOT stick to the fold tool and on each other 🙂
only thing is i cant decide on a proper motor design. bandsei's method of no metal front or rear has its benefits. no reflection and unlimited depth of pleat without changing the motor.
the motor with metal front and rear has much higher field and so efficiency. damned all those choices 🙂
i have allot of 40x20x5 mm magnets, but since there only 5mm high im pretty much limited to high frequency from 1.5khz and up since i cant use deeper pleats. 🙁 or i ahve to stack them, witch makes everything more expensive. something i dont want 🙂
Last edited:
- Status
- Not open for further replies.
- Home
- Loudspeakers
- Planars & Exotics
- Yet another DIY AMT