If I recall correctly Mr. Pass, at the beginning of his career, was working for Oscar Heil:
The original (and best) Heil diaphragms were the aluminum coated polyethylene that were found in airline peanut bags.
😎
I dont use it yet. Might give it a try.
Pvdc is used for microwave oven film too.
Watch out for the perforated types.
It is stretchable ,a few percents.
I do not think it is thermoset.
Bernt
Pvdc is used for microwave oven film too.
Watch out for the perforated types.
It is stretchable ,a few percents.
I do not think it is thermoset.
Bernt
hmm im working on a pleating jig as well. gone do some tests now tih paper to see if i can come close. since 1mm in material does not mean it is actually 1mm thick.
Attachments

well with 39 folds. the paper that is approx 80 micron becomes thick fast 🙂 witch trows of my calcultations. to line up with the membrane. so i added soem extra space between the 2 bloks with all the stacks on it, i made it so that i can space the blocks so i can ge different depths. but i did not account for the fact the membrane itself adds to the the length 🙂 i added small lines on the membrane that line up with the 1mm thick stack material so you can see if your of or not. just like the video of the Adam amt on youtube. another thing with so many folds with such thick paper is that where the paper folds every time the stacks gets thicker and tend to slide backwards, so the top folds have a smaller depth then the bottom. i guess it wont be so extreme when i use the 24 micron foil. but with paper you can see the effect pretty good.
or i had to have spacers of 1mm +80 micron... then that problems would be solved. but hell will see what happens with 24 micron. for now i wont contaminate your thread with my build(witch is just a test and wonder how it sounds) , but i will keep following it of course 🙂
one alst question to the 2 more experienced buiders, what glue you used to set the folds ? i thought of silicone but i dont want to wait 24 hours any ideas ?
hmm i failed to make a line at every fold in this drawing 🙂
Attachments

Last edited:


I use alcohol based silicone now ,not acid due the aluminium etch.
See my pictures on google+ https://plus.google.com/u/0/115027702649442747143/posts/N7DUh3pxgBP?pid=6099333366546214114&oid=115027702649442747143
Very nice jig indeed .
I use a ratio of 1-2 eks. 2,5mm. space and 5mm alu.
Bernt
Last edited:
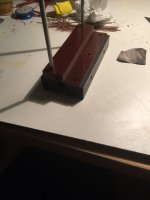
[/url][/IMG]I have used a modified melting glue pistol.
[/url][/IMG]
[/url][/IMG]
I use alcohol based silicone now ,not acid due the aluminium etch.
See my pictures on google+ https://plus.google.com/u/0/115027702649442747143/posts/N7DUh3pxgBP?pid=6099333366546214114&oid=115027702649442747143
Very nice jig indeed .
I use a ratio of 1-2 eks. 2,5mm. space and 5mm alu.
[/url][/IMG]
Bernt
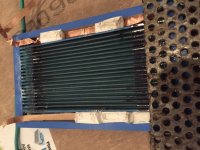
thx i used hot glue as well, then put it in the oven to let it soak in and have a flat front.
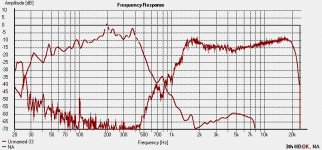
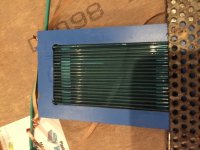
here i made my first membrane with ur blue foil. it measures 7.6 ohm DC. size is 40x80 dept of pleat is 3mm wide is 1mm 39 complete folds
i forgot take pictures of the membrane itself 🙁 but i will later on when i get a proper motor.
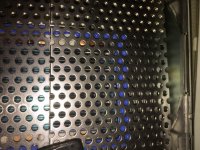
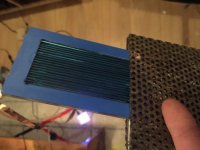
right now i just trow 6 magnets between some perforated metal of only 1 mm thick, and shoved my frame with membrane in 🙂
efficiency is +- 6 db down on the quads so there should be allot of room of improvement in the motor design, but this was just a test if i could make a membrane as well.
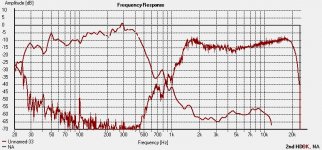
here some pics and first measurements.. pretty low distortion i think, its lower then the rubanoide and planar drivers ive made so far. measure distance 40 cm and i used some felt to damp the front to counter the rise a bit.
Attachments

Last edited:
What's the material, is it pertinax?hmm im working on a pleating jig as well. gone do some tests now tih paper to see if i can come close. since 1mm in material does not mean it is actually 1mm thick.
it is paper based HPL, high presure laminate, both are phenol resin based. not sure if they are exactly the same. its really stiff. they both are to be honest 🙂
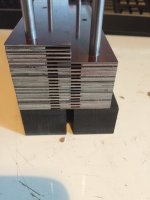
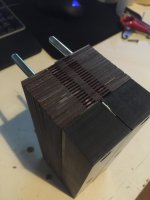
cnc this stuff is a nightmare, because it is so thin 🙁 i cant use a screw to secure it to the table., so had to use glue and double sided tape. but that leaves allot of cleanup work after. took me 1.5 day to cnc all those strips.
the blocks are from a masswive piece of hpl i once bought, 27mm thick 200x1200mm slap of hpl. it weighs a ton. an i did not have a cutter that had such long cutting edge 🙂 so i was really scared i would fuckup my cutter or my workpiece or my motor 🙂
Last edited:
thx i used hot glue as well, then put it in the oven to let it soak in and have a flat front.
here i made my first membrane with ur blue foil. it measures 7.6 ohm DC. size is 40x80 dept of pleat is 3mm wide is 1mm 39 complete folds
i forgot take pictures of the membrane itself 🙁 but i will later on when i get a proper motor.
right now i just trow 6 magnets between some perforated metal of only 1 mm thick, and shoved my frame with membrane in 🙂
efficiency is +- 6 db down on the quads so there should be allot of room of improvement in the motor design, but this was just a test if i could make a membrane as well.
here some pics and first measurements.. pretty low distortion i think, its lower then the rubanoide and planar drivers ive made so far. measure distance 40 cm and i used some felt to damp the front to counter the rise a bit.
Welcome to the club, by the way!

You've made some great progress in a short time.
Pertinax is a trade name of an FR-2 material.
Great that you can use it, how thick is it?
the stuff i used was 1mm thick. because i wanted 1 mm pleats.
ThX solhaga, for ***** an gigles i used a hacksaw to cut 1.5mm perf plate into the right size dropped 2 magnets since it wont fit anymore. i gained 4 db ... i bought some metal to try and dril on my cnc. but...... thats no go, i got to much shatter. i dont dare drilling. am afraid i **** something up. maybe i need to go lower in rpm. but my spindle wont handle that so have to put back my old mount wich can also fit a normal hand drill. perfect for drilling holes. still nto sure if my cnc is not stable enough to do so. if i can dril in the cheapest dril press i should be able to just drill some holes with the gantry cnc.... well for another time i think.
one last idea i had, was using a grinder with cutting wheel to cut slots in the metal. but i wanted to try my half year back bought new grinder.. and it just made a popping sound and thats it 🙂 dead haha well that was money well spend.
must take a look what it can be. i its a new one out of the box. damn chinese crap.
even then i am not sure if a grinder can cut slots. or i need a circular saw with a blade for metal.... mount it on the cnc 🙂 and cut some slots and drink cofee...
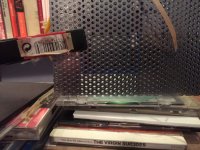
last sonme pictures as i promised, about the first membrane
i kind of like the blue from the foil 🙂
smoking may be bad but it does work for me to let the copper contact the alumnium. and as well keeping a small distance between the metal and the membrane 🙂 nice these filters multipurpose 🙂
i kind of like the blue from the foil 🙂
smoking may be bad but it does work for me to let the copper contact the alumnium. and as well keeping a small distance between the metal and the membrane 🙂 nice these filters multipurpose 🙂
Attachments

Really nice work as always from you 3 båndsai, solhaga and WrineX 🙂
About the use of normal perf plate, this is something I have been thinking about to use for exactly this, for some time. Why not? The use of "stribed" perf is derived from the first AMT from ESS because of their need for really but Ferite mags and the structure that came from that. With super strong noe mags, there is really no use for this. Was also thinking of drilling up some of the holes to get a spread of resonances and thereby hopefully get an even more even freq resp..
The folding looks really super clean
Was looking at some pictures of Aurum Cantus diaphragmes in comparison ... they look awful compated to yours 🙂 .... yes cool blue 🙂
Keep it all you 3. Really interesting to follow 🙂
Have not read thru the hole tread (I will..), but.. building the La Folia in the late -80'ties, we got some "matpakke-/bakepapir"(?) with thin aluminium from Denmark, that we cut the membrane into. And gluing it to a thin film ment for wrapping food that where to be heated in the oven.
I almost remember the name of the stuff.. Båndsei, are these still available in Denmark?
I almost remember the name of the stuff.. Båndsei, are these still available in Denmark?
I did, some 20 years ago with my Tagliatelle clone. That was noisy.
For sure, there could be other suitable carriers and paper might be one of them, but working with the 74 film is very convenient.
I guess you know this stuff, but.. For the tweeter in the La Folia/Egevang rib II, we ended up using som very light "tape" you could get from the farmacy. No noise.
Last edited:
Yes, I tried that 20 years ago when I worked on my version of Tagliatelle.I guess you know this stuff, but.. For the tweeter in the La Folia/Egevang rib II, we ended up using som very light "tape" you could get from the farmacy. No noise.
Didn't use it in the finished speaker though.
I've been using Rullet, the aluminium is 7 µm (or 8?) thick on a paper backing. The paper comes easily off with water.Have not read thru the hole tread (I will..), but.. building the La Folia in the late -80'ties, we got some "matpakke-/bakepapir"(?) with thin aluminium from Denmark, that we cut the membrane into. And gluing it to a thin film ment for wrapping food that where to be heated in the oven.
I almost remember the name of the stuff.. Båndsei, are these still available in Denmark?
But the one that is best is Vita. The aluminium is thicker (10 µm), but the paper backing is waxed paper so it can be easily peeled off.
According to my findings, the latter is working with the Silhouette cutter, the former does not.
I don't know about the thin film, why don't you ask Båndsei?

- Status
- Not open for further replies.
- Home
- Loudspeakers
- Planars & Exotics
- Yet another DIY AMT