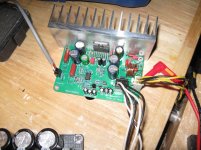
Here is the board before the short.
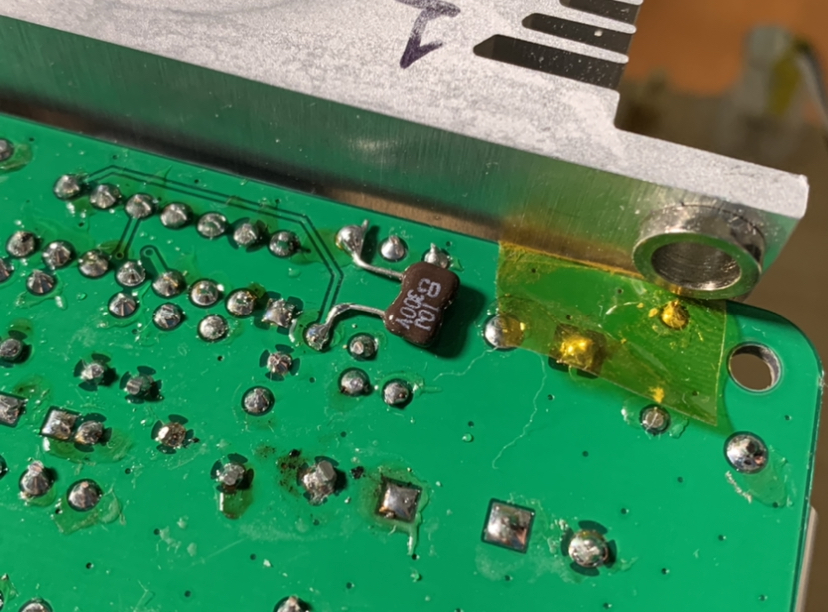
Looking at the picture, it does not look like you have an insulator behind the TDA7293 chip nor a plastic shoulder washer to insulate the metal from the heat sink??
Also, Reflow R2 solder joints, looks like a void at one pad.
Last edited:
Ok I forgot to check the speaker that was connected to the amp when I shorted the output. Yes voice coil measures open. replaced the speaker and believe it or not the board plays with a new chip. If failure is the best teacher I have learned so much tonight.
There is an insulating pad but yes there is no shoulder washer. You can see the grey pad in this shot.
I need to order connectors, washers and thicker pads. Maybe we need to make a list of items that will allow completion of the amp and keep mistakes like mine from happening. Especially if they are really important for success.
I need to order connectors, washers and thicker pads. Maybe we need to make a list of items that will allow completion of the amp and keep mistakes like mine from happening. Especially if they are really important for success.
Attachments
This morning I also received my pair of boards. Thank you very much!
Gonna source the components now.
Best regards!
Gonna source the components now.
Best regards!
Thanks for the tips on adding a 10pF cap across R1. I think I have a silver mica that might work nicely there. One can also change the input resistor R4 to 1k5 to decrease the RF low pass filter frequency. Although, that may attenuate the input signal.
Hi X, if I already asked this I apologize...did you ever use the 10pF cap across R1 and what was the result?
Thanks,
Pete
Yes, I did - I ended up installing a 10pF 300v CDE silver mica cap on the bottom side of the board across R1. I have not looked at it on an Oscope with square waves, but listening to it with music, I can’t really tell a difference. 🙂
Attachments

Hello Builders,
I have to put in an order for some hardware and I am wondering about shoulder washers. The ones I am looking at are 2.0mm in total length (1.2mm washer and 0.8mm insulator length) and fit a #4 or M3 thread. The metal on the TDA7293V is 1.6mm thick.
Are these sufficient for isolation, or what are others using ? Thanks for the help.
MM
Just as long as you use them on both sides (chip side and heatsink side) the M3 metal screw shouldn’t short the system. I actually have used nylon screws, washers, and thumb-screw nuts which don’t need any special insulated inserts; just keep the metal ground plate, of the chip, from touching the heatsink.
Cheers
Cheers
Just as long as you use them on both sides (chip side and heatsink side) the M3 metal screw shouldn’t short the system. I actually have used nylon screws, washers, and thumb-screw nuts which don’t need any special insulated inserts; just keep the metal ground plate, of the chip, from touching the heatsink.
Cheers
Hi Pete,
I don’t think I understand your setup? You can’t use two shoulder washers to hold a device to the heatsink, it will not make contact properly and will melt almost immediately! I also would not recommend plastic/nylon screws as I doubt they will hold the proper torque/snugness.
Myles,
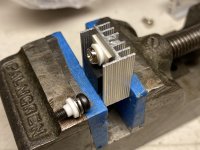
Here is an example using a TO-220 Mosfet.
Heatsink—>insulator pad—>Mosfet—>nylon shoulder washer—>flat washer, split washer then screw
Attachments
Thanks, I think I will go for the shoulder washers that are 3mm long, so I know I am through the metal tab.
If the shoulder portion sticks past the backside of the device, it will need to be trimmed flush. If it sticks past the device when you go to tighten the washer it’s tightening against itself not the device.
Thanks Vunce, you must have posted just before me. Your example is how I thought I would do it. The 0.8 mm shanks would not get me through the metal tab, so I will order some with a longer shank.
MM
MM
Vunce, have you a part number for the shoulder washer's you used on the TDA7293 chip and for the MFets on the FH9HV. That way, no confusion. Building both amps at same time.
MM
MM
The FH9HVX doesn’t require shoulder washers for the TO-247 mosfets.
Small bits and pieces like the nylon washer I get from eBay or the like. These came in a TO-220 heatsink bundle.
10pcs TO-220 Silver Aluminum Cooling Heat Sink Silicone Pad washer Radiator | eBay
Small bits and pieces like the nylon washer I get from eBay or the like. These came in a TO-220 heatsink bundle.
10pcs TO-220 Silver Aluminum Cooling Heat Sink Silicone Pad washer Radiator | eBay
Hi Pete,
I don’t think I understand your setup? You can’t use two shoulder washers to hold a device to the heatsink, it will not make contact properly and will melt almost immediately! I also would not recommend plastic/nylon screws as I doubt they will hold the proper torque/snugness.
Myles,
Here is an example using a TO-220 Mosfet.
Heatsink—>insulator pad—>Mosfet—>nylon shoulder washer—>flat washer, split washer then screw
Yes, I’m sorry, I should have been clearer. I usually use heat sinks with fairly wide fin spacing and drill a hole dead center between the two fins then use an insulated spacer on both sides (chip side and in the gully of the heat sink fins). The situation you pictured is how I would do it for a TO220 regulator onto a tapped heatsink. You can snug down a nylon screw well enough. The aim is only to sufficiently oppose the two surfaces together, with paste in between, for heat transfer. In my normal usage, none of my LM3886 chipamps or this chip, even get slightly warm enough to justify the size of the heatsink I use anyway.
Vunce, I was thinking of these. The shaft length is 1.22mm, just a bit shy of the 1.6mm thickness of the metal tab on the 7293 and they are made to pass through a TO-220.
https://www.mouser.ca/datasheet/2/2/Aavid_04242019_7721_Series-1578809.pdf
MM
https://www.mouser.ca/datasheet/2/2/Aavid_04242019_7721_Series-1578809.pdf
MM
Aavid 7721-7PPSG These shoulder washers fit the chip and a 4-40 bolt. They were on the BOM for Marc Johnson's soft start switch. 3mm should work also but I only had a 4=40 tap.
My second board is up and running with the servo enabled. 4.1mV offset. On pin 6 of the op amp I read 169.1mv. can anyone verify this is the correct reading. On the first board I thought the reading was much higher and I had -4.5 volts offset. X recommended removing R15 and installing C2 to bypass the servo. That worked to get the offset close to 0V.
Thank you
Terry
- Home
- Amplifiers
- Chip Amps
- Xmas Amp - Dibya's TDA7293 by Jhofland