What did you last repair?

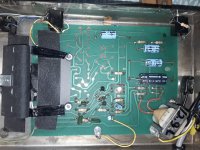
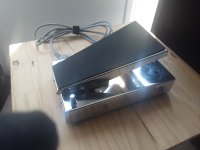
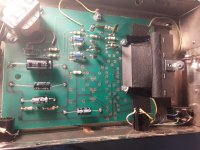
A Morley WVO: total overhaul, aesthetic and electronic ( recaping with 105*c electrolytics, pcb cleaning, rebuild of the optical cell darkening mechanism, global cleaning and regluing of sole).
I'm amazed the whole thing looks and behave like new despite being 50years old.
Pictures of innards with new caps are before pcb cleaning.
 

Attachments

  • 20250527_145900.jpg
    20250527_145900.jpg
    785.1 KB · Views: 38
  • 20250610_135447.jpg
    20250610_135447.jpg
    349.5 KB · Views: 38
  • 20250605_124955.jpg
    20250605_124955.jpg
    499.9 KB · Views: 38
I have a 1997 'Kenstar' (defunct local brand) microwave, it is a Daewoo with local assembly, magnetron open, replaced with one from a LG (new as service parts), had to bend some tabs.
Cost me 900 Rupees long back, even now they are about 1200.

I am told they can be rewound, it is just a high voltage coil.
 
Last edited:
A stand for one of my monitors. I found the old one cracked when I took it out of my car.
Yes, I know it has nothing to do with audio so I am not sure it qualifies for this thread.

Of course it is serious overkill. Certainly for a 1024x786 monitor. But hey, why throw it away? I can use it as test equipment.
Making the slanted parts with the different angles was more complex than I had estimated.
I wonder why I always have so many projects and so little time.

I am still in doubt whether to apply a clear finish on the stand or paint is black.
With a clear finish the artwork remains visible.
But painted black it better matches the monitor.


DSC_2100.jpg


DSC_2097.jpg


DSC_2099.jpg


DSC_2093.jpg


DSC_2095.jpg
 
Nice effort, was it not possible to use a wall mount?
Articulated mounts with adustable links were quite common.
That would free up space on the work table.

Hot glue gun would have worked, and I once repaired a plastic stool with a bracing piece of acrylic sheet, bolted with 2.5 mm fasteners (4 pieces).
The cross piece between the legs had been broken when I put my foot on it.
I used stainless steels screws. Been 7 years or more now...

I would stain the would after polishing till 800 grit. Then coat with transparent wood finish to keep it beautiful.
 
Last edited:
You can choose any finish that you want. I can see where gloss black paint would blend in with the rest of the set up. It may take multiple coats to get the finish that you like.
OTOH, plywood lends itself to a unique look on the edges when a darker stain is used. Can also look quite handsome. Either way, wood was the more solid choice, and you could do simple things like bevel the oval base to easily make it look classy.
 
Thanks you all for your nice comments.

I have very good glue for plastic, the type that melts the plastic. But the stand was seriously deformed and too much gaps and too much stress for a successful glue-up.

Hot glue is out of the question. Hot glue (very rarely) has it purpose, mostly as a filler which sticks, not as glue. Hot glue is together with plastic bottles and self tapping screws the base material for useless life hacks. If desired my heirs can use hot glue to glue my coffin shut. So over my dead body.

I could have screwed the entire thing to a base plate, it would have saved me a lot of time. But now I have satisfaction and that is priceless.

A wall mount would not be very useful. I use the monitor as test equipment. Here and there. With a wall attached that is awkward 🙂 I know how to build wall mounts, see attached picture.

I decided to apply clear finishing. It shows the plywood. And yes I am proud of. It was not easy, but all pieces are very clean an crisp. I only used hand tools, except for the round piece. I used a jig saw for that one. I sanded with 80/120 grit. When dried I will sand with 220 and the final coat will be smooth. Staining was no option because I like the light color. Before applying the first coat of anything, it is no use sanding any finer than 120 grit. After applying the first coat the wood fibers will come up. Only then finer grits are useful.

If I had painted it black, a primer would have been necessary. Never, ever paint wood without a primer. It pays off.

Good observation that the screws to attach the screen would be difficult to access. I admit I forgot to take that into account. But with the screen set to the lowest position I can juuuuuust reach the screws.


monitor_dual_wall_mount_2023.jpg
 
Nice! I repaired one if these in 1982. I was an intern in an electronic repair shop for mobile and maritime equipment. The owner of the shop owned this one but he had never find time to repair. (The shoemaker's children go barefoot or Bij de schilder thuis is het niet geverfd)
 
  • Like
Reactions: anatech
My God, it even has a radar screen to track stereo signals. Heh, heh, I remember the rage about 4 channel. Quite a while back, I bought a Marantz 4 channel receiver because of the price and added versatility of the amp itself. What I remember about Marantz was their 'gyroscope tuning'? Well you know, that big wheel on the front panel. Some of those units back then had some class.

JLinkel, You did the right thing with your mount. And yes, I do appreciate the amount of work that this took by hand. Best part is, projects, even small ones like this are yours. You made something that will last as long as you keep it, unlike most of the hot glue thinking out there.
 
A small plastic fitting at the end of the blade brake cable broke on my trusty Toro Timemaster mower. I tried superglue as well as my cheap plastic welder without success so I was forced to spend $65 on a new brake/cable kit. The install went well enough, I pulled both blades off, sharpened them and adjusted the drive cable. I think I'll give it an oil change before putting it to work though. It's been a fantastic mower for the last 12 years and I've done exactly zero maintenance on it other than replacing a float bowl gasket.
This machine has impressed the crap out of me. It starts on the first pull at least 95% of the time, even after sitting all winter with pump gas in the fuel system. Now that I'm thinking about it, she probably deserves a new spark plug too 🤔
 
  • Like
Reactions: Ixnay and jordheis
You can make the brake cable end out of steel, Aluminum, Teflon or Nylon rod, at least here in India it would be less than $65.
But then a bike parts shop, or a scrap part from a mechanic's junk bin would have yielded the plastic or metal bit.

I tend to use coil springs from auto parts shops, cheaper and more reliable than most custom made springs, and easy to find if you need to replace, or add springs.
Custom made springs are made by local shops here from pre-hardened wire, and heat treatment is poor, ready springs are way better.

Oddly enough, hot glue sticks well enough to more plastics than most adhesives do...agreed, it may look crude, but it works, quick and handy.
 
A small plastic fitting at the end of the blade brake cable broke on my trusty Toro Timemaster mower. I tried superglue as well as my cheap plastic welder without success so I was forced to spend $65 on a new brake/cable kit. The install went well enough, I pulled both blades off, sharpened them and adjusted the drive cable. I think I'll give it an oil change before putting it to work though. It's been a fantastic mower for the last 12 years and I've done exactly zero maintenance on it other than replacing a float bowl gasket.
This machine has impressed the crap out of me. It starts on the first pull at least 95% of the time, even after sitting all winter with pump gas in the fuel system. Now that I'm thinking about it, she probably deserves a new spark plug too 🤔


I had a similar situation on my Husqvarna mower. Looking at where the break occurred on the handle, I knew that the leverage at that point was great. Too great to expect any kind of glue to hold. It might have been about $60 for the fix, but the dealer had one left in stock, and I was back in business with a completely new system, from handle to cable and the rest. I was pleased that it was very well made and easy to install. I am guessing that this mower is 8+ tears old now and doesn't have a shed to store in, only overhead roof to protect it. A couple years ago, I was surprised at the increase in performance when I decided to change the oil, in spite of the fact that I have a small lawn. It does add up in the end, doesn't it?
 
  • Like
Reactions: seventenths
@Ixnay that sounds quite similar. This piece is gusseted to carry the strain and has to fit in a receiving end on two planes. I like to think that I'm fairly competent and resourceful when it comes to repair jobs but after an hour of attemps I realized it was a fools errand. The machine is certainly worth the money and effort. I'd never spent anywhere near that amount on a mower but it was a clear case of "you get what you pay for". I'm reminded of that every time I have to start our cheap Cub Cadet wheeled line trimmer. It IS NOT in the same class. Fwiw, I'm also a Husky fan 👍
 
I will end with this. With that same mower, I used the bag, repairing it multiple times. At some point, you know that the battle is over, and you have to buy a new bag. It wasn't cheap by any means, but the build quality is nothing that I could come close to, even if I had all of the resources to do it. And lastly, I cannot explain it, but all 3 of the Husqvarna mowers that I have owned have had issues with the blade coming loose during mowing! That's exciting when it happens, and yes, believe me, I put them on really tight with a cheater bar in some cases. Go figure. Never seen any other mower do that. So now, I sharpen the blade on the mower. Yes yes, I know, balancing.