A bit about my new flow of the software/firmware development.
Almost from the very beginning of the project I've created git repository for version control of the code.
However, I was not really good with git and didn't commit very often. Maybe once a week, sometimes once a month.
And of course there was only one (main) branch.
It was more or less ok for quite a while, until I needed to debug some bug. Usually during debug I break many things to disable/bypass something, add log messages, insert new code etc. So what happened is: I fixed a bug but broke something else, didn't notice that and uploaded new firmware.
Then it was reported as new bug and I couldn't just go back because I didn't commit previous version of the source code. Another evening of debug and new release...
So, now the process is different and I would say quite standard for software development:

There are two permanent branches: release (main) and development.
Release branch only has the code that is stable and ready for release.
Development branch has the work in progress version.
In case if some new feature needs to be added, the work would be done in a new 'feature' branch.
That allows me to work on different features in parallel without interference between each other and current stable version of the firmware.
When the feature is done, it will be merged to 'development' branch. Once one or more features are merged, the development branch firmware is tested and if everything works, it can be merged to 'Release'. During the merge process it is very easy to review all the code changes between commits and make sure that there are no unwanted changes. I also set up automatic build and deployment of the firmware to the server once it is pushed into 'release' branch.
I was resisting to setting up the development flow properly for too long because it seemed complicated. But in fact it is very easy and together with the task tracker helps to consistently move forward. It is so satisfying to pick some small action item, work on it for 30-60 minutes and do a merge request 🙂
But that also means that it takes a bit longer before I can release new features.
Almost from the very beginning of the project I've created git repository for version control of the code.
However, I was not really good with git and didn't commit very often. Maybe once a week, sometimes once a month.
And of course there was only one (main) branch.
It was more or less ok for quite a while, until I needed to debug some bug. Usually during debug I break many things to disable/bypass something, add log messages, insert new code etc. So what happened is: I fixed a bug but broke something else, didn't notice that and uploaded new firmware.
Then it was reported as new bug and I couldn't just go back because I didn't commit previous version of the source code. Another evening of debug and new release...
So, now the process is different and I would say quite standard for software development:
There are two permanent branches: release (main) and development.
Release branch only has the code that is stable and ready for release.
Development branch has the work in progress version.
In case if some new feature needs to be added, the work would be done in a new 'feature' branch.
That allows me to work on different features in parallel without interference between each other and current stable version of the firmware.
When the feature is done, it will be merged to 'development' branch. Once one or more features are merged, the development branch firmware is tested and if everything works, it can be merged to 'Release'. During the merge process it is very easy to review all the code changes between commits and make sure that there are no unwanted changes. I also set up automatic build and deployment of the firmware to the server once it is pushed into 'release' branch.
I was resisting to setting up the development flow properly for too long because it seemed complicated. But in fact it is very easy and together with the task tracker helps to consistently move forward. It is so satisfying to pick some small action item, work on it for 30-60 minutes and do a merge request 🙂
But that also means that it takes a bit longer before I can release new features.

Hi Volli,
Sorry about that. According to FedEx I should receive new batch on March 27th, so by end of this week it should be back in stock.
Sorry about that. According to FedEx I should receive new batch on March 27th, so by end of this week it should be back in stock.
My apologies for the delay with TDA1541. To integrate it properly with the other PCM DAC configs it took longer than I anticipated.
But now I have it in the config tool:

(I'd probably rename it, don't like this "RJ OBC" format name).
There will be two options for TDA1541: with and without stop clock.
The only remaining thing before release is to check that all other modes work as before.
Another update: the non-iso version is back in stock.

This time I ordered them in panel, so much easier to handle and much less FR4 waste 🙂
But now I have it in the config tool:
(I'd probably rename it, don't like this "RJ OBC" format name).
There will be two options for TDA1541: with and without stop clock.
The only remaining thing before release is to check that all other modes work as before.
Another update: the non-iso version is back in stock.
This time I ordered them in panel, so much easier to handle and much less FR4 waste 🙂
Great news!
Thank you very much!
In another topic I mentioned that you could also make a version for TDA1540
.Do I expect much?😎
Thank you very much!
In another topic I mentioned that you could also make a version for TDA1540
.Do I expect much?😎
Just to make sure I did couple of measurements with the new TDA1541 mode:
-1dB

-96dB:

-1dB
-96dB:
I assume that data format is same so shouldn't be a big deal.In another topic I mentioned that you could also make a version for TDA1540
Alright, it has been too long. My apologies for such delay, @zoom777 and @ZoltanChivay
New firmware is released, version 4.5. Also new version of the config tool is available.
TDA1541 simultaneous mode support:
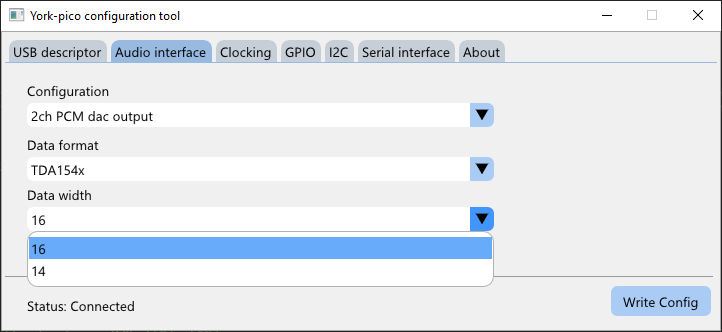
There is only one mode, 16 bit/frame. TDA1540 is not tested, I do not have the ICs.
Another major update is switch to HID bootloader. After firmware update the bootloader version would be 4.0.
With that bootloader version it is possible to do firmware updates in Linux/MacOS. Also settings update function moved from bootloader to application.
This is again to enable re-configuration in Linux/MacOS. the new config tool for Win/Linux/MacOS is also avalable on the website:
https://york.eclipsevl.org
To run in MacOS:
chmod +x your_config_tool_macos
./your_config_tool_macos
in Linux:
chmod +x your_config_tool_linux
sudo ./your_config_tool_linux
Linux requires sudo to have access to HID device
New firmware is released, version 4.5. Also new version of the config tool is available.
TDA1541 simultaneous mode support:
There is only one mode, 16 bit/frame. TDA1540 is not tested, I do not have the ICs.
Another major update is switch to HID bootloader. After firmware update the bootloader version would be 4.0.
With that bootloader version it is possible to do firmware updates in Linux/MacOS. Also settings update function moved from bootloader to application.
This is again to enable re-configuration in Linux/MacOS. the new config tool for Win/Linux/MacOS is also avalable on the website:
https://york.eclipsevl.org
To run in MacOS:
chmod +x your_config_tool_macos
./your_config_tool_macos
in Linux:
chmod +x your_config_tool_linux
sudo ./your_config_tool_linux
Linux requires sudo to have access to HID device
Attachments

Last edited:
Hi @eclipsevl , great work with Linux and MacOS.
Can you please add the STEP board models to the documentation? I'm thinking about integrating it into another project and would prefer to have an authentic 3D view.
Thanks, Tom
Can you please add the STEP board models to the documentation? I'm thinking about integrating it into another project and would prefer to have an authentic 3D view.
Thanks, Tom
Missed “:”, sorry.thank you very much
Unfortunately the link does not work🙄
https://york.eclipsevl.org/
Good point, will do.Can you please add the STEP board models to the documentation? I'm thinking about integrating it into another project and would prefer to have an authentic 3D view.
@volli pointed out an issue with "click/pop" sound when playback starts with TDA1541. I have couple of ideas how to improve it (do not stop latch signal, play 0x8000 when no input). But there is still a click in the very beginning if the TDA1541 powered before Youk sends the stream. I'll try some more experiments this week.
I just received my isolated board and reclocker today, very much looking forward to trying it!
I may have missed it, but is there any information regarding how to integrate the reclocker board? Ideally looking for the pinout and dimensional drawing so that I can generate a KiCad footprint.
I did see the below on how to set up the board for use with the reclocker, any other info would be greatly appreciated.
https://www.diyaudio.com/community/attachments/york_iso_config-pdf.1394201/
Not sure what you are referring to as integration but basically it is plugging the York to the reclocker board via the pin headers which are usually supplied.I may have missed it, but is there any information regarding how to integrate the reclocker board? Ideally looking for the pinout and dimensional drawing so that I can generate a KiCad footprint.
Then use the configuration tool to choose masterclock to be external source.
Hello,
I'll send you the design files via e-mail.I may have missed it, but is there any information regarding how to integrate the reclocker board? Ideally looking for the pinout and dimensional drawing so that I can generate a KiCad footprint.
That is pretty much it. As @zoom777 already said, make sure that external clocking option is set and the right data format on "audio interface" tab is selected.I did see the below on how to set up the board for use with the reclocker, any other info would be greatly appreciated.
https://www.diyaudio.com/community/attachments/york_iso_config-pdf.1394201/
Updated first post to include correct link to the latest version of the config tool.Latest version of config tool:
https://york.eclipsevl.org/york_config_tool.zip
Hello,
I'll send you the design files via e-mail.
That is pretty much it. As @zoom777 already said, make sure that external clocking option is set and the right data format on "audio interface" tab is selected.
Thanks again for sharing the design files. The setup was indeed seamless.
My DAC board was not designed with the York modules in mind, but it wasn't too difficult to hook up with some cat5 cable. Before anyone mentions it: yes, it looks awful. 🙂
And yet the sound is pretty great! I've never been great at the flowery audiophile language, but I'm confident in saying that this is a solid improvement over the Amanero + ADUM340E that it replaced. And this is with the York module still powered by USB. I was frankly skeptical that I would hear any difference at all. This is with a PCM1798.
it's surely been mentioned elsewhere in the thread and I just overlooked it, but it's worth knowing that the reclocker + York stack draws a fair bit of current. I didn't think to measure it, but it was just enough that my regulator IC got a bit too toasty at first. No harm done, and I'm now updating the DAC board and PS to properly support it.
Thanks @eclipsevl for making this available and for all the support you've provided!
Thank you so much, really appreciate your feedback! 🙂
Indeed, good point. I'll have to measure the Idd and document it.it's surely been mentioned elsewhere in the thread and I just overlooked it, but it's worth knowing that the reclocker + York stack draws a fair bit of current.
Do I understand correctly that with the help of York we cannot get 5.1 sound from a computer via USB, for example from games?Oh my god, my apologies for the delay.
Not this one. There will be another one with FPGA.
- Home
- Vendor's Bazaar
- USB UAC2+HID Multichannel input/output interface York