Old Caps
In principle, you're right...the power caps won't last forever...but for as many of these as I've seen, I have yet to see a bad cap in the power supply (I've seen a number of them on the original amplifier boards...but that's part of the reason why I developed this update kit).
Still, it might be best to have a back-up plan...I'll try to find some caps that would be nicely physically compatible with existing mounting arrangements.
Nice project and documention.
The isolated tabbed version of LM3886 has close to double the thermal resistance of your calcs ~ 2*C/W, so at about 1/2 power @ 50% eff, one would see closer to 60*C rise from junction to your case measurement, of ~105*C @25 ambient. This puts Tj~165*C , typically designers shoot for 105*C at max ambient of 40*C.
I would question your measurement of 100*C ? cause that is really really hot for what I see in your setup? maybe I misread your conditions.
Using the metal tabbed package you can get away with much less heatsinking ~1/2 worth and the case actually feels warmer to the touch, with lower junction temps for a given HS. Otherwise sticking with an isolated LM3886 one could tack on some surplus heatsinks on the oposite sides of the existing brackets, maybe by skootching the boards/ brackets closer together?
I still think heat is the big downfall of the ST120. If I were to use a chip amp, I would put the PCB's vertical, with the leads of the chip amp vertical, so they can be bent 90 degrees, and the heat tab can be drilled nicely through a vertically ribbed 2"x4"x 1" aluminum heat sink. If one uses modern output caps, there is plenty of room for 2 each 1" thick vertical ribbed heatsinks. Or one horizontally ribbed 1" thick heatsink could be run across and two chip amps screwed to it. I have two fans external to my ST120; if two real heatsinks are used two fans would still be be needed. One heatsink, one fan. I have my fans outside the steel cage to minimize electrical noise coupling, mounted on a C strut the amp sits on with the cross amp 9vdc wiring covered by the strut. I abandoned the original dyna caps years ago, too many runaway events to trust them.I removed the cap clamps, and stuck new caps to the base with wallboard glue (rubber cement). Hot melt would also work. I also believe a secondary fuse for the transformer is important, even if chip amps have their own overcurrent protection. The filter cap can still go, or parts on PC14, and there aren't any more transformers like that . I have 8 amp fuse on my transformer, besides the dyna overcurrent foldback circuit on the PC14 PCB.
Last edited:
Thermal and Customization Thoughts
Infinia,
Thanks for the kind words...
Everything is a compromise of sorts, especially at a modest price point, kind of like my Honda Accord.
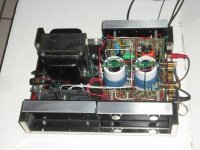
I had considered both the non-isolated and isolated versions of the part. I chose the isolated version because it allows me to groom exactly where the half wave rectified currents of the pull down transistor flow...through my specific return wire, to mecca.
In the current (and original) arrangement, the heatsink is thermally bonded to the chassis, and under sustained high power outputs, amplifier heat passes through the heat sink to heat up the chassis steel. That provides extra heat sinking, but also would provide an unwanted path for the rectified ground currents in a non-isolated tab version.
Now, I could have used the non-isolated version and still controlled the ground currents by a mica washer isolator, but that would have increased the thermal resistance and required more mechanical modifications that would have limited the potential audience. (Dynaco use mica washers for the T03's in the original design)
I guess I could have still stayed out of that kind of trouble if the RCA input connectors were isolated off the chassis, but I didn't want to take the rework that far, since many of the connectors were riveted in place, and drilling out the rivets to replace the connectors is kind of messy.
Perhaps my raw temperature measurements are closer to the die temperature than we might have imagined. Most of the power dissipated on the die travels out the back of the chip and into the heatsink. Very little of the power moves through the front surface of the chip. If you think of the current/resistance/voltage power/thermal resistance/temperature analogy, perhaps the front of the LM3886 is a much more reasonable representation of the chip temp, since very little power flows through that path, especially since it sees largely the rather high thermal resistance of the air. My apologies if the words I chosen make the situation confusing. (I apologize even further if I have this all balled up).
Perhaps we could find the definitive answer by injecting a small current into a protection diode, and using that to measure the chip temperature. Even that would only be the temperature in the area of that protection diode, not necessarily the temperature of the hottest part of the chip.
In the end, none of this may make a lot of difference unless you are beating the heck out of the amp with test tones. In normal, and even loud listening, the amp runs much cooler. I use one with an electric piano at home...It runs cool enough that I don't bother to turn it off between sessions.
Finally, much like people fine tune their cars and add racing parts, I think some diy'ers will use this as a reasonable starting point, and then substitute in their favorite caps, bigger heatsinks, non-isolated LM3886's, and the like. They can take what I hope is a pretty reasonable design, and make it even better. Of course, just like with cars, you may end up with a faster car and a voided warranty 🙂
Thanks again for your feedback about the project.
Update My Dynaco
Infinia,
Thanks for the kind words...
Everything is a compromise of sorts, especially at a modest price point, kind of like my Honda Accord.
I had considered both the non-isolated and isolated versions of the part. I chose the isolated version because it allows me to groom exactly where the half wave rectified currents of the pull down transistor flow...through my specific return wire, to mecca.
In the current (and original) arrangement, the heatsink is thermally bonded to the chassis, and under sustained high power outputs, amplifier heat passes through the heat sink to heat up the chassis steel. That provides extra heat sinking, but also would provide an unwanted path for the rectified ground currents in a non-isolated tab version.
Now, I could have used the non-isolated version and still controlled the ground currents by a mica washer isolator, but that would have increased the thermal resistance and required more mechanical modifications that would have limited the potential audience. (Dynaco use mica washers for the T03's in the original design)
I guess I could have still stayed out of that kind of trouble if the RCA input connectors were isolated off the chassis, but I didn't want to take the rework that far, since many of the connectors were riveted in place, and drilling out the rivets to replace the connectors is kind of messy.
Perhaps my raw temperature measurements are closer to the die temperature than we might have imagined. Most of the power dissipated on the die travels out the back of the chip and into the heatsink. Very little of the power moves through the front surface of the chip. If you think of the current/resistance/voltage power/thermal resistance/temperature analogy, perhaps the front of the LM3886 is a much more reasonable representation of the chip temp, since very little power flows through that path, especially since it sees largely the rather high thermal resistance of the air. My apologies if the words I chosen make the situation confusing. (I apologize even further if I have this all balled up).
Perhaps we could find the definitive answer by injecting a small current into a protection diode, and using that to measure the chip temperature. Even that would only be the temperature in the area of that protection diode, not necessarily the temperature of the hottest part of the chip.
In the end, none of this may make a lot of difference unless you are beating the heck out of the amp with test tones. In normal, and even loud listening, the amp runs much cooler. I use one with an electric piano at home...It runs cool enough that I don't bother to turn it off between sessions.
Finally, much like people fine tune their cars and add racing parts, I think some diy'ers will use this as a reasonable starting point, and then substitute in their favorite caps, bigger heatsinks, non-isolated LM3886's, and the like. They can take what I hope is a pretty reasonable design, and make it even better. Of course, just like with cars, you may end up with a faster car and a voided warranty 🙂
Thanks again for your feedback about the project.
Update My Dynaco
haha I was hoping you were reporting *F as *C . Are you saying the HS bracket is modded to be now floating from the chassis?
Yes that's the best way. Mica is a way better thermal interface than the thick plastic on the isolated package. otherwise they are the same deal electrically.
uhh.. why is this different than what the original did?
Now, I could have used the non-isolated version and still controlled the ground currents by a mica washer isolator, but that would have increased the thermal resistance and required more mechanical modifications that would have limited the potential audience. (Dynaco use mica washers for the T03's in the original design)
Yes that's the best way. Mica is a way better thermal interface than the thick plastic on the isolated package. otherwise they are the same deal electrically.
I had considered both the non-isolated and isolated versions of the part. I chose the isolated version because it allows me to groom exactly where the half wave rectified currents of the pull down transistor flow...through my specific return wire, to mecca.
uhh.. why is this different than what the original did?
The original used mica washers, allowing it to groom the path of the half wave rectified currents. The update design uses the plastic insulated case to afford that same capability.
Using the metal tab case would have required the mica insulator (no big deal), but also drilling out an existing hole to accept the insulating shoulder washer. That mechanical modification was more than I wanted the updater to have to do, so I chose the configuration you see at Update My Dynaco
Using the metal tab case would have required the mica insulator (no big deal), but also drilling out an existing hole to accept the insulating shoulder washer. That mechanical modification was more than I wanted the updater to have to do, so I chose the configuration you see at Update My Dynaco
Drilling or reaming an existing hole in the bracket and insulating a chip amp is not difficult, and well within the grasp of even the most simple DIY folks. (even regular people change their PCs CPU now days) If your target market can't handle that I don't even think they could follow your website instuctions for paypal. lol Seems the logical choice for the performance and reliabilty issues given yer reported very high temps!
You keep talking about half wave currents? why is this so special or different than the stock Class AB configuration?
You keep talking about half wave currents? why is this so special or different than the stock Class AB configuration?
You make an interesting point...perhaps I am underestimating the willingness of the DIY guys to have a "drilling" experience. I shall have to give it some careful consideration...
And, with regard the the class B rectified currents...yes, it's the same as any other class B or AB amp...in all such designs, it's important to deal with the rectified currents carefully so they don't get a chance to add distortion.
And, with regard the the class B rectified currents...yes, it's the same as any other class B or AB amp...in all such designs, it's important to deal with the rectified currents carefully so they don't get a chance to add distortion.
In these days of PC enthusiast lapping heat sink surfaces to a mirror smooth surface and all. I'm sure your customers will thank you for giving them more life and esp better performance and reliability from their Dynaco rigs.
A bit more Dynaco History
I recently acquired an FM-3 tuner (tubes) from the original owner. It had this interesting post card about the tuner that became known as the FM-5. I thought the Dynaco buffs might find this interesting.
I have removed the name information to protect the privacy of the original owner.
I recently acquired an FM-3 tuner (tubes) from the original owner. It had this interesting post card about the tuner that became known as the FM-5. I thought the Dynaco buffs might find this interesting.
I have removed the name information to protect the privacy of the original owner.
Attachments

I might have the resulting FM3 of Mr Blank of Louisville, KY. I bought mine used at a hi-fi boutique in St Matthews (Louisville) across from Sears about 1983. It worked but ever had enough sensitivity to get the local classical station. Waiting for the schematic/alignment instructions to be posted on the internet for free- they are still worth $20 to somebody.
I can say explicitly how useless the thermal management of the ST120 was outside the house. Around the house at 1 V pp, fine. I took mine to a 100 seat church and was driving two Peavey T300 8 ohm speakers with it for the Christmas cantata. This was with my schematicless repair of the toasted unidentifiable PC14 PCB, so it was limited to 2.25 A high voltage rail as was instead of 6.25A per spec. Af the end of a 3.5 hour rehearsal, it melted the solder off the output cap on one channel and the solid core wire sprung up in the air in a ball of blue flame. This was not a cold solder joint, just heat, a new snap in cap with no hole in it for mechanical connection, and solid wire with spring tension pulling up. As you say, the excess heat goes into the frame.
I immediately replaced the ST120 with my ST70 tube amp with worn out output tubes and the rehearsal went on, as did Christmas Sunday. The ST70 had no trouble filling the church even with people and clothing , and even though the output tubes would only measure 1.1v on the bias set instead of the required 1.56 V. B+ cap was 5 years old. So it was nothing like 70 W output. That makes the ST120 about an st20 in my book, without better heat management. My 1970 build unit has plastic rings around the output transistor legs and mica washers. I don't know if this was OEM, but was original to the 1970 kit. Even the unused holes on the flange for the PC-14 are drilled out to the oversize for the plastic washers.
To re-iterate, I've put two fans on the output flanges of my ST120 in lieu of the better heatsinks it deserves, until I make a smaller PC15 + Djoffe bias CB. Two CB per side is a little thick even with the new small output caps.
Last edited:
I rebuilt Dynaco 120 and the problem that they have is the heat coming from the output transistors. People do not understand that they used the 2N3055 that is 60 volts in a 72 volts power supply. If for any reason one of the two 2N3055 shorted due to excessive heat or loaded it will feedback 72 volts to the drivers and will smoked everything since most of the transistors are 60 volts. One fixed that I found is used the 2N3443G transistor for the 2N3055. The 2N3443G is a 140 volts 2 time the working voltage of the power supply. No more problems with the amplifier. It can take a high input signal until the amplifier reached the clipping point with not problem. Also I added a 3 amps fuse to prevent keep burning the boards and last I replaced the PS with one of my own designed that replaced the three capacitors mounting in the board. One simple installation and the sound is excellent. I think the amplifier still is one of the best no matter what the people said.
I've got nte181 output transistors and they sound fine with the new djoffe bias. I think the heat gets the transistors before the voltage does. Melting solder off the O.C. is pretty hot- and the church was cold the week before Christmas. Probably I should put the Output Capacitor terminals through a CB like you have done since direct connect to snap in terminal is not real secure. I did replace the solid core wire with stranded. Mine 1970 build unit originally came with RCA 5 digit private label transistors, (to go from the shorted hulks) not 2n3772 listed in the 1966 reviews and not 2n3055 either. I've run mine all day today at 1 Vpp 8 ohm load, with PCAT P.S. fans the output trans. are quite cold.
Last edited:
Also I forgot to mention is that if the voltage regulator transistor failed it will feed 95 volts to both driver board. The PS is a fold back regulator and it regulated by controlling by raising or lowering the ground voltage.
Nice little CB the snap in caps are stuck in. I should to that. You've done something about the heat sinks. I could do that, but I would have to give up the Djoffe 20 ma bias boards to make room, so I haven't. I'm relying on the external fans (outside the perforated cage) that look like mickey mouse ears.
The PC14 power supply regulator relies on a very low gain transistor to work properly as designed. An NTE181 transistor in that position made it regulate (foldback) at 2.25 A dc. So, I've got the last surviving 4 digit RCA 1970 transistor in that position. I could also bleed off some gain with a base-emmiter resistor to get the same thing, I suppose. I've backed up the regulator with an 8 amp fuse on the high voltage. Two 4 A fuses, between filter cap and each output transistor top collector, would be even better.
Oh, high voltage transistors are not required, Vce 60 is fine, because they actually operate at 36 VDC. The output caps moves the operating point up to that level. Both burns & fires, no speakers were destroyed by my ST120 because of the output cap. I'm not givng that up, no matter what Naim did.
Oh, high voltage transistors are not required, Vce 60 is fine, because they actually operate at 36 VDC. The output caps moves the operating point up to that level. Both burns & fires, no speakers were destroyed by my ST120 because of the output cap. I'm not givng that up, no matter what Naim did.
Yes the output caps are great speaker protectors.
BTW even thought the DC bias is at ~ 1/2 Vcc (+36V) The output section transistors see the full swing of the power supply and even more. ie depending on clipping with inductive speakers and bootstrap bias. It's wise to use replacement TO-3 devices with Vce > 100V here. With so many vendors making 2N3055s each with different processes some get lucky on different parameters.
- Status
- Not open for further replies.
- Home
- Amplifiers
- Solid State
- Updating the Dynaco Stereo 120