That should be easy to find...
Look at the circuit. You have positive supply on TR8 and TR12 collectors. Next we apply positive supply via R18 and R16 to the base of the drivers.
So in order:
1/ Supply voltage on collector of TR8 and TR12. This means you should also see supply voltage on R50 at each end. Be super careful measuring so as not to short anything.
2/ Starting at R18 at the end that connects to the supply measure down that chain. So supply on R18 on both ends and supply on R16 on both ends.
3/ That supply on R16 connects to the base of TR8.
4/ Same voltage should be on the emitter.
5/ The above voltage should make it to the base of TR12.
So the measurements will fall down somewhere in that list.
Do a good visual check for damaged pads... that's common. Make sure each transistor pad hasn't a hairline fracture to the print. Check that first... voltage checks will show that problem though...but be careful 🙂
That should be easy to find...
Look at the circuit. You have positive supply on TR8 and TR12 collectors. Next we apply positive supply via R18 and R16 to the base of the drivers.
So in order:
1/ Supply voltage on collector of TR8 and TR12. This means you should also see supply voltage on R50 at each end. Be super careful measuring so as not to short anything.
2/ Starting at R18 at the end that connects to the supply measure down that chain. So supply on R18 on both ends and supply on R16 on both ends.
3/ That supply on R16 connects to the base of TR8.
4/ Same voltage should be on the emitter.
5/ The above voltage should make it to the base of TR12.
So the measurements will fall down somewhere in that list.
Do a good visual check for damaged pads... that's common. Make sure each transistor pad hasn't a hairline fracture to the print. Check that first... voltage checks will show that problem though...but be careful 🙂
Mooly, just to be sure, these measurements are done are done between the points specified and earth, yeah?
Ok, went through all of those one by one from the points mentioned to earth and I got the supply voltage at all of them.
And with the speaker select switch turned to speaker A, as opposed to off....we have 34V across the left terminals 😀
What a div!! 😱
Right channel is still at 0V 😎
What a div!! 😱
Right channel is still at 0V 😎
OK 🙂
So have we now got both speaker outlets at 0V dc with all bits fitted. If so then you can test again with speakers. As before connect them 'hot' with the amp already on.
Keep using the bulb.
So have we now got both speaker outlets at 0V dc with all bits fitted. If so then you can test again with speakers. As before connect them 'hot' with the amp already on.
Keep using the bulb.
OK 🙂
So have we now got both speaker outlets at 0V dc with all bits fitted. If so then you can test again with speakers. As before connect them 'hot' with the amp already on.
Keep using the bulb.
All good 🙂
Excellent.
The next step is the bias chain of diodes and the preset but before all that I would suggest taking the time to look over all the joints for anything dodgy looking and reflow any that look suspect. Remember... pull the plug out first.
Use a torch, use a magnifying glass, but really be certain they are all good.
Also looking back to the first post, we now have to look at what might have been causing the intermittent issue of popping unless you know for certain that is fixed now.
It's no good saying its fixed if we still have a problem lurking... a problem that might cause damage later.
The suspects parts wise would be the diff pair which seem to be a recognised trouble spot for this amp and also what we call the VAS amp or voltage amplifier stage. That is TR5 and TR6.
I don't know if those are new, old, previously replaced etc.
Back in a bit 🙂 and well done so far.
Thanks, Mooly. The popping issue was already sorted, I replaced a number of transistors including the driver pairs which solved the popping. The issue after that was a lack of bass.
TR5 and TR6 where replaced last time.
I will go over it now and check all the solder pads to be sure.
I will order the trim pot for the right channel tonight and hopefully I will have it by Tuesday.
TR5 and TR6 where replaced last time.
I will go over it now and check all the solder pads to be sure.
I will order the trim pot for the right channel tonight and hopefully I will have it by Tuesday.
OK 🙂
I would recommend you leave the amp running with the bulb and with speakers attached and make sure it behaves OK. Play music through it if you want.
Also you can give the PCB a good tap and a prod with an insulated tool like a pen or something. You should not hear any noises come through the speakers. If you do then look for poor joints.
Are we replacing those diode chains with the 1N4148's ?
I would treat both channels identically, now pot for both.
As with rebuilding the output stage, we replace the parts and test in a specific way, don't just fit them and switch on.
I would treat both channels identically, now pot for both.
As with rebuilding the output stage, we replace the parts and test in a specific way, don't just fit them and switch on.
Are we replacing those diode chains with the 1N4148's ?
I would treat both channels identically, now pot for both.
As with rebuilding the output stage, we replace the parts and test in a specific way, don't just fit them and switch on.
I will do whatever you recommend. I have the diodes so of you think it's worth while I'll fit them.
Pot for each channel, that's what I meant 🙂.
I will leave it running for a while tommorow and have a like about with a pen or something as suggested.
I think replacing the diodes is wise, particularly as they passed enough current to flame the preset.
What did we decide about D2 that feeds the Zener. We need to be certain that everything is good and that Zener problem was a bit of a mystery...
If D2 was open then the resistor it feeds would have been cold, so that kind of rules it out. And if it was short circuit the amp would actually operate normally for all our purposes.
Ordered 3 of these Mooly.
Https://uk.rs-online.com/mobile/p/trimmer-resistors/7870562/
3, 1 spare incase anything happens!
They're 300 ohm which looks right from the schematic. They're roughly right size wise. Legs should be long enough and way to bend to shape to fit.
Will have some time this afternoon to do the stuff you suggested in your previous posts ie we swapping out the diodes and going over all the pads again etc and running the amp for a good while to test it all out.
Is there more stuff I can do once the diodes are in, or are we going to need those trim pots in place before we can move on?
Thanks
If D2 was open then the resistor it feeds would have been cold, so that kind of rules it out. And if it was short circuit the amp would actually operate normally for all our purposes.
Forgot to ask about this.
Should I order a replacement for this? Or can we leave this as is? Should I do more tests on it? If so, what tests should I do? I remember you saying D1 would go bang if I tested between one of it's legs and ground, does same apply for D2?
I could test it with the diode setting with the amp powered down, resistance, across it powered up?
Thanks again, Mooly
Those look fine. If you need to bend leads then use fine pliers to bend just the lead itself, always try and avoid bending or splaying out leads so that they strain where they come of of the package. Same applies to transistors as well.
The diodes... yes they can be fitted and even tested in circuit.
First thing as these diodes are truly critical is for you to look at the originals and be 100% sure of how they are fitted, both for polarity and for how they mount mechanically. If they stand-up on their leads or are bent over to be near the heat of the output stage then mount the replacements in the same way.
Do one channel at a time and also remove the old preset.
Now we need you to temporarily link out the preset with a bit of wire.
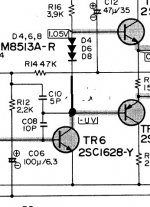
This next bit is really important. The preset has three terminals and depending on the board layout only two may be used or the middle pin of the preset may connect to one of its outer pins.
It doesn't matter how the board is configured, what matters is that you link the preset out so that the base of TR5 or TR6 is in direct electrical connection with D7 or D8.
Electrically it should look like this (attached)
When all that is OK remove the old shorting link connecting the two bases together.
Make sure it all looks like the diagram below.
Do just one channel. The bulb should still be out and all still cool.
The diodes... yes they can be fitted and even tested in circuit.
First thing as these diodes are truly critical is for you to look at the originals and be 100% sure of how they are fitted, both for polarity and for how they mount mechanically. If they stand-up on their leads or are bent over to be near the heat of the output stage then mount the replacements in the same way.
Do one channel at a time and also remove the old preset.
Now we need you to temporarily link out the preset with a bit of wire.
This next bit is really important. The preset has three terminals and depending on the board layout only two may be used or the middle pin of the preset may connect to one of its outer pins.
It doesn't matter how the board is configured, what matters is that you link the preset out so that the base of TR5 or TR6 is in direct electrical connection with D7 or D8.
Electrically it should look like this (attached)
When all that is OK remove the old shorting link connecting the two bases together.
Make sure it all looks like the diagram below.
Do just one channel. The bulb should still be out and all still cool.
Attachments
Forgot to ask about this.
Should I order a replacement for this? Or can we leave this as is? Should I do more tests on it? If so, what tests should I do? I remember you saying D1 would go bang if I tested between one of it's legs and ground, does same apply for D2?
I could test it with the diode setting with the amp powered down, resistance, across it powered up?
Thanks again, Mooly
You can test any of the parts with the amp OFF but that probably wouldn't show much, particularly if we suspect something is intermittent.
D1 which is the Zener you replaced, so we know that is OK. It also seemed to fix the fault of no 18 volts present.
The big question was whether the diode itself was faulty or whether it was something else.
Something else could only be no supply to it or a short across it.
No supply would have meant the 15k (R47) was cold and yet I think you said it was warm. So that points to supply being OK and D2 being OK.
It is just the uncertainty of it all.
If it were me I would say to replace D2 and replace C25. Also check the 15k is soldered properly. Parts that get hot tend to be ones that suffer with dry joints.
Did we check the 15k out of circuit for value? Worth doing that. If it's within tolerance it's going to be OK.
D2 can be any general purpose type such as 1N4002, 1N4004 or 1N4007
Another error I think on the circuit diagram. The value of R47 doesn't compute 🙂
A tenth watt resistor would work there, never mind a 2 watt.
It's 1.5k, not 15k.
A tenth watt resistor would work there, never mind a 2 watt.
It's 1.5k, not 15k.
It doesn't matter how the board is configured, what matters is that you link the preset out so that the base of TR5 or TR6 is in direct electrical connection with D7 or D8.
Just want to make sure if I've understood this, Mooly. Looking at the pic I would say I am to just use a piece of wire to literally bridge the base of TR5's solder pad to the D7 cathode solder pad...
Then remove VR4 and to the same between TR6 and D8?
- Home
- Amplifiers
- Solid State
- Toshiba 330 power amp