
DM1 Display Module to be released 1.13.14
We are pleased to announce that our DM1 Display Module companion product to our LDR3x Preamp Controller Board is being released tomorrow (Monday 1.13.14). It can be used as a single or dual display.
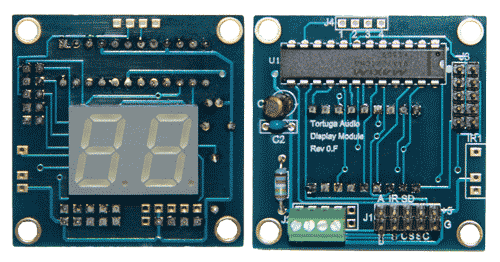
The first pic shows the front (left) and rear (right) view of the DM1. Roughly 1.8 inch square. Control interface is via the rear.
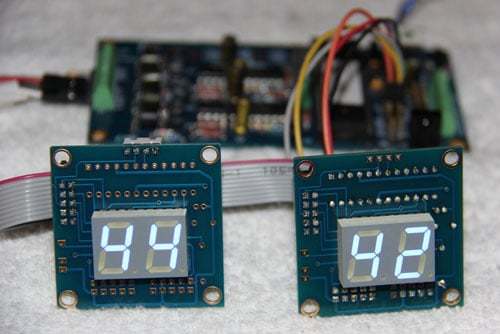
The second pic shows a "live" shot of dual modules. The master (right) module connects to the LDR3x. The slave (left) module connects to the master via a ribbon cable. The reason the left shows 44 and the right shows 42 indicates there's a 2 step bias favoring the left channel (channel balance adjustment is a feature of the LDR3x).
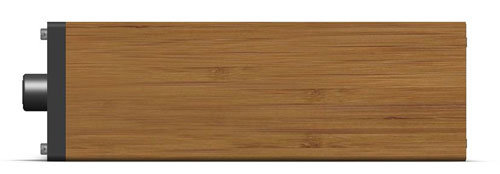
The last pic below shows dual modules (blue) behind a dark gray acrylic front panel. The blue ghosting around the numbers is a photographic artifact and isn't visible when you look at the real thing. When the DM1 is turned off, you can't see them behind the acrylic (assuming of course that it's dark behind the acrylic panel).
More info on the DM1 can be found here: http://www.tortugaaudio.com/product/display-module/

We are pleased to announce that our DM1 Display Module companion product to our LDR3x Preamp Controller Board is being released tomorrow (Monday 1.13.14). It can be used as a single or dual display.
The first pic shows the front (left) and rear (right) view of the DM1. Roughly 1.8 inch square. Control interface is via the rear.
The second pic shows a "live" shot of dual modules. The master (right) module connects to the LDR3x. The slave (left) module connects to the master via a ribbon cable. The reason the left shows 44 and the right shows 42 indicates there's a 2 step bias favoring the left channel (channel balance adjustment is a feature of the LDR3x).
The last pic below shows dual modules (blue) behind a dark gray acrylic front panel. The blue ghosting around the numbers is a photographic artifact and isn't visible when you look at the real thing. When the DM1 is turned off, you can't see them behind the acrylic (assuming of course that it's dark behind the acrylic panel).
More info on the DM1 can be found here: http://www.tortugaaudio.com/product/display-module/
Looks great Morten.
Do you have drilling/milling dimensions or a schematic for front panel? I need to some work done to a case in readiness.
[edit]...argh, sorry, just saw your disclaimer about templates on your site!
Do you have drilling/milling dimensions or a schematic for front panel? I need to some work done to a case in readiness.
[edit]...argh, sorry, just saw your disclaimer about templates on your site!
Hi Morten,
Will this work for folks who ordered the High Z firmware update last month?
Any LDR3x board or related HiZ upgrade purchased and/or shipped on or after 12.18.13 has the necessary firmware to drive the DM1. Earlier boards need a firmware upgrade regardless if they already had the HiZ upgrade or not.
Last edited:
Looks great Morten.
Do you have drilling/milling dimensions or a schematic for front panel? I need to some work done to a case in readiness.
[edit]...argh, sorry, just saw your disclaimer about templates on your site!
Dimensional details on the DM1 board as well as the LDR3x will be available soon on our site.
The DM1 is 1.8 x 1.8 inches overall and the holes are 1.55 x 1.55 inches.
LDR3B Balanced Passive Preamp - Update
We just published a status update on the LDR3B Balanced Passive Preamp. Getting closer to launch!!
You can find the article here. http://www.tortugaaudio.com/ldr3b-balanced-passive-preamp-update/

We just published a status update on the LDR3B Balanced Passive Preamp. Getting closer to launch!!
You can find the article here. http://www.tortugaaudio.com/ldr3b-balanced-passive-preamp-update/
LDR3B Balanced Passive Preamp - Update
I got the link wrong in the last post but it's too late to fix it via edit.
Here's the correct link: LDR3B Balanced Passive Preamp - Update | Tortuga AudioTortuga Audio
We just published a status update on the LDR3B Balanced Passive Preamp. Getting closer to launch!!
You can find the article here. http://www.tortugaaudio.com/ldr3b-balanced-passive-preamp-update/
I got the link wrong in the last post but it's too late to fix it via edit.
Here's the correct link: LDR3B Balanced Passive Preamp - Update | Tortuga AudioTortuga Audio
Finally, my DIY build...
I am finally able to start to build the beautiful LDR3x kit that I won last year. Various (happy) events have meant I have had little time to devote to my hobby but the box is open and I am off. I hope it's OK to publish my build adventure here but Morten, please let me know if you'd rather I start a fresh thread.
First off a couple of unboxing pics. Morten was kind enough to supply me with a balanced kit and a remote!!
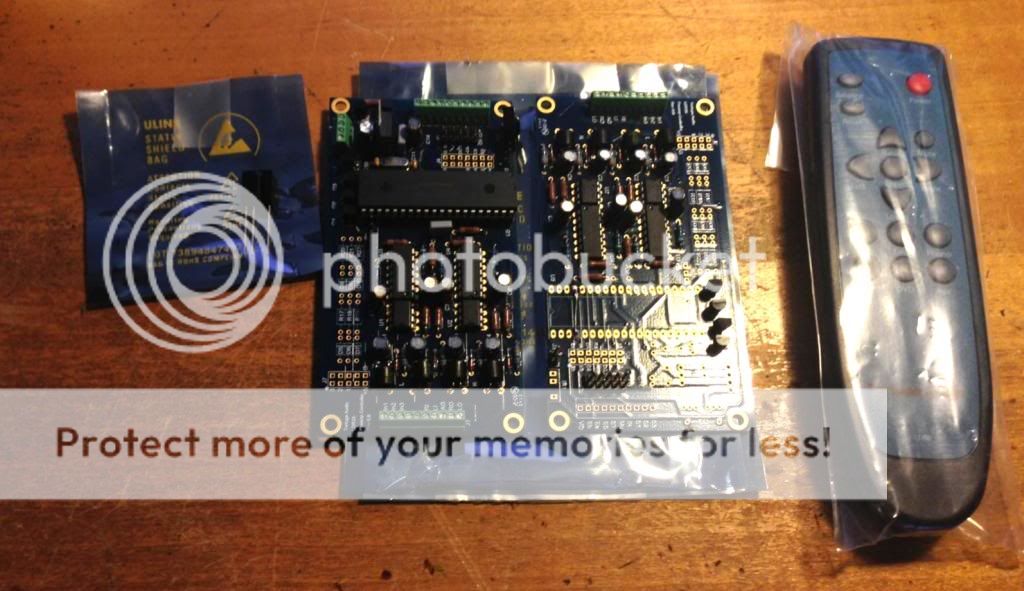
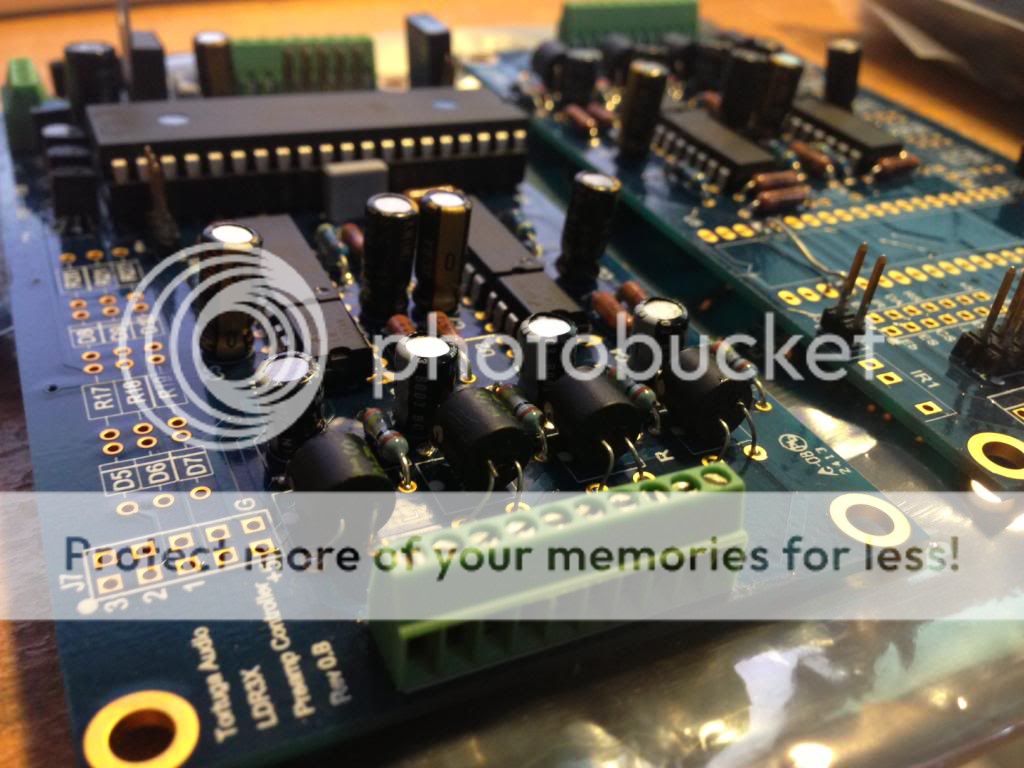
This is a close up of the LDRs in place on one of the boards:
I have the older firmware which means that I can't use a sexy apple remote just yet (amongst other things) but I'm going to get it all set up and then try the older before the new firmware.
I am finally able to start to build the beautiful LDR3x kit that I won last year. Various (happy) events have meant I have had little time to devote to my hobby but the box is open and I am off. I hope it's OK to publish my build adventure here but Morten, please let me know if you'd rather I start a fresh thread.
First off a couple of unboxing pics. Morten was kind enough to supply me with a balanced kit and a remote!!
This is a close up of the LDRs in place on one of the boards:
I have the older firmware which means that I can't use a sexy apple remote just yet (amongst other things) but I'm going to get it all set up and then try the older before the new firmware.
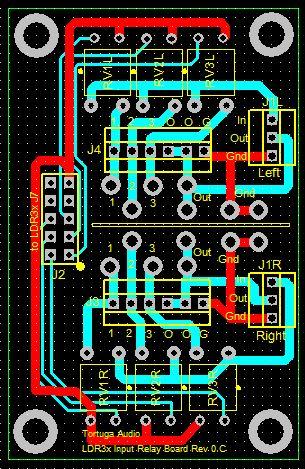
Introducing the LDR3x IOBoard
After going through several design iterations, we're close to finalizing a simple 3 input (2 output) companion switching board for the LDR3x preamp controller board.
Below is a summary. If you have any thoughts, wish lists, must haves, can't stand, can't live withouts etc, now is the time to pipe up with your input.
1) Switches between 3 stereo inputs using control signals from the LDR3x
2) Provides for connecting 2 outputs in parallel
3) Left/right channel grounds are kept separated (should each be tied to power/chassis star ground)
4) 0.1 inch pitch screw terminals for landing inputs/outputs/grounds
5) as alternative to 4), also has solder holes for terminating I/O plus ground
6) 0.1 inch pitch screw terminal for interfacing with the LDR3x board
7) Uses LDRs as signal switches in lieu of electromechanical relays. Roughly 40-60 ohm resistance when on, several megaohms when off.
8] Control/power interface with pin/jumpers to the LDR3x. Note that the LDRs have to be current limited when switched on. This is handled by 6 diode/resistor pairs that need to be installed on the LDR3x board and will be provided with the IOBoard.
9) 1.6 by 2.5 inch board size
I would suggest to make a version for balanced setup in dual mono to not share ground between channels. Also make use of the display to show which input is being used.
What would be the main difference in SQ using mechanical relays instead?
Looking forward to this board!
Thanks Morten!
Do
What would be the main difference in SQ using mechanical relays instead?
Looking forward to this board!
Thanks Morten!
Do
I would suggest to make a version for balanced setup in dual mono to not share ground between channels. Also make use of the display to show which input is being used.
What would be the main difference in SQ using mechanical relays instead?
Looking forward to this board!
Thanks Morten!
Do
Hi Do,
The grounds in the Rev 1 board (original board was Rev 0) will be kept separate for both unbalanced and balanced configurations. Basically left/right channels will have separate grounds so it follows that balanced versions (dual mono boards) will have separate grounds as well.
The current display firmware does show which channel is selected but it only shows this when channels are being changed. Once you confirm your channel selection the display goes back to showing volume step level.
As far as I know there's no evidence of LDR switches vs. electromechanical relays having different sonic characteristics. It's more a question of design philosophy. That fewer mechanical interfaces in the signal path is inherently better than more.
However, many of us make a lot of fuss regarding interconnects, plugs and jacks and the search for optimal materials (gold, platinum, silver, rhodium etc. ), wire configurations, interfaces etc. Relays are just another link in that signal chain. And if you're convinced that one link is important, does it not follow that they all may be?
Our LDR1 and LDR6 Passive Preamps have successfully used LDRs for input switching/isolation so we're extending this approach to our IOBoard.
Cheers,
Morten
Hi Morten,
Thanks for the clarifications. This is really interesting. Do you have a price in mind for a balanced config?
Thanks
Do
Thanks for the clarifications. This is really interesting. Do you have a price in mind for a balanced config?
Thanks
Do
Hi Morten,
Thanks for the clarifications. This is really interesting. Do you have a price in mind for a balanced config?
Thanks
Do
Our Rev 1 preamp controller board will have some key new features - especially auto calibration of the LDRs! - both the master and slave boards will be essentially identical although we may leave out a few power supply components on the slave board to shave off a few $. Still working out those details.
Thus, a balanced configuration will essentially be 2 LDR3x boards with a jumper setting designating one as the master and the other one as the slave. Both will have their own processors unlike our original Rev 0 approach.
The master will send volume command signals to the slave. Each board will independently auto calibrate their own LDRs.
We expect to keep the Rev 1 board prices the same as Rev 0 - $199. For balanced audio you'll need 2 of these. We may shave a little off a pair of boards purchased at the same time but worst case is $398....maybe $375. The Rev 1 boards are more complex and more costly to build.
Sorry, my bad... I meant to talk about the IOboard?
BTW, this new Rev1 looks totally killer with the auto calibration feature!
Nice work!
Do
I admit: I'm posting this 'cause I'm interested in LDRx passive preamps.
Just a litte question, hope you haven't replied before: what are total dimensions of the two boards? So I can plan a project ... somehow. 😀
Just a litte question, hope you haven't replied before: what are total dimensions of the two boards? So I can plan a project ... somehow. 😀
I admit: I'm posting this 'cause I'm interested in LDRx passive preamps.
Just a litte question, hope you haven't replied before: what are total dimensions of the two boards? So I can plan a project ... somehow. 😀
Hey there,
The LDR3x board is 2.5 x 4.73 inches. The 4 corner mounting holes are 2.21 x 4.43 inches. The mounting holes are 0.15 inch in diameter.
I suggest a minimum additional 0.5 inch all around to allow for connections etc. so plan for an area of 3.5 x 6.0 inches for a single board and 6.5 x 6.0 inch for 2 boards side by side. You could also stack them vertically in which case you'd need at least 1 inch between boards.
Good luck with your project!
Cheers,
Morten
- Status
- Not open for further replies.
- Home
- Vendor's Bazaar
- Tortuga Audio LDR3x DIY Preamp Controller w/ Remote