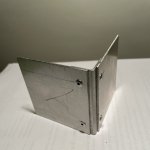
I started to build simple Aluminium cases by myself since it's cheaper then buying them and since I can do them of the exact size I need.
Plus I enjoy DIY 😉
I only use tools for hobbyst (low cost).
I still have some problems bending the sheet at the right angle and distance.
Any suggestions?
You can see a video on how I do it currently here: How to build Metal Case CHEAP - YouTube
Thanks
Plus I enjoy DIY 😉
I only use tools for hobbyst (low cost).
I still have some problems bending the sheet at the right angle and distance.
Any suggestions?
You can see a video on how I do it currently here: How to build Metal Case CHEAP - YouTube
Thanks
You could cheat a little to get a sharp edge. Mark the inside of the bend and, abuse a wood chisel, inscribe a groove into the aluminium, about 1/4 depth of the material, before bending. E
Mark off the flat pattern as per the INSIDE dimensions of the folded part.
Attach a protractor scale to the end of the folder for consistent repeat bending.
Mark off and bend a strip of material to check dimensions and folding before folding the full plate.
Make the main wrapper plate first then adjust dimensions of end panels to suit.
Attach a protractor scale to the end of the folder for consistent repeat bending.
Mark off and bend a strip of material to check dimensions and folding before folding the full plate.
Make the main wrapper plate first then adjust dimensions of end panels to suit.
Thank you all for suggestions. I will try to build the protractor gig. I also will try to build a similar gig to keep the 90 deg bending repeatable.
Hi AudioStile, thanks for your video.
I have been trying my hand at designing and building amplifier cases recently. I am using two PC speaker amps at the moment, and while they sound good, I have no permanent case to house them in.
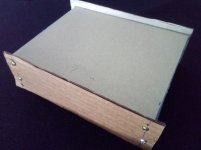
I tried using plywood, however, the finish is is difficult to achieve unless I use vinyl sticker paper. Metal seems to be the material of choice for amplifiers, and after some experimenting with thin metal sheets and cardboard, I have come up with a design I think that will work. Your amplifier has a great finish, not sure I can make that finish, however I intend to get the case made at a metal fabricator close by.
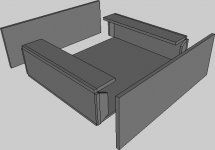
The images are from Wings 3D, illustrating the 4 times folded sheet metal bottom and sides. The tabs on that piece are for attaching the front and back aluminium plates with screws.
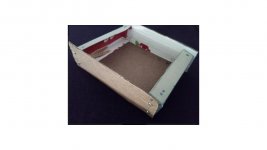
The cardboard structure is just a prototype, however it highlighted the importance of getting the alignment of the holes for the attachment bolts right. Folding itself can be done with an acceptable degree of accuracy. The only other thing to worry about is making the apertures for the connections, and also the aluminium waste, which can be a hazard but is not toxic.
I have been trying my hand at designing and building amplifier cases recently. I am using two PC speaker amps at the moment, and while they sound good, I have no permanent case to house them in.
I tried using plywood, however, the finish is is difficult to achieve unless I use vinyl sticker paper. Metal seems to be the material of choice for amplifiers, and after some experimenting with thin metal sheets and cardboard, I have come up with a design I think that will work. Your amplifier has a great finish, not sure I can make that finish, however I intend to get the case made at a metal fabricator close by.
The images are from Wings 3D, illustrating the 4 times folded sheet metal bottom and sides. The tabs on that piece are for attaching the front and back aluminium plates with screws.
The cardboard structure is just a prototype, however it highlighted the importance of getting the alignment of the holes for the attachment bolts right. Folding itself can be done with an acceptable degree of accuracy. The only other thing to worry about is making the apertures for the connections, and also the aluminium waste, which can be a hazard but is not toxic.
Images both 3D and prototype:
Attachments
Last edited:
If you’re using .125 aluminum you can use a table saw with a carbide blade. Set the depth to about two thirds of the thickness and very slowly cut your line. I bends easily and straight. Be very safety conscious! Practice with scrap.
No-global-loop amplification
No-global-loop amplification
This will be useful for your own diy case😉
No-global-loop amplification
This will be useful for your own diy case😉
Last edited:
Rather than try to bend the Aluminium, why not just use aluminum angle? You can buy a length at almost any hardware store. It will require that you connect them to the panels somehow, but at least you could do a nice clean job without a metal brake.

Yes, of course.
You can even put sheet aluminum insid the joining angle extrusion and let it be a visible part of your project.
Can´t find it now, but I remember (was it in the chipamp section?) that some diyers showed very creative chassis and cabinets made out of aluminum panels and extrusions.
Some had very industrial/futuristic looks.
Self clinching nuts are great for joining panels - dome headed socket bolts can look good, also countersunk socket bolts too if you want a flush surface.I used rivets because they are cheap and simple. They can be replaced with any connector type you prefer.
when I need to bend / straight cut my aluminum or steel plate, i just go to my nearest workshop who has giant bend/cut machine, something that can handle 3m width. there are even giant lathe, plasma cut etc 😀 my area is full of metal workshop, because there are many industry around and near to harbor, where they are servicing ship spare parts
but my preference for DIY chassis is to use thick 10mm alum base for left and side, then use thinner 3-4mm top bottom back front panel. this is what commercial casing approach, but majority they use thick front panel.
so no need to bend or use L aluminum plate
but my preference for DIY chassis is to use thick 10mm alum base for left and side, then use thinner 3-4mm top bottom back front panel. this is what commercial casing approach, but majority they use thick front panel.
so no need to bend or use L aluminum plate
Attachments
Hey, you live in an Industrial Country 🙂
We poor souls in America or Europe have to DIY with hand tools.
And I´m only half kidding 🙁
We poor souls in America or Europe have to DIY with hand tools.
And I´m only half kidding 🙁
bad thing about industrial workshop, if you come with small batch which don't make money alot for them, they will refuse it. so i had to try several workshop who has good willing to help me.
funny thing is they always ask " is this for company order or your own usage? of course it's for me" they do this because they charge less for individual usage, sometimes less than 50% cost.
when i tried to cut alum/steel plate with my power tools, i spent alot of time and the result is not good. so i dont waste my time anymore with metal, for wood is still doable for me.
I bought an L shaped aluminium length, pictured here. It is a great idea, but it is a little difficult to drill holes at that thickness. Getting anything made is really difficult these days, I think I will have to do this all DIY.
Extruded Aluminum L Shape Aluminium Channel Profile For Kitchen Cabinet - Buy Aluminum Profile For Kitchen Cabinet,Extruded Aluminum L Channel,L Shape Aluminum Product on Alibaba.com
Extruded Aluminum L Shape Aluminium Channel Profile For Kitchen Cabinet - Buy Aluminum Profile For Kitchen Cabinet,Extruded Aluminum L Channel,L Shape Aluminum Product on Alibaba.com
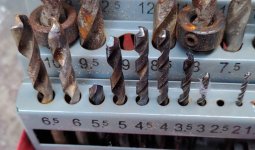
what is the thickness of that L plate? i have worked on 6x6cm with 6mm thickness, no issue at all using hand drill to make holes and tap it. right side on my attached chassis image. looking at your link that is not that thick at all
my previous diy chassis use 10mm metal steel on the base, i could drill it easily. steel or alum L plate is not hard to drill, different story with composite steel which usually found in steel L or H plate. you can not drill it with normal drill bits, i had done it and lost several broken bits without any holes created. then i got a trick from my metal workshop to grind the drill bits with 45degree angle so the bits can "eat" the metal
look at my drill bits number : 5 and 5.5 (in mm) which i had grind for composite steel use
this trick also save my bits until the last piece of it, look at the short one. no need to throw away dull bits anymore 😀
Attachments
Last edited:
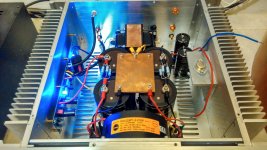
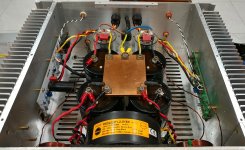
That's quite a chassis. This is off topic, but I see some connections are not soldered, something I highly favor at this moment for my Class A prototype. You are using crimped ring connectors? Can you build an entire amplifier without soldering?
Thanks for the tip about the drill bit.
Thanks for the tip about the drill bit.
for pcb/rca/binding post connection, i prefer using solder. while for toroid/cap bank/softstart/ac inlet connection then i prefer using crimping method.
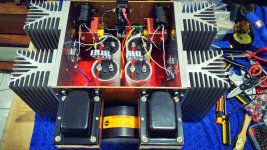
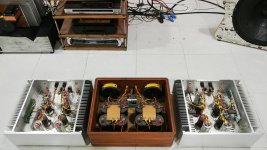
that is my previous iteration layout, the right side is SIT L'amp. but later SIT has it's own chassis (my above diy chassis). while later i put M2 board on another side.
I also had designed 1 chassis for both J2 board, another chassis for M2 and separate psu box. while now psu and cap bank inside amplifier chassis to make monoblock.
so you see with crimping i can change my amplifier layout without too much hasle with solder/desolder.
yes you can use no solder at all for connection on pcb, like using small connector (dont know it's name, usually used on computer board) but it depends on your taste.
Attachments
Last edited:
- Home
- Design & Build
- Construction Tips
- Tips for building simple ALU cases