Yep, Vunce has the Hakuin/Yarra dialed in. It’s a sweet sounding preamp. One of my favorites.
Vence,
Would you be so kind as to comment on the value of R 121/122 on your Hakuin plate?
Cheers
Would you be so kind as to comment on the value of R 121/122 on your Hakuin plate?
Cheers
Start with 22R and increase to drop the output voltage to the Hakuin. Ideally,adjust so that the value of voltage at the collector of the 2SA1837 BJT circa 24v +/-2v is ok.
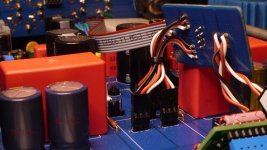
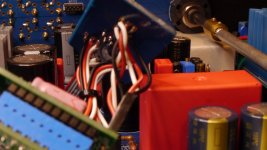
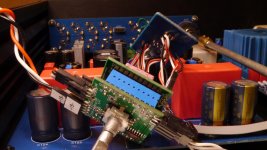
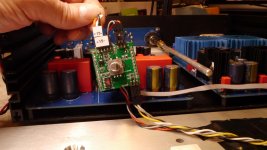
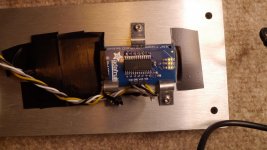
I built the Yarra pre about a year ago. It is a beautiful sounding pre with customizable modules. However, I missed having a remote volume control. So, I decided to add a Muse volume control module inside the existing case. The Muse control I used was a project by member meldano he created a couple years ago. Information on this project can be found here.
As most of you know, there is not much 'extra' space inside the Yarra. Getting everything to fit was a little challenging, but obviously doable. The module requires +-15V, and includes an onboard regulator supplying 5V for the micro-contoller and display. I decided to use a separate supply, with a small toroidal tranny under a DIY'ed faraday cage to help minimize noise. The meldano project is available in SE output, or using 2 stereo boards - balanced as well. The display is optional as well. To attach the VC I used one of the small unused PCB included with Yarra kit. That was the simplest plug-n-play replacement and worked effectively.
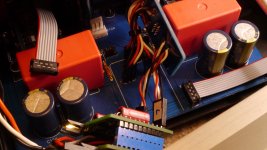
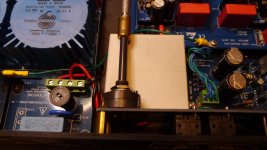
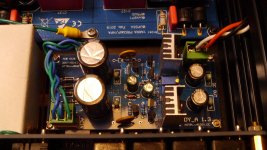
Below are some pictures of my install inside the Yarra, as well as the finished revised chassis. As you can see, it was a pretty tight fit of everything. I polished off the mod with the front panel being 'redone' by FPE to support the display, and my input/selection text.
With very limited testing in my system using X's new class D amp, I've been impressed. I can't hear any noise introduced by the controller, and the volume has 240 steps! One nice addition is, the project uses the ubiquitous Apple remote for volume up/down and mute. Very convenient.
For the benefit of some members (otto) who may be interested in some additional details of this build, I've included a few more pictures.
Special notes:
1) The MUSE volume control I/O is connected to the same location of the VC on one of the 3, Yarra supplied breakout boards. I used the BO board that was designed for a small ALPS VC. That BO board was then attached using SIL connectors as designed for the Yarra. I just had to add small pieces of wire to each end to make everything fit properly.
2) The MUSE volume encoder was attached directly to the front panel with the supplied nut. I had to countersink the back of the front panel to allow more clearance on the front for the nut to fit. It was tight, but it tightened securely and will work just fine.
3) The PSU I used was a simple regulated PCB (from China), that was adjustable to dial-in the +-15volts required. I used a small toroidal xformer and put it under a small foil-lined cardboard cage to help minimize interference. The regulator board is no longer in my eBay history, but you should be able to fine something similar to use and that would fit.
4) The Adafruit display was fit to the front panel using my retro-design of the FP using Front Panel Express. It is simply using 3 small aluminum clips to hold it securely in place. The black tape around is used to help light leakage around the edges and hold some wires/connector in place. Not my best work. 🙂
5) As can be seen in most of the attached images, I used various connectors to fit everything the way I needed, and twisted all cables.
6) A little extra studying of the Yarra schematic and layout, along with the MUSE PCB will be helpful to understanding how everything fits together.
Hope this helps. I had a to do a little dismantling of my pre to get these new pictures, so hope they will provide more clarity to those wanting to tackle this build. 🙂?
Attachments

Hi Otto,
You did some great research here for lessons learned from the chassis.
I have since found some RCA jacks that are compatible with the Elecaudio RCA footprint, and have smaller diameter nuts that will fit the chassis, as is.
Vunce reminded me that the PCB back panel board has an orphaned ground pad on certain versions. So I need to get this sorted out to make sure the new batch has this issue fixed.
Here are the RCA jacks that would be compatible with Yarra. The pins can be adjusted for 90deg or 0deg orientation mounting. Note the very low profile nut vs the Elecaudio version.
Premium RCA jacks for BTSB/Yarra pair | Etsy
Thank you.
Research? I’ve learned over time, upfront often saves time later 😉
And thank you again, for your efforts generally
Btw I should let you know
For me at least, lately, there have been delays, in some cases several days (!)! before I get a notification of a new post on a thread I’m following
Those RCA jacks
would be a solution, tho exxy … As six pairs are needed it would total ~ USD 90. ~ $ 120 in my currency. Might you do a better price for six, especially as getting the Yarra boards, a couple of daughterboards.
(And several BTSB, When I finally(!) decide for certain which ones would work best for me) Your specific response to me about options for cases for it - unless I accidentally deleted the email – extremely unlikely – I only came across by accident
Cheers
redjr/ Rick
Thank you, mightily. It helps me a lot.
Hopefully some others will benefit from your comprehensive description, and the generosity of taking the time to open up your Yarra for those excellent pictures.
Cheers
Thank you, mightily. It helps me a lot.
Hopefully some others will benefit from your comprehensive description, and the generosity of taking the time to open up your Yarra for those excellent pictures.
Cheers
Last edited:
xrk,
Reconciling Redjr’s description with what’s now on Etsy, and generally
Redjr wrote -
1) The MUSE volume control I/O is connected to the same location of the VC on one of the 3, Yarra supplied breakout boards. I used the BO board that was designed for a small ALPS V
From Etsy, * all of the amp boards are now sold separately
While the “Yarra suppled breakout boards”, Etsy says
“Included in boardset are an input selector switch panel for rotary switch and RCA jacks, board for remote volume pot (various types), and dual rail dual monoblock PSU”
… BO is an acronym(?) for the remote volume pot board?
Thank you
@otto,
BO commonly refers to 'break-out' board. The Yarra, if memory serves, is supplied with 3 different sized, small BO boards design to accommodate different sized VC pots. The large ALPS and small ALPS styled - depending upon the user preference and what they have on hand, or prefer. They all use SIL plugs to connect to the pre-amp 'motherboard' using the same layout and spacing (obviously) required by the mobo.
The design of the Yarra did try and (and very well at that), to accommodate a plug-n-play approach to the fittings as well as the modular pre-amp daughter cards. Suited to allow the user to mix and match various components to their sonic liking or for better matching to downstream equipment. Brilliant!
I’m using the Melbourne DB with the Yarra preamplifier but I’m having an issue where I can’t get sound out of either channel.
Could someone take a quick look at the Melbourne DB’s and confirm the jumpers are in the right place?


Could someone take a quick look at the Melbourne DB’s and confirm the jumpers are in the right place?
Have you had sound come out with other DB’s so the issue the Melbourne DB? Or this is a brand new system and no sound ever? Because it might be your connections on the main board.
As always, check to make sure the DB is getting power. Does DMM shows +/-v supply at the bolts labeled + and -?
Then turn source on and use volts AC and probe the input bolt on the DB. Is there signal in the tens to 100 mV rms range?
If no signal then it won’t play.
Check bias current of Melbourne across the resistors above the collector or below the emitter of the main output transistor.
Thanks X
It hasn’t worked since I made it.
I have 60v across the input to the DB.
There is no AC signal to the input of the DB, so something must have gone awry on the Yarra main board.
It hasn’t worked since I made it.
I have 60v across the input to the DB.
There is no AC signal to the input of the DB, so something must have gone awry on the Yarra main board.
Yes, that would do it. There are jumpers to select headphone or RCA out - depends on where you connect your output. Are you using the full channel select board or just wiring directly to the main board?
I’m using the RCA out and using the full channel select board. I’m still not getting a signal at the DB input pins though. Am I taking the reading at the right spot?


Last edited:
Yep it’s working, weird I wasn’t getting a reading at the input, I must have been measuring in the wrong location.
The copper heatsinks get very hot, maybe I need to add active cooling or make them bigger. Do they look too small?

The copper heatsinks get very hot, maybe I need to add active cooling or make them bigger. Do they look too small?
It does run hot - that’s normal (it’s SE Class A after all). As long as it doesn’t burn your fingers. Glad you got it working. Which jumper were you missing?
- Home
- Group Buys
- The YARRA Preamplifier/HPA for Melbourne DB Group Buy