I admire the patience and methodical logic you've used throughout this build. Some really fantastic work but also an example determination and perseverance.
Thanks for the nice words...
The patience I had to learn 🙂, it didn't exactly come natural to me. The rest of it comes from treating this journey as an engineering project, analyzing and improving what you've got. Sure there are some mysteries left, which is why I treat every tiny bit of it as important.
Even though I do expect to achieve progress, we'll still have to wait and see. Lots of little stuff has changed, like the room itself etc. In theory most of those little changes should be of benefit. Except maybe the 20 cm higher ceiling. Time will tell.
A good thing I keep this journal pretty complete. I tried to remember the amount of micro balloons I used and really couldn't with certainty. I thought i remembered about 15%. I started searching this thread for epoxy and sure enough:
Not the first time reading my own thread saved my butt... 😀
So expect me to write down the details every now and then (lol).
First batch is just a clean (but colored, black) coat applied with a brush. Did not take any pictures of that, it looks ugly.
The second coat is applied with a roller to get that textured look. I added micro balloons (about 15%) for just that bit of added drama.
Yes it looks kinda like Duratex coating but I couldn't get that locally.
Not the first time reading my own thread saved my butt... 😀
So expect me to write down the details every now and then (lol).

Hard to see due to the shiny appearance, but I'm not quite done yet. I will do at least one more cover of epoxy. The coats are quite thin as is, I'll add a bit more micro balloons and do one more coat. (not unlike what I did with the subs in hindsight)
I have plenty of epoxy left, but I'll have to sand this coat before I can lay on another. Almost there, but not quite yet.
I have plenty of epoxy left, but I'll have to sand this coat before I can lay on another. Almost there, but not quite yet.
Not being satisfied resulted in hard work after my regular job. I had to pick up a few items from the store, sanded down both enclosures, gave them a good rub down to clean them with acetone.
Next I mixed the epoxy with 20% micro balloons, making it much thicker overall. The end result seems to be much better, will have to wait how it cures, as that is where the previous coat sagged a bit, showing the irregularities underneath.
I'll see if i can post a picture tomorrow. Now on to dinner as I've been working non stop to get at this point and at 9:30 PM, I'm getting a bit hungry 😀.
A bit OT maybe but... if you have ended up with a really linear FR but now you would like to att a tilt... say from 100 Hz all the way up and + 3dB at the top... how to go about that?
//
//
Thanks! I did try that. I see a bit of a wavy response for that but I suppose its the best option!!
//
//
but not the only option. you could use REW auto-eq to a target curve that you customize with RePhase
Dedication! 😀
Always... 😉
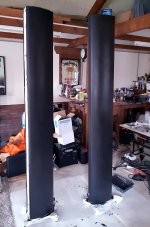
Here are the pictures of the coat from last night.
That's what I wanted to achieve. I can be happy with this result.
All it took was using more micro balloons to better hold the shape.
Attachments

but not the only option. you could use REW auto-eq to a target curve that you customize with RePhase
I've used something similar, just not the auto-EQ part. I can always get a better result by choosing manual EQ.
It's not part of my FIR filter, I use an (P)EQ bank in JRiver to shape the room curve.
Even though my epoxy coat is done, this weekend the temperatures will be too low to coat it with the boat paint (I need a 15 degree Celsius minimum). So that job will have to wait another week. 🙁
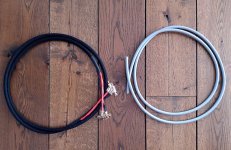
I'll start on getting the newly ordered Canare 4s11 wiring into shape. Also get the other baffle in order and some other small stuff. Still lots to do before I can call it finished, at least I'm getting closer. Another test of my patience 🙂. I do know I'll get there, some day.
I'll start on getting the newly ordered Canare 4s11 wiring into shape. Also get the other baffle in order and some other small stuff. Still lots to do before I can call it finished, at least I'm getting closer. Another test of my patience 🙂. I do know I'll get there, some day.
you won't have to worry all you need to do now is find a low cost way of shipping them to me for evaluation...😀
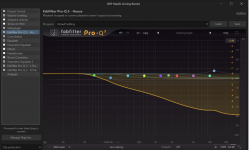
If you use a number of shelving filters spaced an octave part set to a Q of 0.7 then the gain will set the rate of db/oct tilt you desire. I do this as part of my processing. Image below, I added an extra couple of filters and changed the Q in the bass to get a different slope but it would have been a straight line without that.A bit OT maybe but... if you have ended up with a really linear FR but now you would like to att a tilt... say from 100 Hz all the way up and + 3dB at the top... how to go about that?
//
Attachments
- Home
- Loudspeakers
- Full Range
- The making of: The Two Towers (a 25 driver Full Range line array)