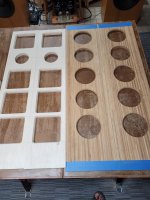
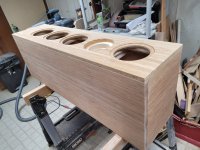
Progress report on my ULD build. Just finished with cutting and routing out all the panels. The cabinet is 1" bamboo plywood, except for the front baffle, which is 3/4" bamboo plywood. The sub front panel is 24mm baltic birch plywood (2-12mm panels glued together in a press) as well as the tweeter stiffening panel. The main brace is a laminate of 6mm baltic birch ply on the outer surfaces and a 1/2" MDF core. I was actually surprised that an unscientific rap on this composite (identical sized) was a higher pitch than 24mm baltic birch. I didn't weigh it, so don't know if it is stiffer or just less massive.
dmcgown,
Are you going to do a round over / chamfer on the insides of the cut-outs for the drivers?
Attachments


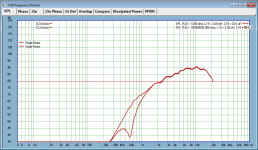
I use the 15° off axis as the waveguide was designed for that with that tweeter, so they need to be thought of combined single unit. But electrically this is 1st order down to 1500Hz, the effect of the LC null is shown below. Greater power handling and lower distortion and basically minimal amplitude near the resonance of the tweeter. I want the dome to hardly move. The waveguide also means the capacitor value is close to a third of what it would normally be, that too lowers distortion, increases power handling. Those are the major aims here, but keeping it looking like 1st order (electrically at least) near the crossover frequency.
Attachments
Good and timely question. I have been approaching routing on the bamboo plywood cautiously. I used a solid carbide spiral bit for the driver holes and rebates which worked well but only have straight chamfer bits. Concerned about tear out. Of course it is the back side of the baffle (who cares about the cosmetics). So I may do a test on a scrap piece of bamboo plywood to see how it goes. Fortunately, I was too busy today to begin glue up, so I will give a try to chamfer the holes. Maybe Planet10 can chime in, this is the first time I have worked with this material.dmcgown,
Are you going to do a round over / chamfer on the insides of the cut-outs for the drivers?
Zman,
I chamfered the baffles as well as the front sub panel using a 30 degree chamfer bit (didn't have a 45 deg 1/2" shank handy). That leaves a bit more material on the flange in way of the mounting holes. Interestingly, I had more fuzzing (tearout) on the BB front sub panel than the bamboo plywood baffle, in fact the latter was clean with no tearout at all, to my surprise and relief.
As a note to Scott, I borrowed the dual mono Pass F4 I built for a friend of mine a year ago and using my 12SN7 Aikido preamp (which never worked well in my current setup due to excessive total system gain), got a wonderful sound on the MFC Elsinores, it is like having a giant 6SN7 amplifier. I think it has the sound quality of a great tube amp, almost SET-like but with better extension at both ends and better definition and focus on individual instruments/voices. It is definitely on my build list after the ULD Elsinores, at which point I will have to do some culling of my amplifier herd. I can see Balanced F4 monoblocks sometime in my future....
David
Attachments
Nice work David.
Look forward to updates as your build progresses.
One more question, do you plan to elevate the speakers from the ground? IIRC it has been suggested by Joe to lift the speakers by ~10cm, and there's been a number of builder anecdotes that indicate an improvement in subjective listening impressions/experiences after doing that.
Zman,
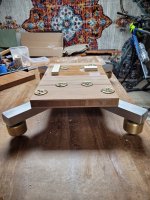
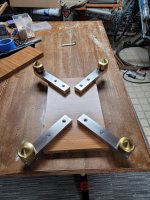
Another good question. I fabricated some heavy outrigger feet using 1"x1-1/2" solid aluminum bar stock that are coupled to the enclosure base via 3/8"-16 socket head cap screws into nut inserts that I epoxied into the bottom panel. I had to carefully layout the placement of the holes to clear the baffle depth and the braces on the back panel, and both the panel and aluminum bar was drilled to suit. I am using (for now) Mapleshade brass footers with 3/8"-16 threads that are 2" (51mm) high, together with the jam nut (6mm) and thickness of the bar (25mm) gets me to 82mm height. I can always install a longer piece of brass threaded rod with a 25mm standoff between the brass footer and outrigger foot to extend the height, but this is pretty close to optimum. I can also use the ISO Acoustics Gaia feet should I choose to (I already have the Mapleshade footers).
David
Attachments
David,
Looks like you got the stand/footer for elevating the loudspeaker cabinets sorted out. 👍
Looks like you got the stand/footer for elevating the loudspeaker cabinets sorted out. 👍
My 5 cents to this issue: I just moved to a significant smaller flat and unpack slowly all the boxes. Everything working, but the ISO Acoustik feet were missing.
I have to lift the ULD's by at least 14 cm, now with the installed feet everything went immediately to the good. Without the feet: highs a little bit muffling, the bass not as accurat as I am familiar with, imaging nice, but not on high level.
The absoltute number of cm the Elsinores have to be lifted depend on the hight of the listening chair as well as on my tallness, I am 1.8 m. Some one with 1.7 m may get away with a lifting of about 10 cm, trial and error.
Even with a still unfinished room the sound of my Elsinores is very pleasent, now I look forwards to the change to the Miflex.
For those interested and for what it is worth, below is the result I get here with the tweeter null starting 1st order (6), then 3rd order (18) and finally 8th order (48), all quite gradual. The idea is simple enough, as far as possible, as little motion as possible at Fs. Note that the result with the null is roughly 1st order to well below 1KHz. The difference however, at Fs is a good 20dB and hence 1/10 movement of the dome. But around 3KHz Crossover, it is definitely 1st order, but we all want the lowest possible distortion and that is what the null is all about.

Typo, it should have read:Note that the result with the null is roughly 1st order to well below 1KHz
Note that the result without the null is roughly 1st order to well below 1KHz.
Greeting to all Elsinore builders
I am building protective grill for Elsinors.
As a connection beetween grill and front plate of the speaker, I am planing to put small neodium magnets (6mm diameter) in 4 corners of the grill.
Do you think that those magnets could interference with crossover/speakers ?

I am building protective grill for Elsinors.
As a connection beetween grill and front plate of the speaker, I am planing to put small neodium magnets (6mm diameter) in 4 corners of the grill.
Do you think that those magnets could interference with crossover/speakers ?
Last edited:
If the grill Can bend, i myself would add two more magnets so you have 6 in total. Then you are sure it Will sit nice when material work over time.
Tripplecheck right direction before glueing. If hole is rather tight, super Glue is fine (Wear Eye protection if you have feeling you would need to Bang Them in place.
Tripplecheck right direction before glueing. If hole is rather tight, super Glue is fine (Wear Eye protection if you have feeling you would need to Bang Them in place.
I have used these 8x8 mm copper plated ones. I think they are good!
Dont hammer with metal on them for risk of chipping. Block of Wood is fine.
https://www.supermagnete.dk/disc-magnets-neodymium/disc-magnet-8mm-8mm_S-08-08-K
Dont hammer with metal on them for risk of chipping. Block of Wood is fine.
https://www.supermagnete.dk/disc-magnets-neodymium/disc-magnet-8mm-8mm_S-08-08-K
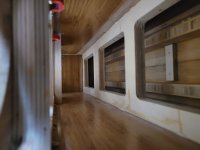
More progress on the first cabinet on my ULD build. All assembled and glued, I put a lot of care in fitting all the parts together prior to glue-up so everything fortunately fit perfectly with tight glue joints. Once the glue dries, then I will flush trim and sand the original finish off the sides (a really plastic looking gloss finish which fortunately sands off pretty easily). I kept the original finish on the inside surfaces except where I sanded to bare wood for the glue joints. Included an inside cabinet view just for fun.
Assembly of the second cabinet will probably in the next day or so.
David
Assembly of the second cabinet will probably in the next day or so.
David
Attachments
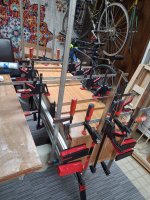
Zman,
One can never have too many clamps!😀. In fact, I ran out of clamps on that glue up, so tomorrow buying a couple more so I don’t run out on the other cabinet.
David
One can never have too many clamps!😀. In fact, I ran out of clamps on that glue up, so tomorrow buying a couple more so I don’t run out on the other cabinet.
David
- Home
- Loudspeakers
- Multi-Way
- The "Elsinore Project" Thread