BTW: Good job on the cabinets
Thanks Joel. You were a big inspiration to take them a bit further with raw wood veneer, which, I think really pays off in the overall look.
Question for you. The screws you provide with the waveguide. What diameter are they? They appear to be somewhere between a #8 and a #10, but, I suspect they are metric.
Raw wood seems to have this unfiltered look. I get excited about it
each time a put some on.. Glad I could help..
Your screws are 4mm I believe.. I switched to 8/32 later because I could find 8/32 nuts easily but not 4mm.. Staying with 8/32 now..
I'm curious about your xover parts selection. Did you go for anything exotic or you play with that later..
Joel
Interested in building a pair of these to replace my B&W 603 floorstanders.
Has anyone had experience using an electronic crossover with them?
Is there any reason why an active crossover would be a bad choice over the passive?
Thanks
Has anyone had experience using an electronic crossover with them?
Is there any reason why an active crossover would be a bad choice over the passive?
Thanks
I'm curious about your xover parts selection. Did you go for anything exotic or you play with that later..
I didn't go the cheapest route but I did not get carried away either. I upgraded where it made sense to me to start with a better part. For the coils I am using Erse. Resistors are Mills and the tweeter cap is a Sonicap Gen I. The other caps are Erse films.
Progress as of late has been really poor as I caught the flu. While I put a lot of sweat, tears and even some blood into the construction of these, I draw the line at mucus. 😉
All stuffed up and ready for wiring...
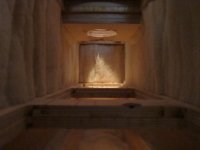
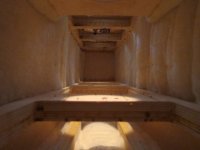
I finally installed the acoustic dampening fill. I ended up using the wool/poly blend rolls available from MCM electronics (Acoustic Dampening Pad | LS00916 | Distributed By MCM). If you catch them on one of their 25% off and free shipping deals, they are not too badly priced. Although, the price has seemed to go up significantly as of late. I bought a bunch of them a while back.
This material, while close to the right density blend, is a bit thicker than Joe used on his original build. So, I went with a single layer on the sides and a double layer on the back. I figured that was close enough to Joe's original specs and would provide a good starting point. I ended up using about 4 and 1/2 rolls of the material in total. Easy to work with, but, messy when cutting as the fine fibers seems to come off the cut into a dusting of material. In hindsight, I should have cut them outside.
Below are a couple internal shots of the finished installation. Time to move onto the wiring harness.
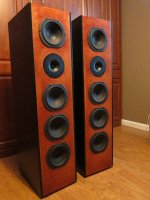
BTW, these things start to become very cumbersome to move around. They are currently weighing in at 72.8lbs a piece (~33.1kg). You can certainly build some muscle moving these around.
I finally installed the acoustic dampening fill. I ended up using the wool/poly blend rolls available from MCM electronics (Acoustic Dampening Pad | LS00916 | Distributed By MCM). If you catch them on one of their 25% off and free shipping deals, they are not too badly priced. Although, the price has seemed to go up significantly as of late. I bought a bunch of them a while back.
This material, while close to the right density blend, is a bit thicker than Joe used on his original build. So, I went with a single layer on the sides and a double layer on the back. I figured that was close enough to Joe's original specs and would provide a good starting point. I ended up using about 4 and 1/2 rolls of the material in total. Easy to work with, but, messy when cutting as the fine fibers seems to come off the cut into a dusting of material. In hindsight, I should have cut them outside.
Below are a couple internal shots of the finished installation. Time to move onto the wiring harness.
BTW, these things start to become very cumbersome to move around. They are currently weighing in at 72.8lbs a piece (~33.1kg). You can certainly build some muscle moving these around.
Attachments

Anybody have Elsinores near Columbus, Ohio? I was hoping to listen to some. I've got the woofers, but not the tweeters or cabinets, would like to listen to some before considering building them, if it's not too difficult.
Finished mine last September
Believe it or not I built a pair a pair of MkV's last year without once visiting this forum. I should have as it transpires as I have made some parallel discoveries with others. I could have saved some time and perhaps a little money. Firstly let me say I am extremely happy with my Elsinore's. They have opened up my music collection dramatically. Like others on this forum I have had to re listen to my entire collection, quite a happy task. The thing that strikes me is the detail in the music. Every instrument can be singled out and placed in the soundstage. They never appear to shout even when played quite loud. It's deceiving as you think you have them at a subdued level until someone (my wife usally) tries to talk over them. One improvement I made ,and subsequently discovered that I was beaten to, was to replace the 2MFD HF filter pass capacitor with a Jantzen superior Z Capacitor. This made a very noticeable improvement to the subtlety of the HF reproduction. I was using a Solen SCR type previously and thought these were adequate but after some reading started experimenting. I'm very glad I did. As for damping material I used Tontine Acoustisorb. This comes in several grades. I used the least dense one available and have plenty left over for future projects. My cabinets are Veneered using Tasmanian Blackwood and stained with Danish oil and finished with Canuba wax. I'm very happy with the outcome particularly as this was my first large speaker project. Previously I built some LS3/5a clones. I thought these were terrific until now! It was a leap of faith to build the Elsinore's unheard but the literature provided by Joe was so detailed and concise that after some years of following progressive versions I felt compelled to build them. All I can say is if you will not find a more rewarding project if you are into hi end audio. I'll be following posts from now on as there is quite a knowledge base out there. A colleague at work is also building a pair and is about half way. I'm on his back to finish them so we can compare notes. He's in for a treat! Picture attached.
Believe it or not I built a pair a pair of MkV's last year without once visiting this forum. I should have as it transpires as I have made some parallel discoveries with others. I could have saved some time and perhaps a little money. Firstly let me say I am extremely happy with my Elsinore's. They have opened up my music collection dramatically. Like others on this forum I have had to re listen to my entire collection, quite a happy task. The thing that strikes me is the detail in the music. Every instrument can be singled out and placed in the soundstage. They never appear to shout even when played quite loud. It's deceiving as you think you have them at a subdued level until someone (my wife usally) tries to talk over them. One improvement I made ,and subsequently discovered that I was beaten to, was to replace the 2MFD HF filter pass capacitor with a Jantzen superior Z Capacitor. This made a very noticeable improvement to the subtlety of the HF reproduction. I was using a Solen SCR type previously and thought these were adequate but after some reading started experimenting. I'm very glad I did. As for damping material I used Tontine Acoustisorb. This comes in several grades. I used the least dense one available and have plenty left over for future projects. My cabinets are Veneered using Tasmanian Blackwood and stained with Danish oil and finished with Canuba wax. I'm very happy with the outcome particularly as this was my first large speaker project. Previously I built some LS3/5a clones. I thought these were terrific until now! It was a leap of faith to build the Elsinore's unheard but the literature provided by Joe was so detailed and concise that after some years of following progressive versions I felt compelled to build them. All I can say is if you will not find a more rewarding project if you are into hi end audio. I'll be following posts from now on as there is quite a knowledge base out there. A colleague at work is also building a pair and is about half way. I'm on his back to finish them so we can compare notes. He's in for a treat! Picture attached.
irext,
They sound beautiful. Can you try again to post a picture? The first one does not appear to have come through.
They sound beautiful. Can you try again to post a picture? The first one does not appear to have come through.
WAVEGUIDE PURCHASE LIST
IF anyone is interested in purchasing the Aluminum Waveguides please let me know. It wont start for a few weeks as CNC lathe is being reworked..Looking for numbers and I'll keep a list and return email before starting...
Thanks, Joel
Spoonted-I emailed back to you twice but it dosent show up in sent folder so not sure if you recieved it..
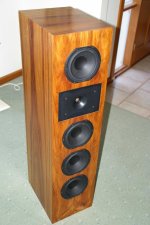
They look great irext! There is a lot of character in that veneer. Very, very nice.
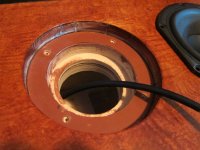
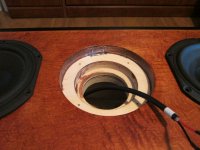
How did you fashion the waveguide?
How did you fashion the waveguide?
Can't remember if this question has been asked ( I have read all the pages over the last few months 🙂, what inductor would be recomended to get as close as possible to the designed crossover? Air core, iron core 1.8mH or 2mH? is less DCR better? I can't wait to build these speakers 🙂
Thanks!
Dave
Thanks!
Dave
I'd like to say I fashioned the waveguide myself but the truth is I purchased them from Joe Ras. I'm reasonable with a router but not that good. Plus I was impatient to get them going (as you could imagine).
Can't remember if this question has been asked ( I have read all the pages over the last few months 🙂, what inductor would be recomended to get as close as possible to the designed crossover? Air core, iron core 1.8mH or 2mH? is less DCR better?
I would think you would want air core wherever possible for the best performance, but that does not rule out iron core which are more affordable. It all depends upon your budget and thoughts on premium components. An air core for the big 18mH would be quite expensive, but are available as well. I went with an iron core for that piece myself.
The goal for the 1.8/2.0mH is to find a part of that inductance range with a low DCR, in this case no more than 1R. Lower being better.
Xover
I also used iron/ferrite core for the 18mh (2 x 9mh in series) and air core for all the others. The series resistance of the 18mh (L4) needs to be known to calculate the value of R2. The total of R2 and the series resistance of L4 needs to be as close to 8ohms as possible. (as per Joes notes). I measured mine with a low ohms meter as I didn't trust the given specs.
I also used iron/ferrite core for the 18mh (2 x 9mh in series) and air core for all the others. The series resistance of the 18mh (L4) needs to be known to calculate the value of R2. The total of R2 and the series resistance of L4 needs to be as close to 8ohms as possible. (as per Joes notes). I measured mine with a low ohms meter as I didn't trust the given specs.
Attachments
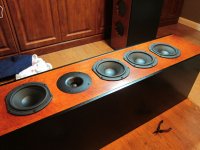
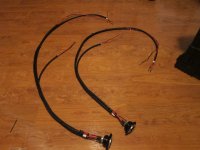
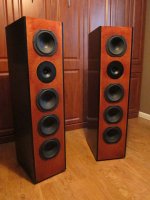
Wiring Harness completed and Drivers installed...
Put together the main wiring harness that ties into the speakON connector. The speakON spades fit one side of the peerless drivers perfectly (the positive side). The negative, not so much. A bit of "modification" and rework is needed to get a good mechanical grip on the small spade negative side of the drivers (same with the tweeter lugs) using the neutrik spades. In hind sight, I should have gotten the proper spade for those lugs. But, the neutrik spades were already installed and solder into the harness and I was able to get them to work just fine. It would be nice if this was a standard across all connectors. Perhaps it is, but, I was unaware of it if it was.
In any case, installed the drivers, screwed them down tight and also installed the neutrik jack. So far, I am happy with the neutrik system. Very clean and neat.
Attachments


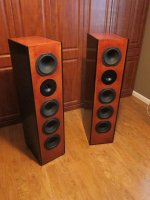
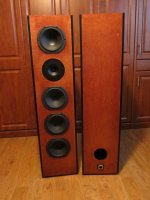
90.2lbs (40.9kg) a piece...
Well, the drivers (and the waveguide) certainly added some mass. An additional 19.4lbs (8.8kg) of it to be exact. Very tricky to move around. I would have relocated them to a different room to get better pics, but, I need to go get a new dolly for moving these bad boys around! Very difficult to move around once the driver holes have been filled. Waveguide looks great, thanks again to Joel for making those available. They are truly first rate.
Cabinets are complete and stuffed (finally!!). Time to get cranking on that cross over. All the parts are in-house. Just need to start building it.
Attachments
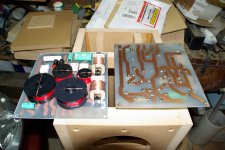
I did the PCB's myself. I designed them using Protel PCB design software and used photo paper on a laser printer to create the etch resist. You use an iron to press the resist onto the bare copper PCB. Then etch using ferric chloride. It takes a lot of practice runs to get it right! Trouble is I have changed several components for better quality ones (mainly caps) and they are a lot larger. Maybe I will do a new artwork. I love the look of your cabinets JK. They look very professional. If I was building mine now I'd definitely use the round waveguides and most definitely use the 8 way Neutrik Speakon connectors they would be so much more convenient.
I did the PCB's myself. I designed them using Protel PCB design software and used photo paper on a laser printer to create the etch resist. You use an iron to press the resist onto the bare copper PCB. Then etch using ferric chloride. It takes a lot of practice runs to get it right! Trouble is I have changed several components for better quality ones (mainly caps) and they are a lot larger. Maybe I will do a new artwork. I love the look of your cabinets JK. They look very professional. If I was building mine now I'd definitely use the round waveguides and most definitely use the 8 way Neutrik Speakon connectors they would be so much more convenient.
I have heard about the iron on technique. I see a lot of folks using the UV light technique as well. I need to learn how to do that one day as it sure is convenient being able to make a custom PCB. If you consider doing new artwork, you might want to check out this link on coil placement to minimize interference effects between the parts. (Placement of coils in crossover networks).
Thanks for the kind words on the cabinets. I am very pleased with how they turned out. Installing the drivers really brought everything together as far as the overall look. I could not be happier with the results.
- Home
- Loudspeakers
- Multi-Way
- The "Elsinore Project" Thread