I've read again through your post and I begin to understand what kind of guides you are talking about. The holes I'm mostly drill when working on amp are marked with a punch so I cannot clamp a guide before starting to drill because it wouldn't be at the spot marked by a punch. The drill locks itself on that spot when drilling. It's the only way and I don't see how a guide might be helpfull here. FAA is not required here as well so why making your work more complicated then required. Lubricating a drill helps a lot when drilling deep holes.
The guides I'm showing on my pictures are not the same thing you are using. They are required when working on aircrafts with hand (air) drill guns and help in positioning the drill at 90 deg. towards drilled surface. No clamps here. They also have removable inserts with different hole sizes. I don't think they come as cheaply as you said.
What you do when your piece is too big to fit the drill press?
What is a current price of a Tapmatic?
The guides we used were the same as yours. They slipped into the jig, allowing different sizes.
I’m not saying I was FAA certified, I don’t know anyone that is. Our parts were sent in to be FAA certified. All our parts were small enough to be made on a press. Everything larger was sent out. The parts I worked on were small, like your
For cheap drill guides/jigs, I’d suggest your local metal shop. Shipping alone would double the cost.
I see Tapmatics in the $15-35 range at the Rose Bowl Flea Market.
As for fluid, it was used for both drilling and tapping, lots of it. A different kind was used for aluminum and non-aluminum, although I don’t remember what the deference was.
As for fluid, it was used for both drilling and tapping, lots of it. A different kind was used for aluminum and non-aluminum, although I don’t remember what the deference was.
For aluminum: ethanol is the best !
Keld
Nednai,
You still didn't answer my question. What method would you use for drilling and tapping if the piece is too big to fit drill press?
The guides might be the same, but the mount for them is different. If my hole is marked with a center punch I am not going to use a jig. This is mostly done in production when the process is repeated thousand of times but not when the part is one of a kind.
I'm not trying to say that either me or you need FAA certification. All I'm saying is that the parts we make for amps don't need that certification.🙂
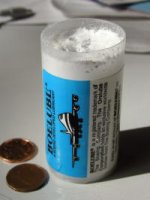
The lubricant I'm using and which is recommended when working on aircrafts is Anchorlube G-771 by Anchor Chemical Co., Tel.440-871-1660
You still didn't answer my question. What method would you use for drilling and tapping if the piece is too big to fit drill press?
The guides might be the same, but the mount for them is different. If my hole is marked with a center punch I am not going to use a jig. This is mostly done in production when the process is repeated thousand of times but not when the part is one of a kind.
I'm not trying to say that either me or you need FAA certification. All I'm saying is that the parts we make for amps don't need that certification.🙂
The lubricant I'm using and which is recommended when working on aircrafts is Anchorlube G-771 by Anchor Chemical Co., Tel.440-871-1660
Another good lubricant that I'm using is Boelube. Developed by Boeing and distributed by The Orelube Corp, Tel(516)-249 6500, (800)645-9124, product # 70200-13.
It's like a waxy substance which sticks to the bit and when hot melts. This is actually least messy lubricant I tried and in some aplications very recommended. It works with metal, composites, graphite and wood. Can be applied to drill bits, taps, reamers, files, saw blades, deburringtools, belt sanders, punches.
It's like a waxy substance which sticks to the bit and when hot melts. This is actually least messy lubricant I tried and in some aplications very recommended. It works with metal, composites, graphite and wood. Can be applied to drill bits, taps, reamers, files, saw blades, deburringtools, belt sanders, punches.
Attachments
I thought I answered your question when I said, "All our parts were small enough to be made on a press. Everything larger was sent out."
Unfortunately not all my parts "are small enough to be made on a press" and I have to deal with that problem myself. 😉
Boelube
That's funny that you mention Beolube. My father works a Boeing and I get it for free, I didn't know you could buy it from the retail market. I just dip my bit in and let her rip, also it works great on taps too, highly recommended.
Rob
That's funny that you mention Beolube. My father works a Boeing and I get it for free, I didn't know you could buy it from the retail market. I just dip my bit in and let her rip, also it works great on taps too, highly recommended.
Rob
Being that in most situations the truth lies somewhere in between, I would be tempted to say that the best would be to have a small pcb for all the small signal stuff and p2p for power stuff.
I am extremely good at soldering, and yet I think it would be extremely difficult not to have to heat the small components several times with the soldering iron in order to attach the various components together and that can't be too good.
I am working on such a board right now. Will post soon.
I am extremely good at soldering, and yet I think it would be extremely difficult not to have to heat the small components several times with the soldering iron in order to attach the various components together and that can't be too good.
I am working on such a board right now. Will post soon.
Hybrid approach
I am in full agreement with Grataku.
Keeping all the high current stuff off board and wired point to point is more flexible (than having everything fixed in place on a PCB) and has far greater current capacity than can ever be accomplished on a PCB.
I am in full agreement with Grataku.
Keeping all the high current stuff off board and wired point to point is more flexible (than having everything fixed in place on a PCB) and has far greater current capacity than can ever be accomplished on a PCB.
Re: Boelube
I don't know if you can get it retail. The phone # was on a box. I get mine from aircraft industry as well.🙂
Digi said:That's funny that you mention Beolube. My father works a Boeing and I get it for free, I didn't know you could buy it from the retail market. I just dip my bit in and let her rip, also it works great on taps too, highly recommended.
Rob
I don't know if you can get it retail. The phone # was on a box. I get mine from aircraft industry as well.🙂
grataku said:Being that in most situations the truth lies somewhere in between, I would be tempted to say that the best would be to have a small pcb for all the small signal stuff and p2p for power stuff.
I am extremely good at soldering, and yet I think it would be extremely difficult not to have to heat the small components several times with the soldering iron in order to attach the various components together and that can't be too good.
I am working on such a board right now. Will post soon.
When putting together that circuit I used four different soldering irons. I wouldn't worry about overheating small components when using correct temperature. However, I must agree that small board for input circuit (preferrably double sided) wouldn't be a bad idea. Although for my amps I'll stick with p2p.😉
HPotter: You’re the one that said we’re talking about heat sinks and small amplifier parts. Most of us don’t have the room or feel the need to have a shop like Parker Hannifin. If you take your time and keep your eyes open, you can easily find a Tapmatic and a drill press for the price of a new drill gun. I trained a lot of people how to drill and tap holes in the past. None seemed to have the difficulties you experienced. Unlike you, I’m not telling others how they need to achieve their goal. As a Quality Control Analyst I know there is more than one way to skin a cat. An option was what I offer, not a demand.
I had a feeling that you would not let that go. You probably make good material for Quality Control Analyst because you are picky about every single word I use. So just to clarify the things:
I never ever had a problem with using drill press, in fact I love to use it and I do it whenever I can.
The parts are rather small but the heat sinks are sometimes big and they don't ALWAYS fit the drill press that I'm using.
You didn't offer any solution for the above scenario and I did present the easiest and quite accurate way to drill and tap the holes off the drill press.
I don't remember demanding anything and I don't see anything wrong with telling others how they need to achieve their goals. They are always free to make their choices.
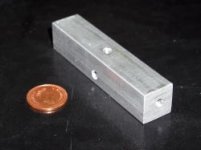
Now, since you trained a lot of people how to drill and tap, I would like to ask you for advice. In my recent amp I had to drill and tap the following parts. Drilling the holes on the side of the rod is not a problem, however, doing it at the ends might present some difficulties to unexperienced or not creative. I had to make 16 such holes for #10-32 bolts. What would be your recommendation to do that in an "easy, precise and fast" manner. Please notice that I'm using your words and you might treat it as a sort of a challenge.😉
I never ever had a problem with using drill press, in fact I love to use it and I do it whenever I can.
The parts are rather small but the heat sinks are sometimes big and they don't ALWAYS fit the drill press that I'm using.
You didn't offer any solution for the above scenario and I did present the easiest and quite accurate way to drill and tap the holes off the drill press.
I don't remember demanding anything and I don't see anything wrong with telling others how they need to achieve their goals. They are always free to make their choices.
Now, since you trained a lot of people how to drill and tap, I would like to ask you for advice. In my recent amp I had to drill and tap the following parts. Drilling the holes on the side of the rod is not a problem, however, doing it at the ends might present some difficulties to unexperienced or not creative. I had to make 16 such holes for #10-32 bolts. What would be your recommendation to do that in an "easy, precise and fast" manner. Please notice that I'm using your words and you might treat it as a sort of a challenge.😉
Attachments
Jung based PCB
Hi all,
ALW, you said in a mail in this thread that
"My PSU's are pretty much as good as it gets (Jung-based). I know for a fact it would be impossible to get consistent and almost perfect results without a PCB. Of course there's plenty
of wiring to the PCB's. A wire though, 1mm out of place, even along a heavy low-impedance connection gives measurable and audible degradation! "
I like what you are saying about PCB. I tend to keep power supplies p2p for simplicity but the rest has to be on a PCB, especially as I want as good a match between channels as I can get. I would also much rather spend the effort getting one right and then just bang them out after that for the bi-amp, tri-amp monstors I dream of.
My real question is that I have seen reference to Jung in relation to PCB before. Who ? What ? and most importantly where ???? Is there a paper or web site or reference for this PCB guru ?
Ta
DocP
"A wire though, 1mm out of place, even along a heavy low-impedance connection gives measurable and audible degradation! "
ALW, what do you mean here?
ALW, what do you mean here?
Walt Jung
Walt Jung is an application engineer for Analog Devices. He is an OP Amp applications "guru" and has written several books on using op amps. He has written several articles for Audio Amateur now Audio Electronics magazine. I don't remeber any references to him being a "PCB" guru.
http://www.audioxpress.com/magsdirx/audelex/aabilist.htm
H.H.
Nednai said:I’d recommend using a self-reversing Tapmatic with a drill press instead of a drill gun with a clutch. I’d even suggest using drill guides with a drill press instead of drill guides and a drill gun.
Quick search on Tapmatic tools shows following link: http://www.penntoolco.com/catalog/products/54.cfm
The cheapest self-reversing head cost $360. Even my needs for drilling and tapping wouldn't justify that expense. As to flea markets my search didn't bring any results. However Mr. Nednai, I would be glad to buy a used one from you and check it again. Maybe the one I was using initially was defective.
😕
More Tapmatic comments
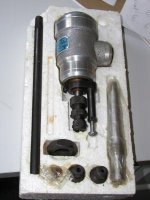
Since you were so persistant with your Tapmatic I made an effort and found the tool I was using for tapping. While it's not exactly Tapmatic, the price was different as well. I paid CAD$150, used it once and never tried it again. The biggest problem I found about it was that when tapping small holes in aluminum it did not go into reverse and was breaking taps. It was happening probably because there was no torque adjustement.
The other and probably main reason for not using that kind of tool is that YOU ACTUALLY need two drill presses. As you can see that this tool has to be mounted on a drill press in place of a chuck, which means permanent installation. The way I work on my press is that I like to drill some holes, then tap them, put the parts together, mark more holes, drill them and then tap again and this is how it goes. With that kind of installation you either use your drill press for drilling or for tapping. I understand that Tapmatic mounts in similar way, at least for the price they ask it should.
I can only suspect that somebody using similar tool for the first time would experience more trouble than gain. Cordless drill gun is one most popular tool in home use. If used for tapping with a tap guide it can work marvels.
PS. Mr. Nednai, please remember about my challenge and present us with an easy solution to drill those holes at the ends of the rod. Enough time wasted for talk about Tapmatic.
😉😉
Attachments
- Status
- Not open for further replies.
- Home
- Amplifiers
- Pass Labs
- The beaty of p2p wiring