Xrq, you have to invest in water cutting for foam.... the skill level is becomming huge here !😀
Btw xrq, Weltersys : what about foam flat pack to glue with just a little heavier damped wood throat ?
Weight & shipment abroad should be easier : so cost as well ? (I mean for the one with no cut skill 😉 )
I like foam core and all, but the heaviness of these 10in drivers and the big fat 1.4in CD are simply too much mass to hang on a FC box. Maybe thin wood laminate with foam core center - like aerospace type honeycomb panels would work though. Two layers of luauan floor underlayment (3/16in thick) bonded onto 0.5in thick XPS with 3M 777 fastack would make a pretty nice speaker construction material. The edges would look not so good though.
Jennygirl you make a cabinetmaker proud.
Great use of some knowledgeable tricks of the trade.
If you have any other tough cuts you come up against drop me a line. I have been there and done that.
Many many Tshirts!
But this is a pretty well thought out set of cabinets.
Great use of some knowledgeable tricks of the trade.
If you have any other tough cuts you come up against drop me a line. I have been there and done that.
Many many Tshirts!
But this is a pretty well thought out set of cabinets.
JG is rocking it! Incredible work. Your process reminds me of an old school pattern maker. In fact, it gave me an idea. I was originally gonna ask you to sell me your jigs as a joke but I had a thought. Wonder if we could work a deal to get some CNC jigs for this made and Art could license. I don't think flat packs make good sense but a jig set could probably work. Maybe even get the the driver adapter CNC machined for the kit as well. There would still be some harder cuts but the jigs should simply things greatly. diysound group does stuff like this. Just a thought.
Wowwww thanks guys, kind of floored by the props. Mega appreciate all of the responses! Really nice to wake up to and read!
I am hoping that the photos are helping to tell a visual story for the processes used. The overhead fence on the table saw is my new best friend for this project- allowing me to (for the first time ever) cut miters with confidence and accuracy that was, before, quite a mystery. Building more horns will be a snap. I am definitely building another once this first one goes together and tests well. Thankfully found my Dayton mic yesterday, I'll definitely be taking measurements when this is done.
Re:jigs
It would be very easy to route new jigs off of my mine and mail them. I hope to be 3d printing the throat adapter and potentially cone plug, which could also be thrown in the package. I would want approval from Art before sending stuff like that in the mail
At the rate things are going in my shop, we might have a CNC sooner than later but don't wanna jinx it. I wouldn't need a huge one, maybe even a desktop CNC could suffice. I'd really love to CNC the throat adapter and plug out of wood vs making it out of extruded plastic. Much nicer finish
Thanks again for the responses. Curious what Art thinks about putting jigs in the mail.
Last edited:
Jenny,Re:jigs
It would be very easy to route new jigs off of my mine and mail them. I hope to be 3d printing the throat adapter and potentially cone plug, which could also be thrown in the package. I would want approval from Art before sending stuff like that in the mail
At the rate things are going in my shop, we might have a CNC sooner than later but don't wanna jinx it. I wouldn't need a huge one, maybe even a desktop CNC could suffice. I'd really love to CNC the throat adapter and plug out of wood vs making it out of extruded plastic. Much nicer finish
Thanks again for the responses. Curious what Art thinks about putting jigs in the mail.
I'd be OK with a 10% commission of the cost you would sell jigs or machined parts/flat packs for. That said, not many people have an overhead fence on their table saw, so not sure how applicable your jigs would be for the average builder.
Art
Sounds good Art! I'm sure others will appreciate your clearance on the matter. If/when the time comes, I'll hit you up about the best way to send money your way.
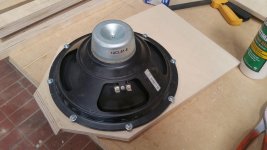
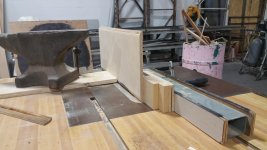
The overhead fence we have is made out of scrap MDF. It's basically just a flat & straight piece that gets clamped to the normal fence. Its sole purpose is to provide an offset to the existing fence by 2-3" to the left, and is raised to the height of the material being cut. It's held on to the regular fence by a couple of slide clamps. Takes about 3min to get set up and adjusted properly. It is shown in the first photo in Post 292
If I do end up sending a jig to someone, happy to throw together a quick set of instructions on how to make the overhead fence. It's easy breezy!
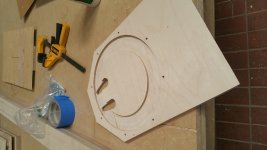
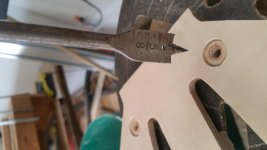
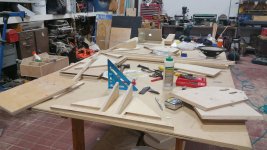
Progress update 1
Sorry that some of the photos are not coming in rotated properly, dunno what's up with that!
Sorry that some of the photos are not coming in rotated properly, dunno what's up with that!
Attachments
-
 20160513_162328.jpg381.4 KB · Views: 1,051
 -
 20160513_170125.jpg396 KB · Views: 1,051
 -
 20160513_170349.jpg548.9 KB · Views: 1,018
 -
 20160513_170724.jpg370.4 KB · Views: 1,023
 -
 20160513_171011.jpg468.1 KB · Views: 1,001
 -
 20160513_171032.jpg430.5 KB · Views: 588
 -
 20160513_173728.jpg550.4 KB · Views: 530
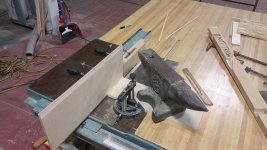
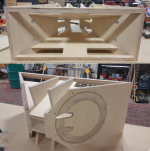
Cutting top & bottom cleats... Check out my sweet table saw contraption 😛 Luckily, I didn't die!
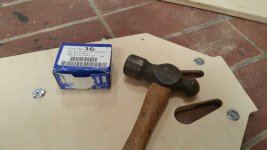
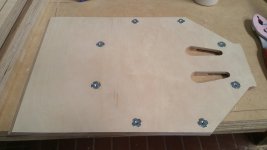
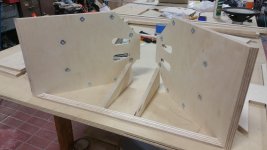
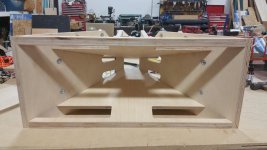
And then assembling the horn
And then assembling the horn
Attachments


Well done JennyGirl.
I have heard Fin's and was blown away by the size, output and sound quality. Hope you are too.
Have fun.
I have heard Fin's and was blown away by the size, output and sound quality. Hope you are too.
Have fun.
Thanks Byrtt, you are very welcome for the process photos. I consider it a way to give back for all of the appreciation I have for awesome online communities like this. Seriously, the people on this forum rock. And yes... you read my mind about the TH. The thought has already been circulating 😉 A slightly different overall dimension would be nice, and possibly split up into two boxes.. More portable.
I built that TH with nothing more than a circular saw and jigsaw 😱
How I completed any project without a table saw... I do not know. Those were the dark days... I can never go back.
I built that TH with nothing more than a circular saw and jigsaw 😱
How I completed any project without a table saw... I do not know. Those were the dark days... I can never go back.
thunk, Fin was just telling me about somebody who recognized him from this thread while he was at a friend's place.. Is that you, maybe?
I can't wait to hear them. All of these experience reviews are getting me all giddy inside!!
Need a lathe!!
I can't wait to hear them. All of these experience reviews are getting me all giddy inside!!
Need a lathe!!
Wow - these are some of the best progress / process photos I have seen. It really shows the complexity and fine points of the build. Thanks for taking the time to document so copiously. Beautiful craftsmanship. My last wooden speaker was built with not even a table or circular saw but just a jigsaw. Never again 🙂

.....Need a lathe!!
If its for volume filler weltersys show clever setup with a drill press and belt sander as semi pro lathe at post 138 http://www.diyaudio.com/forums/mult...-single-point-source-horn-14.html#post4523799.
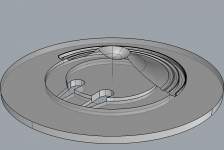
I think JG has a 3D printer and that is a perfect application. I made a paper profile pattern then used that to make a solid of revolution for the volume plug.
thunk, Fin was just telling me about somebody who recognized him from this thread while he was at a friend's place.. Is that you, maybe?
I can't wait to hear them. All of these experience reviews are getting me all giddy inside!!
Need a lathe!!
I have not heard any other Synergy/Unity builds yet besides my own. Hard to compare my humble diy efforts with anything else out there.
I have not completed them yet (enjoying the design/tweaking phase for 3 years now). I did demo them last year, they were fairly complete with 3 way active crossovers. In a nutshell they could deliver dynamics like nothing I have heard before and still able to deliver a very pleasing stereo sound for home use on things like Pentatonix, Radio Head, etc.
You should really enjoy this build when you are done!
Great construction and photos so far, that is some very nice plywood you have there...........keep it up!
Here is a test track I really enjoyed with mine:
https://youtu.be/o-zccp0NuYU
Steve
Reminds me of a Cabinetmaker test I did for a shop years ago.
There is a national museum in Ottawa Canada. Used to be called the Museum of Civilization. I helped make many of the reproductions there.
The test to get hired was to make a hollow pyramid. With joinery on the interior as good as joinery on the exterior. They specified the base dimensions and the height dimensions.
Took me 4.5 hours.
Will always remember it, because it was a real test of what you can or cannot do.
This speaker has many of the same elements.
So I will share a little trick.
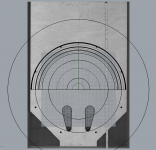
If you need to cut a secondary angle on the edge of boards. Such as the top and bottom boards of the horn in this example you can do it like this.:
https://drive.google.com/folderview?id=0BxsgqQl3NiLuTmxxdzFZaGtneGM&usp=sharing
The pics are in this file. I showed this little trick to someone a while back.
It requires a sacrificial fence, the MDF board with the wooden hook and wingnut in it.
And a little patience in setting up the angle and saw blade junction which is cut into the sacrificial fence a bit.
It allows you to put an angles secondary cut into any shape you choose. Even a convex round if you are patient with it.
There is a national museum in Ottawa Canada. Used to be called the Museum of Civilization. I helped make many of the reproductions there.
The test to get hired was to make a hollow pyramid. With joinery on the interior as good as joinery on the exterior. They specified the base dimensions and the height dimensions.
Took me 4.5 hours.
Will always remember it, because it was a real test of what you can or cannot do.
This speaker has many of the same elements.
So I will share a little trick.
If you need to cut a secondary angle on the edge of boards. Such as the top and bottom boards of the horn in this example you can do it like this.:
https://drive.google.com/folderview?id=0BxsgqQl3NiLuTmxxdzFZaGtneGM&usp=sharing
The pics are in this file. I showed this little trick to someone a while back.
It requires a sacrificial fence, the MDF board with the wooden hook and wingnut in it.
And a little patience in setting up the angle and saw blade junction which is cut into the sacrificial fence a bit.
It allows you to put an angles secondary cut into any shape you choose. Even a convex round if you are patient with it.
Steve- I love taking time to finish projects like that! For me, I am trying to get this done just in time for summer events. I cannot wait to hear ittt!
Mark- my roommate who showed me the overhead fence trick actually did the same project of a pyramid. So good! Actually the overhead fence is exactly the same principle, except that the offset piece of MDF is raised to the height of the material. You then apply a jig piece to the top of the piece to be cut with tape loops, which really holds it surprisingly well. Then when you run the piece, the cutoff is not pressing up against the fence, eliminating the chance of kickback. This also lets you use a jig piece on top of a slightly larger rough cut piece and use the table saw like a router. This is how I evenly cut all of my horizontal horn supports. Just a slight modification on what you're saying. I'll have to take some pics to better show how small the difference is!
xrk- I will try to give the 3D printer a go. If it doesn't work, I'll probably stick to the table saw cutdown with finish sanding on a drill press like Art did.
To get the 3D print matching the bass injection ports, my plan is to scan the jig on a scanner (with a ruler placed underneath to get scale set correctly). That should let me perfectly match the profile of the injection ports and also provide the small registration hole present for routing the driver relief channel.
I obviously don't want to print a fully solid part (#1 it would take forever and #2 it would most definitely warp terribly). So I am considering using a 10 or 20 percent fill on the inside to help with both. I do have some ABS, but I have way more PLA. Do you think PLA will suffice? I don't foresee the horn getting hot enough that it would deform. PLA just prints a lot easier on the current setup (no heated print bed and not enclosed). As far as the 10 - 20 percent fill, do you think it would be a good idea to seal the part with something?
- Home
- Loudspeakers
- Multi-Way
- SynTripP: 2-way 2-part Virtual Single Point Source Horn