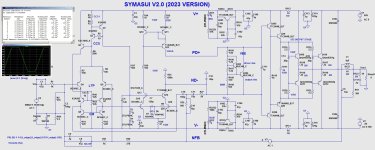
Explain C6/5 ,R25/R30 , C23/C22 ?This is mine VFA from 2014 (or around ) with LSK389 and TT output transistors and with simulated THD below ppm level at all frequences and output power.
I still listening sometime (to many finished amps
OS
F-FET. "F GRADE"Lsk389 available from Mouser but not the c grade.
https://gr.mouser.com/c/?marcom=151273010
OS
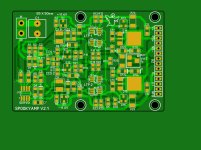
OK , I'm going to upload all 4 boards (with gerbers).
I wish y'all would look for errors. I have more time , I would not order my boards till after June .
Power board and OPS are surely perfect , The 2 IPS's ... still have a doubt.
I will upoad all 4 packages within a couple hours.
OS
I wish y'all would look for errors. I have more time , I would not order my boards till after June .
Power board and OPS are surely perfect , The 2 IPS's ... still have a doubt.
I will upoad all 4 packages within a couple hours.
OS
Attachments


C6/C5/R30 - TPC, C22 -Cherry cap, C23 smoots the hump in TPC compensation, R25( not strictly necessary) improve phase margin. All that is what I called OITPC.Explain C6/5 ,R25/R30 , C23/C22 ?
OS
You can play with LTspice with added zip file.
Attachments
I'll do the Gerber's for the big boards , I would like any advice that can be offered on this !!
There are extra SMD specific export functions I am not familiar with.
OS
There are extra SMD specific export functions I am not familiar with.
OS
Your OITPC is straitforward. Thank you . Easier than Printnik's compensation method .... which even uses first stage "Resonant tank" plusC6/C5/R30 - TPC, C22 -Cherry cap, C23 smoots the hump in TPC compensation, R25( not strictly necessary) improve phase margin. All that is what I called OITPC.
You can play with LTspice with added zip file.
lag/lead. I have about 6 different Symasui type Japanese input stages , all 6 use different combinations of these compensation "tricks".
That's why I'm holding back on the symasui for now.
OS
?There are extra SMD specific export functions I am not familiar with.
Only the paste layer if you plan on getting a stencil made but not required or used for pcb fab
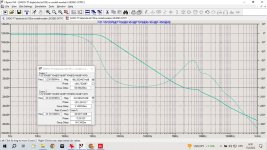
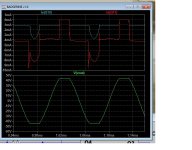
Hi. I redid the correction and removed the coil in the input differential stage. The clip has become better. Distortion has become even less - 0.000045%.
The output coil also introduces its own distortions and it needs to be covered by feedback. It is also necessary to use a circuit for compensating the resistance of the wires to the speaker system. Otherwise, all efforts to reduce distortion will be useless.
The output coil also introduces its own distortions and it needs to be covered by feedback. It is also necessary to use a circuit for compensating the resistance of the wires to the speaker system. Otherwise, all efforts to reduce distortion will be useless.
Attachments
works good.
maybe we give symasui a chance. easy addition of the second R-C.
I like the 2-pole margin better than the TMC one.
OS
maybe we give symasui a chance. easy addition of the second R-C.
I like the 2-pole margin better than the TMC one.
OS
FINAL OUTPUT. (most likely) 😉 All in "package" zip's at my first post. All you need for product.
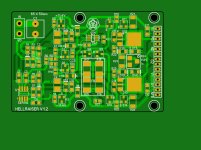
- Hellraiser V1.2 - perfect !
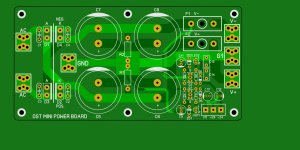
- OST "mini" power , Set for 1 or 2 (stereo) uses 4 X 8200uF @ 63-80V (25-30mm) caps. (Optional) 24V regulators for bluetooth , protection,
use IC 12V/5V on any accessory board.
Glad I have all this backed up in 3 places ... , actually 4 places .. bought 2 1TB SSD's for 50$.
OS
- Hellraiser V1.2 - perfect !
- OST "mini" power , Set for 1 or 2 (stereo) uses 4 X 8200uF @ 63-80V (25-30mm) caps. (Optional) 24V regulators for bluetooth , protection,
use IC 12V/5V on any accessory board.
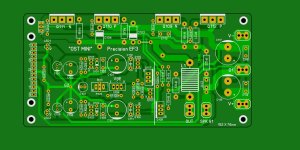
- OST "mini" EF3 , 100W of goodness. HK680 EF3 with tweaks and ripple eaters.
- Spookyamp V2.1 .... Hardest of the artwork and my favorite IPS.
Glad I have all this backed up in 3 places ... , actually 4 places .. bought 2 1TB SSD's for 50$.
OS
Attachments
I'll do BOM's and build guides next. Not much , all the parts are standard fare ! Any special stuff is in the "SMD parts" zip.
Most resistors are 0805 tiny ... just some VAS and CFA are the bigun's (2010/2512).
I included the pinouts of my select dual BJT's , they are listed also in "SMD parts" Zip.
Here is the standard resistor capacitor pad guide - https://www.vishay.com/docs/31545/soldpaddims.pdf
So you know what to get , most of these parts are in multiple packages (many !!).
OS
For complete disclosure - "LT_ALL_IPS.zip" is also in the first post.
@ 10Khz/ 1V /8R ... with 72mA OPS bias , the Ranking is ....
1 - "BADGERINE" = .3PPM (my take on the wolverine which is no longer mine)
2 - Symasui = 1PPM
3 - Hellraiser = 3PPM
4 - Spookyamp = 5PPM
Most likely , as was the case with the Wolverine .... the layout and sourcing can produce even better results.
Oh , here is the "Badgerine" (Below) - different .... with the saturation issue solved = cascoded LED VAS + a simple LED VAS CCS.
Badgerine and Symasui will be next. I just have to add Printnik's (smart Russian) compensation tweaks to Symasui - done.
OS
Attachments
Heck of alot of work, cheers to you, now comes the proof in the pudding, building, testing, listening.
First issue I see before even loading the gerber layers in the viewer, is that there is no drill file(s) in the "OST-mini_EF3_gerber" folder
File names can be changed and then zipped up for upload to fab like jlcpcb, which have an on line file viewer so its and extra checking step.
First issue I see before even loading the gerber layers in the viewer, is that there is no drill file(s) in the "OST-mini_EF3_gerber" folder
File names can be changed and then zipped up for upload to fab like jlcpcb, which have an on line file viewer so its and extra checking step.
does not matter, what's (same as) the gerber outputted in? needs to be in excellon format, file name extension is irrelevant, needs to be changed anyways.
Usually the ecad tool creates a drill schedule table showing symbols for the fab drawing, locations, tolerances, notes etc, its more historical than a necessicity because drill hole tolerances are part of the fab process.%
T9C0.1000F200S100
X006000Y015740
T6C0.0500F200S100
X-024500Y006094
Y'all might be curious what my use of these designs might be. A 2.1 amp. One heatsink will have
the sub amp with 2 pair of 200W Panasonic outputs I actually am using in a current plate amp. (Spooky powered) ,
this amp will have an offboard filter with adjustable Fc /phase/gain.
The other heatsink will be 2 smaller , (Hellraiser or symasui.... most likely Hellraiser - I heard these with the Slewmaster Kypton - Clear and
crisp ! These will run on a single cap board. So , I'll have 2 trafo's , 2 power boards ... and 3 amps (one with a filter).
I have the case , a 3U E-waste Alesis amp that was blown. My whole collection of choice used parts will get new amps !
Alesis has 2 level controls , I will use one with a replacement stereo pot to control the (stereo satellites),and the other for the
bigger bass amp.
OS
- Home
- Amplifiers
- Solid State
- Spooky and Hellraiser SMD 60W amps (Wolverine compatible IPS)